Build your web apps using Smart UI
Smart.Grid - Grid CRUD operations using Angular HTTP
Angular HTTP CRUD operations using Grid
The folling guide will show how to make Grid CRUD ( Create-Read-Update-Delete) operations using the Angular HTTP module.
The HttpClient in @angular/common/http offers a simplified client HTTP API for Angular applications that rests on the XMLHttpRequest interface exposed by browsers. Additional benefits of HttpClient include testability features, typed request and response objects, request and response interception, Observable apis, and streamlined error handling.
We are going to create an application that uses the Angular HTTP module and a Grid Component. The sample app does not require a data server. It relies on the Angular in-memory-web-api, which replaces the HttpClient module's HttpBackend. The replacement service simulates the behavior of a REST-like backend.
Overview
The application will contian two components - heroes and messages. The HeroesComponent will contain a GridComponent, two ButtonComponents and a TextBoxComponent. The textbox will be used to enter a searching term or add a new hero while the buttons will execude the corresponding commands. The Grid will display the heroes and will allow to edit or remove a hero.
Creating the Application
-
Create a new Angular Project by typing in the following command:
ng new angular-http-crud
-
Since we are using a replacement server we need to install the Angular in-memory-web-api
package
that contains the REST-like backend simulator. You can install it as an NPM package via the
following command:
npm i angular-in-memory-web-api -D
-
Open the newly created project folder and create a new Angular component via the following
command:
ng generate component heroes
A new folder called heroes will be created in the application directory. This folder will hold the configuration files for the HeroesComponent.
Open the heroes component folder and configure the following files:
- Create a new TS file called hero.ts - it will contain the interface
definition
for
the Hero component.
Here is the content of the file:
export interface Hero {
  id: number;
  name: string;
}
As you can see the Hero object will have two attributes - an id and a name.
-
Create a new file called heroes.service.ts. That will be the Hero service
containing the methods for the CRUD operations.
Here's what the file looks like:
import { Injectable } from '@angular/core'; import { HttpClient, HttpParams, HttpHeaders } from '@angular/common/http'; import { HttpErrorHandler, HandleError } from '../http-error-handler.service'; import { Observable } from 'rxjs'; import { catchError } from 'rxjs/operators'; import { Hero } from './hero'; @Injectable() export class HeroesService { heroesUrl = 'api/heroes'; // URL to web api private handleError: HandleError; constructor( private http: HttpClient, httpErrorHandler: HttpErrorHandler) { this.handleError = httpErrorHandler.createHandleError('HeroesService'); } /** GET heroes from the server */ getHeroes (): Observable{ return this.http.post (this.heroesUrl, hero) .pipe( catchError(this.handleError('addHero', hero)) ); } /** DELETE: delete the hero from the server */ deleteHero (id: number): Observable<{}> { const url = `${this.heroesUrl}/${id}`; // DELETE api/heroes/42 return this.http.delete(url) .pipe( catchError(this.handleError('deleteHero')) ); } /** PUT: update the hero on the server. Returns the updated hero upon success. */ updateHero (hero: Hero): Observable { return this.http.put (this.heroesUrl, hero) .pipe( catchError(this.handleError('updateHero', hero)) ); } } The following methods will be used for the CRUD operations:
- getHeroes - makes a GET request to the server and returns an Observable with all of the heroes.
- searchHeroes - makes a GET request to the server and returns an Observable with heroes that match a string.
- addHero - makes a POST request to the server and returns an Observable of the newly created hero.
- deleteHero - makes a DELETE request to the server and returns an Observable array with the deleted hero.
- updateHero - makes a PUT request to the server and returns and Observable of the updated hero.
Don't forget to import the HttpClient from the @angular/common/http package. We are using a variable called http in the service to take advantage of the HttpClient methods.
-
Prepare the heroes.component.html - here's what it looks like:
<h3>Heroes</h3>
<div class="controls-container">
    <smart-text-box #textBox [label]="'Hero Name:'"></smart-text-box>
    <smart-button #button (onClick)="add($event, textBox.value); textBox.value=''">Add</smart-button>
    <smart-button #button2 (onClick)="search($event, textBox.value)">Search</smart-button>
</div>

<smart-grid #grid id="grid" [editing]="editing" [editing]="editing" [layout]="layout" [dataSource]="dataSource"
    [columns]="columns"></smart-grid>
We are going to use a GridComponent to display the heroes and edit/delete them and a TextBoxComponent to search and add new heroes.
-
Prepare the heroes.component.ts - the TS file containing the Grid settings and
event handlers. Here's the content of the file:
import { Component, OnInit, ViewChild, AfterViewInit, ViewEncapsulation } from '@angular/core';

import { Hero } from './hero';
import { HeroesService } from './heroes.service';

import { GridComponent, Smart, DataAdapter } from 'smart-webcomponents-angular/grid';

@Component({
  selector: 'app-heroes',
  templateUrl: './heroes.component.html',
  providers: [HeroesService],
  styleUrls: ['./heroes.component.css'],
  encapsulation: ViewEncapsulation.None
})
export class HeroesComponent implements AfterViewInit {
  heroes: Hero[];

  constructor(private heroesService: HeroesService) { }

  @ViewChild('grid', { read: GridComponent, static: false }) grid!: GridComponent;

  layout: object = {
    rowHeight: 35
  }

  dataAdapter: DataAdapter = new Smart.DataAdapter({
    dataSource: [],
    dataFields: [
      'id: number',
      'name: string',
      'action: string'
    ]
  })

  dataSource = this.dataAdapter;

  editing = {
    enabled: true,
    action: 'click',
    addDialog: {
      enabled: true
    }
  }

  columns = [
    {
      label: 'ID', dataField: 'id', allowEdit: false, cellsAlign: 'center', align: 'center'
    },
    {
      label: 'Hero Name', dataField: 'name', width: '70%', cellsAlign: 'center', align: 'center'
    },
    {
      label: 'Delete', dataField: 'action', allowEdit: false, template:
        function (formatObject: any) {
          if (!formatObject.template) {
            formatObject.template = '<smart-button class="delete-row-button">X</smart-button>';
          }
        }
    }
  ]

  getHeroes(): void {
    const that = this;

    that.heroesService.getHeroes()
      .subscribe(heroes => {
        that.heroes = heroes;
        that.dataAdapter.dataSource = heroes;
      });
  }

  add(event: CustomEvent, name: string): void {
    const that = this;

    name = name.trim();

    if (!name) {
      return;
    }

    // The server will generate the id for this new hero
    const newHero: Hero = { name } as Hero;

    that.heroesService
      .addHero(newHero)
      .subscribe(hero => {
        that.heroes.push(hero);
        that.dataAdapter.dataSource = that.heroes;
      });
  }

  delete(hero: Hero): void {
    const that = this;

    that.heroes = that.heroes.filter(h => h !== hero);
    that.dataAdapter.dataSource = that.heroes;

    that.heroesService
      .deleteHero(hero.id)
      .subscribe();
  }

  search(event: CustomEvent, searchTerm: string) {
    const that = this;

    if (searchTerm) {
      that.heroesService
        .searchHeroes(searchTerm)
        .subscribe(heroes => {
          that.heroes = heroes;

          that.dataAdapter.dataSource = heroes;
        });
    }
    else {
      that.getHeroes();
    }
  }

  update(editHero: Hero) {
    const that = this;

    if (editHero) {
      that.heroesService
        .updateHero(editHero)
        .subscribe(hero => {
          // replace the hero in the heroes list with update from server
          const ix = hero ? that.heroes.findIndex(h => h.id === hero.id) : -1;

          if (ix > -1) {
            that.heroes[ix] = hero;
            that.dataAdapter.dataSource = that.heroes;
          }
        });
    }
  }

  ngOnInit() {
    this.getHeroes();
  }

  ngAfterViewInit(): void {
    // afterViewInit code.
    this.init();
  }

  init(): void {
    // init code.

    const that = this,
      grid = that.grid;

    //Delete a Hero
    grid.addEventListener('rowClick', function (event: CustomEvent): void {
      const button = event.detail.originalEvent.target.closest('smart-button') as HTMLElement;

      if (!button) {
        return;
      }

      const heroIndex = event.detail.row.index;

      if (button.classList.contains('delete-row-button')) {
        that.delete(that.heroes[heroIndex]);
      }
    });

    //Update the hero
    grid.addEventListener('endEdit', function (event: CustomEvent): void {
      const heroIndex = event.detail.row.index,
        hero = that.heroes[heroIndex];

      if (!hero) {
        return;
      }

      hero.name = event.detail.cell.value;

      that.update(hero);
    });
  }
}
The search() and add() methods represent click event handles on the Search and Add ButtonComponents that are present in the heroes.component.html. Updating a hero is done on endEdit event firing while delete a hero is done on rowClick event.
Remember to include the HeroesService as a provider in order to use it.
- Create a new TS file called hero.ts - it will contain the interface
definition
for
the Hero component.
Here is the content of the file:
-
Create a new folder called http-interceptors that will hold the HTTP interceptors which
are responsible for processing the HTTP request/responses before passing them to the
caller and logging the entire HTTP operation.
The folder should contain three files:
-
logging-interceptor.ts - responsible for logging the messages of the
request/response operations using the Messaging service that we will create later.
Here's what the file looks like:
import { Injectable } from '@angular/core';
import {
  HttpEvent, HttpInterceptor, HttpHandler,
  HttpRequest, HttpResponse
} from '@angular/common/http';

import { finalize, tap } from 'rxjs/operators';
import { MessageService } from '../message.service';

@Injectable()
export class LoggingInterceptor implements HttpInterceptor {
  constructor(private messenger: MessageService) {}

  intercept(req: HttpRequest, next: HttpHandler) {
    const started = Date.now();
    let ok: string;

    // extend server response observable with logging
    return next.handle(req)
      .pipe(
        tap(
          // Succeeds when there is a response; ignore other events
          event => ok = event instanceof HttpResponse ? 'succeeded' : '',
          // Operation failed; error is an HttpErrorResponse
          error => ok = 'failed'
        ),
        // Log when response observable either completes or errors
        finalize(() => {
          const elapsed = Date.now() - started;
          const msg = `${req.method} "${req.urlWithParams}"
             ${ok} in ${elapsed} ms.`;
          this.messenger.add(msg);
        })
      );
  }
}
The add method of the Message service is called in order to populate the log list.
-
trim-name-interceptor.ts - a interceptor used in cases where we want to mutate
the request body before handling it. Here's the content of the file:
import { Injectable } from '@angular/core'; import { HttpEvent, HttpInterceptor, HttpHandler, HttpRequest } from '@angular/common/http'; import { Observable } from 'rxjs'; @Injectable() export class TrimNameInterceptor implements HttpInterceptor { intercept(req: HttpRequest, next: HttpHandler): Observable -
index.ts - a "barrel" file that gathers all the interceptor providers into an an
httpInterceptorProviders array. This allows to easily add and remove new
interceptors by just adding a reference to the file in app.module.ts.. Here's
what it looks like:
/* "Barrel" of Http Interceptors */
import { HTTP_INTERCEPTORS } from '@angular/common/http';

import { LoggingInterceptor } from './logging-interceptor';
import { TrimNameInterceptor } from './trim-name-interceptor';


/** Http interceptor providers in outside-in order */
export const httpInterceptorProviders = [
  { provide: HTTP_INTERCEPTORS, useClass: TrimNameInterceptor, multi: true },
  { provide: HTTP_INTERCEPTORS, useClass: LoggingInterceptor, multi: true },
];
The order of interceptor declarations is important here, because Angular applies them in the order that you provide them. If you provide interceptors A, then B, then C, requests will flow in A->B->C and responses will flow out C->B->A.
-
logging-interceptor.ts - responsible for logging the messages of the
request/response operations using the Messaging service that we will create later.
Here's what the file looks like:
-
Create a new component in the root of the Application called MessagesComponent via the
following line:
ng generate component messages
This component will be used to log messages from the request/response operations of the HTTP API.
Here's the HTML of the component:<div *ngIf="messageService.messages.length"> <h3>Messages</h3> <smart-button (onClick) ="messageService.clear()">Clear Messages</smart-button> <br> <ol> <li *ngFor='let message of messageService.messages'> {{message}} </li> </ol> </div>A simple List is used to display the messages and a SmartButtonComponent to clear the log.
Here's the Typescript file contents:import { Component } from '@angular/core'; import { MessageService } from '../message.service'; @Component({ selector: 'app-messages', templateUrl: './messages.component.html' }) export class MessagesComponent { constructor(public messageService: MessageService) {} }We define the messageService variable inside the constructor in order to use it later in the HTML.
-
Prepare the app.component.html. It will contain an instance of the HeroesComponent
and the MessagesComponent:
<app-heroes></app-heroes>
<app-messages></app-messages>
-
Configure app.module.ts. The main module of the application must be configured to use all
necessary files( components, services, etc) in order to use them:
import { NgModule } from '@angular/core';
import { BrowserModule } from '@angular/platform-browser';
import { FormsModule } from '@angular/forms';
import { HttpClientModule, HttpClientXsrfModule } from '@angular/common/http';

import { HttpClientInMemoryWebApiModule } from 'angular-in-memory-web-api';
import { HttpErrorHandler } from './http-error-handler.service';

import { httpInterceptorProviders } from './http-interceptors/index';

import { GridModule } from 'smart-webcomponents-angular/grid';
import { TextBoxModule } from 'smart-webcomponents-angular/textbox';
import { ButtonModule } from 'smart-webcomponents-angular/button';

import { HeroesComponent } from './heroes/heroes.component';

import { AppComponent } from './app.component';
import { MessageService } from './message.service';
import { MessagesComponent } from './messages/messages.component'
import { InMemoryDataService } from './in-memory-data.service';

@NgModule({
    declarations: [
        AppComponent,
        HeroesComponent,
        MessagesComponent,
    ],
    imports: [
        BrowserModule,
        FormsModule,
        GridModule,
        TextBoxModule,
        ButtonModule,
        HttpClientModule,
        HttpClientXsrfModule.withOptions({
            cookieName: 'My-Xsrf-Cookie',
            headerName: 'My-Xsrf-Header',
        }),
        // The HttpClientInMemoryWebApiModule module intercepts HTTP requests
        // and returns simulated server responses.
        // Remove it when a real server is ready to receive requests.
        HttpClientInMemoryWebApiModule.forRoot(
            InMemoryDataService, {
            dataEncapsulation: false,
            passThruUnknownUrl: true,
            put204: false // return entity after PUT/update
        }
        )],
    providers: [
        HttpErrorHandler,
        MessageService,
        httpInterceptorProviders
    ],
    bootstrap: [AppComponent]
})

export class AppModule { }
Remember to import the Grid,TextBox and Button modules along with the rest in order to used them.
-
Create a http-error-handler.service.ts - is a HTTP service that is used to handle errors
thrown
from unsuccessful http operations. The service uses the MessageService to log
an error. Here's the code behind the service:
import { Injectable } from '@angular/core'; import { HttpErrorResponse } from '@angular/common/http'; import { Observable, of } from 'rxjs'; import { MessageService } from './message.service'; /** Type of the handleError function returned by HttpErrorHandler.createHandleError */ export type HandleError =(operation?: string, result?: T) => (error: HttpErrorResponse) => Observable ; /** Handles HttpClient errors */ @Injectable() export class HttpErrorHandler { constructor(private messageService: MessageService) { } /** Create curried handleError function that already knows the service name */ createHandleError = (serviceName = '') => (operation = 'operation', result = {} as T) => this.handleError(serviceName, operation, result); /** * Returns a function that handles Http operation failures. * This error handler lets the app continue to run as if no error occurred. * @param serviceName = name of the data service that attempted the operation * @param operation - name of the operation that failed * @param result - optional value to return as the observable result */ handleError (serviceName = '', operation = 'operation', result = {} as T) { return (error: HttpErrorResponse): Observable => { // TODO: send the error to remote logging infrastructure console.error(error); // log to console instead const message = (error.error instanceof ErrorEvent) ? error.error.message : `server returned code ${error.status} with body "${error.error}"`; // TODO: better job of transforming error for user consumption this.messageService.add(`${serviceName}: ${operation} failed: ${message}`); // Let the app keep running by returning a safe result. return of( result ); }; } } -
Create the in-memory-data.service.ts that is used as the local database for the
application. It is passed to the HttpClientInMemoryWebApiModule in app.module.ts
in order to be used by the HTTP API. Here is the content of the file:
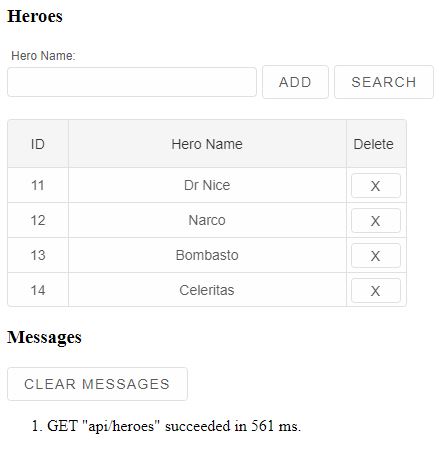
import { InMemoryDbService } from 'angular-in-memory-web-api';

export class InMemoryDataService implements InMemoryDbService {
  createDb() {
    const heroes = [
      { id: 11, name: 'Dr Nice' },
      { id: 12, name: 'Narco' },
      { id: 13, name: 'Bombasto' },
      { id: 14, name: 'Celeritas' },
    ];
    return {heroes};
  }
}
By default there will be 4 mock heroes in our local DB.
-
Create the message.service.ts - the MessageService with the methods for loging
messages from incoming/outgoing HTTP requests. Here's what it looks like:
import { Injectable } from '@angular/core';

@Injectable()
export class MessageService {
  messages: string[] = [];

  add(message: string) {
    this.messages.push(message);
  }

  clear() {
    this.messages = [];
  }
}
The clear method will remove all messages from the view while add method, adds a new message to the list.
-
Build and run the application
After configuring the corresponding project files enter the following command in order to build the application for production:
ng build --prod
Result
A live version of the code presented in this tutorial can be found in the demo Angular HTTP CRUD with GRID. Here is what the application looks like when launched.