Blazor - Get Started with Smart.Grid
Setup The Project
Follow the Getting Started guide to set up your Blazor Application with Smart UI.
Setup Basic Grid
- Add the Grid component to the Pages/Index.razor file.
<Grid></Grid>
- Create an example Client data and bind it to the Grid using the
Datasourceproperty.
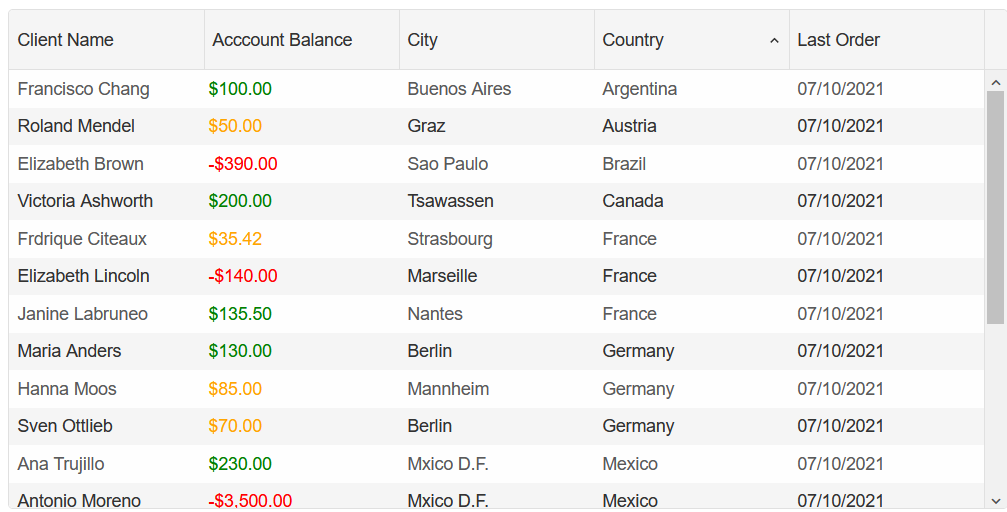
          class Client {
            public string Name { get; set; }
            public double Balance { get; set; }
            public string City { get; set; }
            public string Country { get; set; }
            public DateTime LastOrder {get; set; }

            public Client(string name, double balance, string city, string country, DateTime lastOrder){
              Name = name;
              Balance = balance;
              City = city;
              Country = country;
              LastOrder = lastOrder;
            }
        }
        Client[] Clients = new Client[]
          {
            new Client("Maria Anders",130.00,"Berlin", "Germany", DateTime.Now),
            new Client("Ana Trujillo",230,"Mxico D.F.", "Mexico", DateTime.Now),
            new Client("Antonio Moreno",-3500,"Mxico D.F.", "Mexico", DateTime.Now),
            new Client("Thomas Hardy",55,"London", "UK", DateTime.Now),
            new Client("Christina Berglund",132.86,"Lule", "Sweden", DateTime.Now),
            new Client("Hanna Moos",85,"Mannheim", "Germany", DateTime.Now),
            new Client("Frdrique Citeaux",35.424,"Strasbourg", "France", DateTime.Now),
            new Client("Martn Sommer",0,"Madrid", "Spain", DateTime.Now),
            new Client("Elizabeth Lincoln",-140,"Marseille", "France", DateTime.Now),
            new Client("Victoria Ashworth",200,"Tsawassen", "Canada", DateTime.Now),
            new Client("Patricio Simpson",59.55,"London", "UK", DateTime.Now),
            new Client("Francisco Chang",100,"Buenos Aires", "Argentina", DateTime.Now),
            new Client("Yang Wang",107.44,"Mxico D.F.", "Mexico", DateTime.Now),
            new Client("Pedro Afonso",-200,"Bern", "Switzerland", DateTime.Now),
            new Client("Elizabeth Brown",-390,"Sao Paulo", "Brazil", DateTime.Now),
            new Client("Sven Ottlieb",70,"Berlin", "Germany", DateTime.Now),
            new Client("Janine Labruneo",135.50,"Nantes", "France", DateTime.Now),
            new Client("Ann Devon",0,"London", "UK", DateTime.Now),
            new Client("Roland Mendel",50,"Graz", "Austria", DateTime.Now),
            new Client("Patrick Smith",30,"Liverpool", "UK", DateTime.Now),
            new Client("John Mayers",30,"Liverpool", "UK", DateTime.Now)
          };
Note that the Smart.Grid can import data from various formats, such as JSON, XML, CSV, XLSX and TSV. - Inside the Grid, set the column labels and the
DataFieldthey will use.<Grid Datasource="@Clients"> <Columns> <Column DataField="Name" Label="Client Name" > </Column> <Column DataField="Balance" Label="Acccount Balance"></Column> <Column DataField="City" Label="City"></Column> <Column DataField="Country" Label="Country"></Column> <Column DataField="LastOrder" Label="Last Order"></Column> </Columns> </Grid>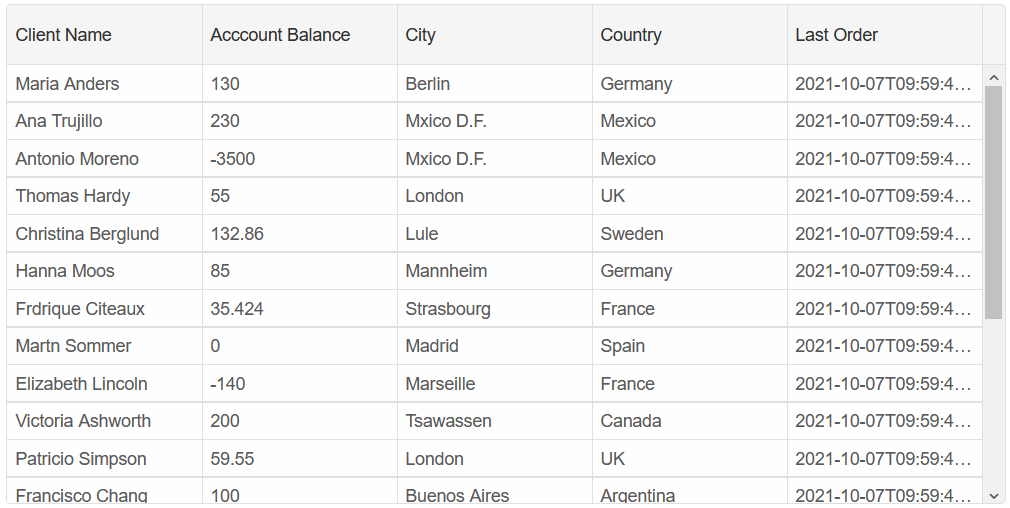
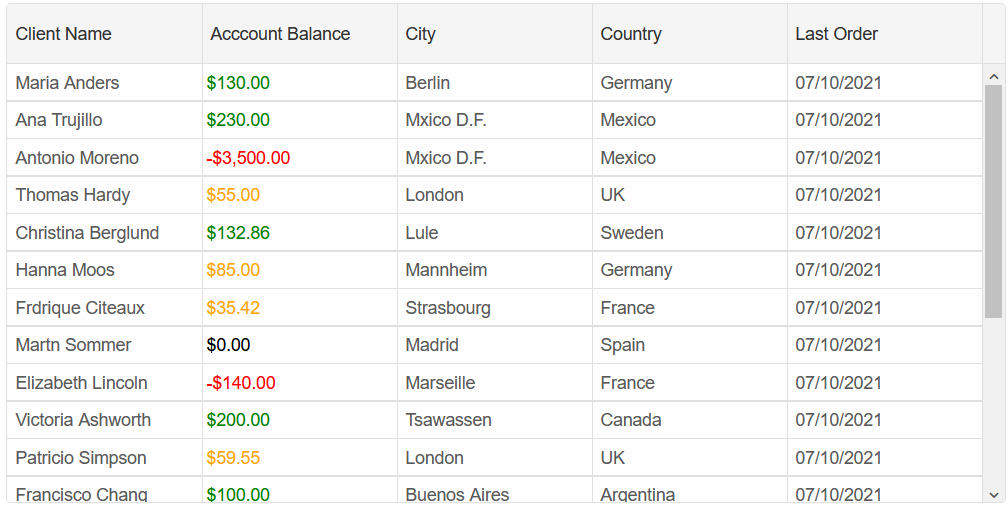
Format Grid
-
DateTime Formatting
Inside the Last Order column, set the
DataTypetodateand choose theCellsFormatyou wish to use.<Column DataField="LastOrder" Label="Last Order" DataType="date" CellsFormat="dd/MM/yyyy"></Column>
-
Number Formatting with Template
In the Index.razor page, create the template you will use for the Acccount Balance column and declare the
balanceTemplatein the@codeblock..... <template id="balanceTemplate"> <div style="width: 100%; height:100%;"> <div smart-if="value >= 100"> <div style="padding-left: 4px; color: green;">{{value::c2}}</div> </div> <div smart-if="value > 0"> <div style="padding-left: 4px; color: orange;">{{value::c2}}</div> </div> <div smart-if="value == 0"> <div style="padding-left: 4px; color: black;">{{value::c2}}</div> </div> <div smart-else> <div style="padding-left: 4px; color: red;">{{value::c2}}</div> </div> </div> </template> @code { string balanceTemplate = "#balanceTemplate"; ... }In the Account Balance column, set the
DataTypeand theTemplate.<Column DataField="Balance" Label="Acccount Balance" DataType="number" Template="@balanceTemplate"></Column>
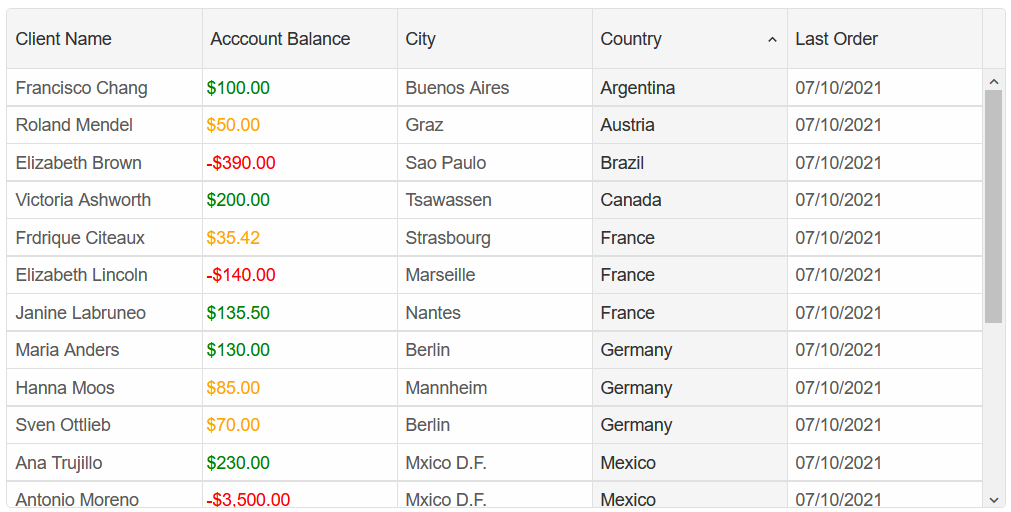
Sort Grid
In the @code block, declare the sorting behaviour of the Grid.
        @code{
          ...
          GridSorting sorting = new GridSorting() { Enabled = true };
          ...
        }
In the Grid component, set the Sorting property and choose a default sort column.
        <Grid Datasource="@Clients" Sorting="@sorting">
          <Columns>
              <Column DataField="Name" Label="Client Name" >
              </Column>
              <Column DataField="Balance" Label="Acccount Balance"
                DataType="number"  Template="@balanceTemplate"></Column>
              <Column DataField="City" Label="City"></Column>
              <Column DataField="Country" Label="Country" SortOrder="GridColumnSortOrder.Asc"></Column>
              <Column DataField="LastOrder" Label="Last Order"
              DataType="date" CellsFormat="dd/MM/yyyy"></Column>
          </Columns>
        </Grid>
Grid Appearance
Smart.Grid provies numerous tools to modify the Grid's appearance according to your neeeds.
In the @code block, declare the Grid's appearance.
Then set the Appearance property in the Component
      <Grid Datasource="@Clients" Sorting="@sorting" Appearance="@appearance">
      ...
      </Grid>

      @code{
        ...
        GridAppearance appearance = new GridAppearance()
        { AlternationCount = 2, ShowRowLines = false, ShowColumnLines = false };
      }
Edit Data
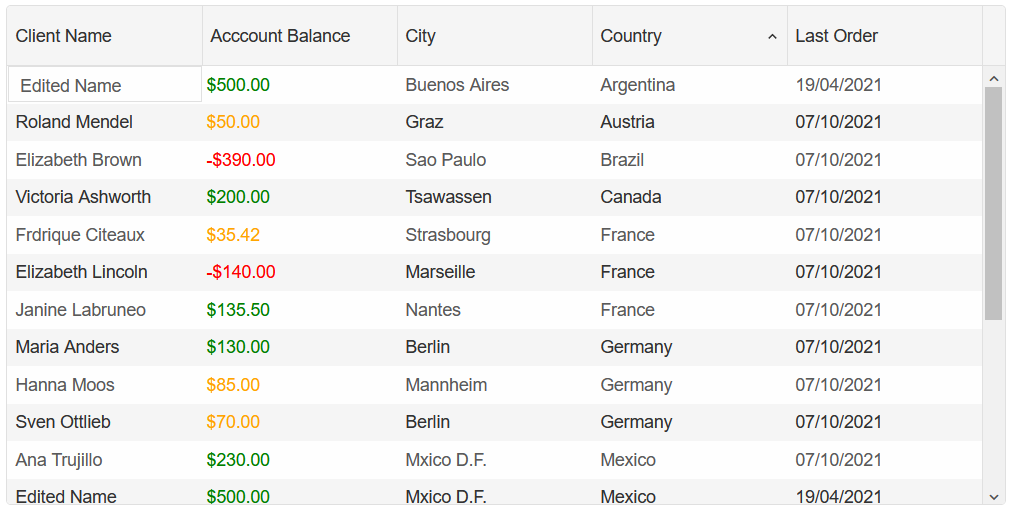
To allow users to edit cell data, enable GridEditing in the @code block.
Then use the Editing property inside the Component.
        <Grid Datasource="@Clients" Sorting="@sorting" Appearance="@appearance" Editing="@editing">
        ...
        </Grid>

        @code{
          ...
          GridEditing editing = new GridEditing() { Enabled = true };
        }
Data Selection
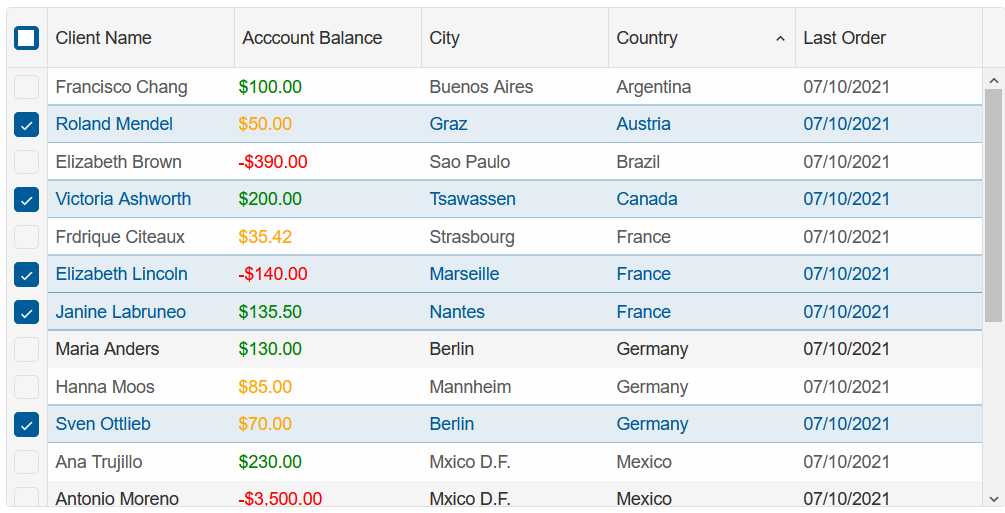
Smart.Grid provides multiple ways for the user to select data from the Grid - Cell Selection, Row Selection, Checkbox Selection and others.
Enable Checkbox Selection in the @code block. Then use the Selection property in the
Grid Component.
        <Grid Datasource="@Clients" Sorting="@sorting" Appearance="@appearance"
        Editing="@editing" Selection="@selection">
        ...
        </Grid>

        @code{
          ...
          GridSelection selection = new GridSelection()
          {
              Enabled = true,
              Mode = GridSelectionMode.Extended,
              CheckBoxes = new GridSelectionCheckBoxes()
              {
                  Enabled = true
              }
          };
        }
Group Data
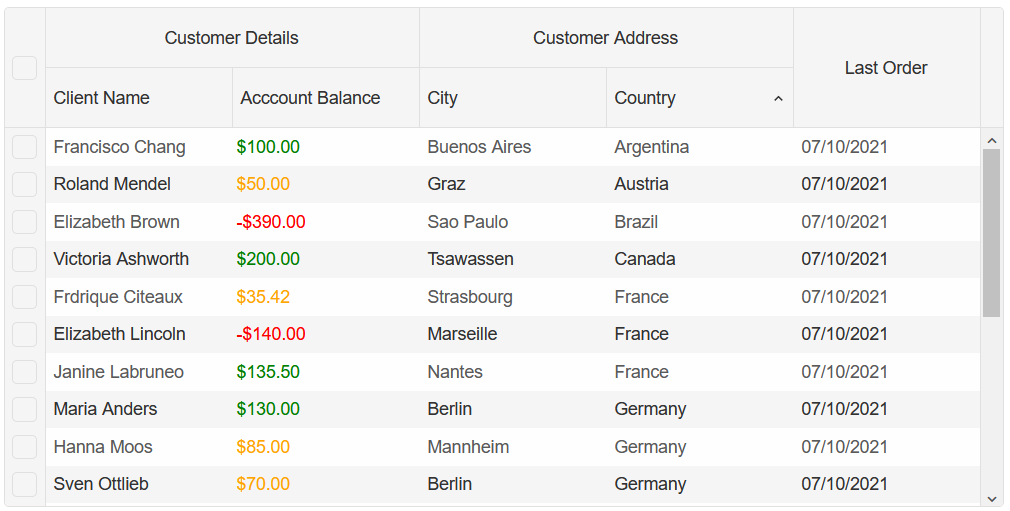
Smart.Grid allows you to group multiple columns into seperate groups for better user experience.
Inside the @code block define the Column Group you wish to create.
Then set ColumnGroups in the Grid and bind the Groups to the appropriate Column components.
        <Grid Datasource="@Clients" Sorting="@sorting" Appearance="@appearance" Selection="@selection"
          Editing="@editing" ColumnGroups="@columnGroups">
          <Columns>
              <Column DataField="Name" Label="Client Name" ColumnGroup="Details" ></Column>
              <Column DataField="Balance" Label="Acccount Balance" DataType="number"
                Template="@balanceTemplate" ColumnGroup="Details"></Column>
              <Column DataField="City" Label="City" ColumnGroup="Address"></Column>
              <Column DataField="Country" Label="Country" SortOrder="GridColumnSortOrder.Asc"
                ColumnGroup="Address"></Column>
              <Column DataField="LastOrder" Label="Last Order" DataType="date" CellsFormat="dd/MM/yyyy"
                Align="HorizontalAlignment.Center"></Column>
          </Columns>
        </Grid>
        ...
        @code{
          ...
          List<GridColumnGroup> columnGroups = new List<GridColumnGroup>()
            {
                new GridColumnGroup()
                {
                    Label = "Customer Details",
                    Align = HorizontalAlignment.Center,
                    Name = "Details"
                },
                new GridColumnGroup()
                {
                    Label = "Customer Address",
                    Align = HorizontalAlignment.Center,
                    Name = "Address"
                }
            }
            ...
        }
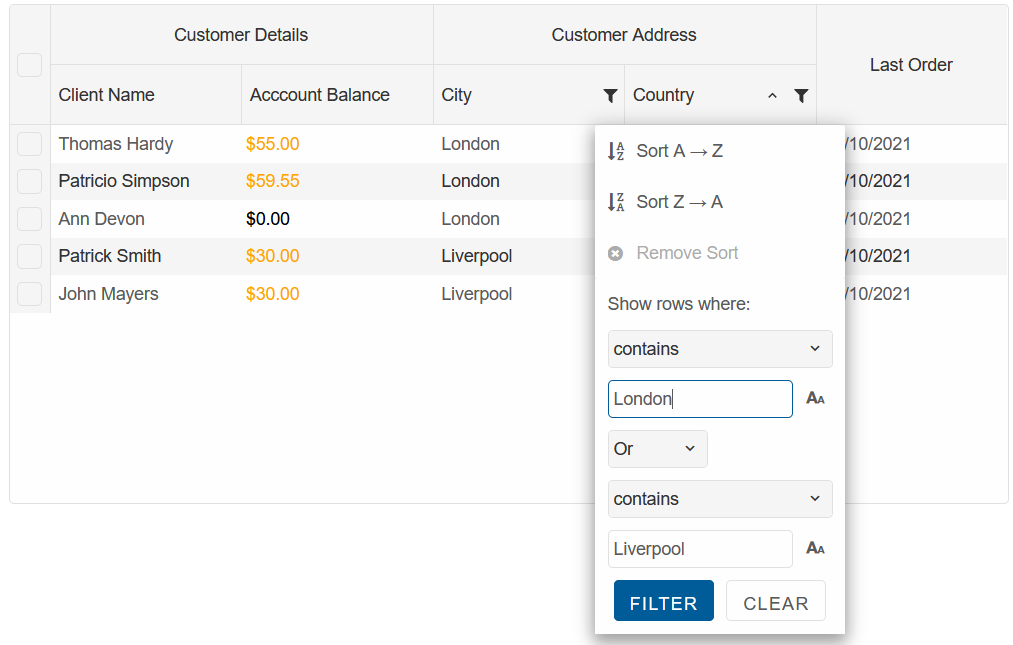
Filter Data
Smart.Grid allows you and the user to filter data in various ways. This method is ...
Inside the @code block, enable filtering and define the conditions you want to use.
        GridFiltering filtering = new GridFiltering()
        {
            Enabled = true,
            Filter = new string[][]
            {
                new string[] { "Country", "contains UK" },
                new string[] {"City", "contains London or contains Liverpool"}
            }
        };
Then set the Filtering property of the Grid Component.
        <Grid Datasource="@Clients" Sorting="@sorting" Appearance="@appearance" Selection="@selection" Editing="@editing"
          ColumnGroups="@columnGroups" Filtering="@filtering">
          ...
        </Grid>
Smart.Grid automatically generates a filtering menu for the user to modify the filtering rules without writing code.