Blazor - WebAssembly Full-Stack App with GraphQL - Part 2
In the previous part of the tutorial we showed how to configure a Blazor WebAssembly application to create a GraphQL server using Hot Chocolate.
We created a GraphQL query and used the Banana Cake Pop IDE to execute it.
Now we will cover how to create a GraphQL mutation to add new album data and we will configure the Strawberry Shake tools which will help us create a GraphQL client to consume the server endpoints.
Update the Album Class
We will use a form to accept the album data from the user. We will make some fields required by adding the [Required] attribute to them in the Album class, like this:
    public partial class Album
    {
        public int AlbumId { get; set; }

        [Required]
        public string AlbumName { get; set; } = null!;


        public DateTime ReleaseDate { get; set; }

        [Required]
        public int ArtistId { get; set; }

        [Required]
        public int GenreId { get; set; }

        public virtual Artist Artist { get; set; } = null!;
    }
Update the IMusic Interface
Inside the IMusic.cs file, add a method in IMusic interface for adding an album, like this:
    public interface IMusic
    {
       Task<List<Genre>> GetGenre();

       Task AddAlbum(Album album);
    }
Implement the Add Album Functionality in the Music Data Access Layer
As we have added the AddAlbum method in the IMusic interface, we need to update the MusicDataAccessLayer class by implementing the method as shown below:
    public async Task AddAlbum(Album album)
    {
        try
        {
            await _dbContext.Albums.AddAsync(album);
            await _dbContext.SaveChangesAsync();
        }
        catch
        {
            throw;
        }
    }
The method accepts an album as a parameter and it adds it to the Music DB set. Then it updates the database by invoking the SaveChangesAsync method.
Add a GraphQL Mutation Resolver
Next, add a class called MusicMutationResolver.cs inside the MusicApp.Server/GraphQL folder.
Add the following code inside:
    using MusicApp.Server.Interfaces;
    using MusicApp.Server.Models;

    namespace MusicApp.Server.GraphQL
    {
        public class MusicMutationResolver
        {
            public record AddAlbumPayload(Album album);

            readonly IWebHostEnvironment _hostingEnvironment;
            readonly IMusic _musicService;
            readonly IConfiguration _config;

            public MusicMutationResolver(IConfiguration config, IMusic musicService, IWebHostEnvironment hostingEnvironment)
            {
                _config = config;
                _musicService = musicService;
                _hostingEnvironment = hostingEnvironment;
                posterFolderPath = System.IO.Path.Combine(_hostingEnvironment.ContentRootPath, "Poster");
            }

            [GraphQLDescription("Add new album data.")]
            public AddAlbumPayload AddAlbum(Album album)
            {
                _musicService.AddAlbum(album);

                return new AddAlbumPayload(album);
            }
        }
    }
Register mutation resolver
Inside the Program.cs file add the following code:
    builder.Services.AddGraphQLServer()
        .AddQueryType<MusicQueryResolver>()
        .AddMutationType<MusicMutationResolver>();
We are done with the server configuration. We can now add new albums data via the Banana Cake Pop IDE.
Next we will continue with the client side of the application.
Configure the Strawberry Shake CLI tools
We should configure the Strawberry Shake tool to create a GraphQL client.
Navigate to the MusicApp\Client directory in your machine, open a command prompt and run the following command:
dotnet new tool-manifest
When executed, it will create a .config folder inside the MusicApp\Client directory. This folder will contain a dotnet-tools.json file.
After that run the following command to install the Strawberry Shake tools:
dotnet tool install StrawberryShake.Tools –local
Add NuGet Packages
We should install all the necessary NuGet packages to our client project. Navigate to Tools > NuGet Package Manager > Package Manager Console. Select MusicApp.Client from the Default project dropdown and install the following packages:
- Install-Package StrawberryShake.Transport.Http -Version 12.5.0
- Install-Package StrawberryShake.CodeGeneration.CSharp.Analyzers -Version 12.5.0 - for code generation
- Install-Package Microsoft.Extensions.DependencyInjection -Version 6.0.0 - for dependency injection
- Install-Package Microsoft.Extensions.Http -Version 6.0.0 - for HTTP
- Install-Package Smart.Blazor
Configure Smart Blazor
To configure Smart.Blazor package for use follow this Smart - Getting Started with Blazor - Tutorial.
Generate the GraphQL Client Using the Server Schema
To generate a GraphQL client based on the server schema follow these steps:
- Run the application and get the path of the GraphQL server. For example: https://localhost:7091/graphql/
-
Navigate to the MusicApp\Client directory, open the command prompt, and run the following command:
dotnet graphql init https://localhost:7091/graphql/ -n MusicClient -p ./GraphQLAPIClient
MusicClient is the name of the client we will use to invoke the GraphQL endpoints. GraphQLAPIClient is the name of the folder that will contain all the client schema and related files. Both of these are user-specific names, and you can use any name of your choice.
When executed, the command will create a folder called GraphQLAPIClient inside the MusicApp\Client project. The folder should look like the following image:
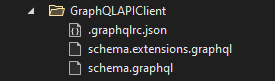
-
Add the following namespace definition to the .graphqlrc.json file. It will be used by the client class which will be generated when we build the project.
"namespace": "MusicApp.Client.GraphQLAPIClient",
The extension inside .graphqlrc.json should look like this:
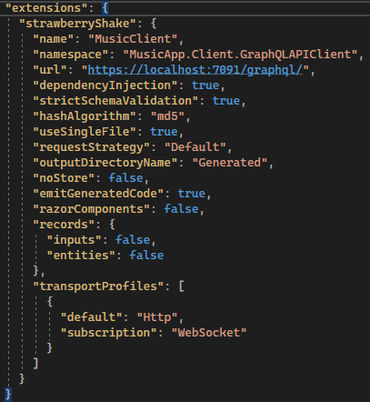
The GraphQL schema is generated inside the schema.graphql file.
Add GrapqhQL Queries
Add a file called AddAlbumData.graphql inside the MusicApp.Client\GraphQLAPIClient folder. Inside, add the GraphQL query for adding album data, like this:
    mutation AddAlbumData($albumData:AlbumInput!){
      addAlbum(album:$albumData){
      album{
          albumName
        }
      }
    }
Next, add a file called FetchGenreList.graphql and add the following GraphQL query to fetch the genre list:
    query FetchGenreList{
      genreList{
        genreId,
        genre1
      }
    }
Now build the project. A folder called Generated will be created inside the MusicApp.Client\GraphQLAPIClient folder. It will contain a file called MusiceClient.StrawberryShake.cs that contains GraphQL query and type definitions as C# objects.
Add Dependency Injection in Program.cs File
Inside MusicApp.Client\Program.cs add the following code:
    string graphQLServerPath = builder.HostEnvironment.BaseAddress + "graphql";

    builder.Services.AddMusicClient()
       .ConfigureHttpClient(client =>
       {
           client.BaseAddress = new Uri(graphQLServerPath);
       }
    );
We have registered the MusicClient via dependency injection and created the GraphQL server path by appending graphql to the base address of the application. This will make sure that we do not need to maintain separate URLs for different environments.
Create Component for Adding Albums
Inside MusicApp.Client\Pages folder add a new component called AddEditAlbum.razor and a base class for the component called AddEditMovie.razor.cs.
Add the following code inside the AddEditMovie.razor.cs:
    public class AddEditAlbumBase : ComponentBase
    {
        [Inject]
        public NavigationManager NavigationManager { get; set; } = default!;

        [Inject]
        MusicClient MusicClient { get; set; } = default!;

        [Parameter]
        public int AlbumID { get; set; }

        protected string AlbumName = "Add";
        public Album album = new Album() { ReleaseDate = DateTime.Today };
        protected List<Genre>? listGenre = new();

        public string ArtistId
        {
            get { return album.ArtistId.ToString(); }
            set { album.ArtistId = Int32.Parse(value); }
        }

        public string GenreId
        {
            get { return album.ArtistId.ToString(); }
            set { album.ArtistId = Int32.Parse(value); }
        }

        public string[] AlbumSelectedValues
        {
            get { return new string[] { album.GenreId.ToString() }; }
            set { album.GenreId = Int32.Parse(value[0]); }
        }
    }
We have injected the NavigationManager and MusicClient into the component. The component will accept the parameter AlbumID of type integer.
If the parameter is provided, then it means that the album data already exists, and the component is invoked for editing the album data. If the parameter is null, we can assume that the component is invoked for adding new album data.
Add the following method to fetch the genre list:
    protected override async void OnInitialized()
    {
        await GetAvailableGenre();
    }

    public async Task GetAvailableGenre()
    {
        var results = await MusicClient.FetchGenreList.ExecuteAsync();

        if (results.Data is not null)
        {
            listGenre = results.Data.GenreList.Select(x => new Genre
            {
                GenreId = x.GenreId,
                Genre1 = x.Genre1,
            }).ToList();

            StateHasChanged();
        }
    }
We will use the FetchGenreList method of the MusicClient to get the list of available genres. This GetAvailableGenre method will be called on the OnInitialized life-cycle method to ensure that the genre list is available as soon as the component loads.
Add the following method to save the album data:
    protected async Task SaveAlbum()
    {
        AlbumInput albumData = new()
        {
            AlbumId = album.AlbumId,
            AlbumName = album.AlbumName,
            GenreId = album.GenreId,
            ArtistId = album.ArtistId,
            ReleaseDate = album.ReleaseDate
        };
        await MusicClient.AddAlbumData.ExecuteAsync(albumData);
        NavigateToAdminPanel();
    }

    protected void NavigateToAdminPanel()
    {
        NavigationManager?.NavigateTo("/");
    }
We map the album data to an object of type AlbumInput and invoke the AddAlbumData method of the MusicClient to save the album. The NavigateToAdminPanel method will navigate the user back to the home page.
Finally, add the following code in the AddEditAlbum.razor file:
        @page "/albums"

        @using MusicApp.Client.Pages

        @inherits AddEditAlbumBase

        <div class="row justify-content-center">
            <div class="col my-3">

                <h1 class="display-3">@AlbumName Album</h1>
                <hr />

                <EditForm Model="@album" OnValidSubmit="SaveAlbum">
                    <DataAnnotationsValidator />

                    <div class="row justify-content-between">
                        <div class="col-md-8">
                            <div class="mb-3">
                                <label for="Title" class="form-label">Album Name</label>
                                <div class="col-md-6">
                                    <Input @bind-Value="@album.AlbumName"></Input>
                               </div>
                                <ValidationMessage For="@(() => album.AlbumName)" />
                            </div>

                             <div class="mb-3">
                                <label for="Title" class="form-label">Artist Id</label>
                                <div class="col-md-6">
                                   <NumericTextBox @bind-Value="@ArtistId" />
                                </div>
                                <ValidationMessage For="@(() => album.ArtistId)" />
                            </div>

                             <div class="mb-3">
                                <label for="Title" class="form-label">Release Date</label>
                                <div class="col-md-6">
                                    <DateTimePicker FormatString="d" CalendarButton @bind-Value="@album.ReleaseDate" />
                                </div>
                                <ValidationMessage For="@(() => album.ReleaseDate)" />
                            </div>

                            <div class="mb-3">
                                <label for="Genre" class="form-label">Genre</label>
                                <div class="col-md-6">
                                    <DropDownList DataSource="@listGenre" DisplayMember="Genre1" ValueMember="GenreId" @bind-SelectedValues="@AlbumSelectedValues" />
                                </div>
                                <ValidationMessage For="@(() => album.GenreId)" />
                            </div>
                        </div>
                    </div>

                    <div class="form-group">
                        <Button Type="submit" Class="primary">Save</Button>
                        <Button OnClick="NavigateToAdminPanel">Cancel</Button>
                    </div>
                </EditForm>
            </div>
        </div>
We have used the EditForm component to create the form that will allow the user to add or edit the album data. The DataAnnotationsValidator component is used to implement all the validators defined for the model. The dropdown to display the genre will be created dynamically by iterating the listGenre variable.
When you click the Save button, the form validations will be checked. If all the client-side validation passes, then the SaveAlbum method will be invoked.
Configure Navigation Bar
Lastly, we will update the navigation menu to add the link to the AddEditAlbum component.
Inside the MusicApp.Client\Shared folder, add a base class for the navigation menu component called NavMenu.razor.cs.
Add the following code inside this class:
    using Microsoft.AspNetCore.Components;

    namespace MusicApp.Client.Shared
    {
        public class NavMenuBase : ComponentBase
        {

        }
    }
Add the following code inside the NavMenu.razor file:
    @inherits NavMenuBase

    <nav class="navbar fixed-top navbar-expand-lg navbar-dark">
        <div class="container-fluid">
            <a class="navbar-brand" href="/">Music App</a>
            <span class="spacer"></span>
            <a class="nav-link" href="/albums">Add Album</a>
        </div>
    </nav>
We have created a Bootstrap navigation menu and added a link to the AddEditAlbum component.
Inside NavMenu.razor.css file replace the existing code with the following:
    nav {
        background-color: #3f51b5;
        box-shadow: 0 3px 5px -1px rgba(0,0,0,.2), 0 6px 10px 0 rgba(0,0,0,.14), 0 1px 18px 0 rgba(0,0,0,.12);
    }

    .spacer {
        flex: 1 1 auto;
    }

    .nav-link {
        color: #ffffff;
    }
Update Application Layout
Finally, we will update the application layout.
Replace the code of Shared/MainLayout.razor with the following:
    @inherits LayoutComponentBase

    <div class="page">
        <div class="main">
            <NavMenu />
            <div class="container">
                @Body
            </div>
        </div>
    </div>
Replace the code of MainLayout.razor.css with the following:
    .container {
        margin-top: 70px;
    }

    .page {
        position: relative;
        display: flex;
        flex-direction: column;
    }

    .main {
        flex: 1;
    }
Result
Now you can launch the application and add an album like this: