Build your web apps using Smart Custom Elements
Smart.Scheduler - Events Drag & Resize
Events
Smart.Scheduler Events are defined as objects. Each object has specific attributes that surve a purpose and most of them are validated strictly by the element. However the Smart.Scheduler allows setting any other custom attributes to the Events and will always return them event on export.
The dataSource property of the Smart.Scheduler is used to define the array of events that will be loaded to the element.
By default drag, drop and resize operations of events are enabled.
Check out the following drag & drop demo on the official website that we will be using as a reference point.
Event Dragging
Smart.Scheduler events can be dragged inside the Scheduler or between Schedulers. Events from one Scheduler can be dragged and dropped into another and vice versa depending on the properties of the elements.
Dragging and Dropping an event are two separate actions that are executed on an event. By default both are enabled. However the user can disable one or both of them via the following properties:
- disableDrag - disables event dragging. Events cannot be dragged when this property is set to true.
- disableDrop - disables event dropping. Events cannot be dropped inside a Smart.Scheduler when this property is set to true.
The disableDrag property is also applicable to specific events. For example when we need a specific event not to be draggable we set the disableDrag: true property to the event object like so:
window.Smart('#scheduler', class {
    get properties() {
        return {
            //Properties
            view: 'week',
            dataSource: [
                {
                    label: 'Event',
                    dateStart: new Date(currentYear, currentMonth, todayDate - 2, 11, 45),
                    dateEnd: new Date(currentYear, currentMonth, todayDate + 1, 13, 45),
                    disableDrag: true
                }
            ]
        };
    }
});
As a result all other events will be draggable except the one with disableDrag property set to 'true'.
There are two events that are related to Scheduler event dragging:
- dragStart - fired when an event is about to be dragged. The event contains details
regarding the Scheduler event object that is going to be dragged an other useful information.
The event
details can be reached in the following way:
const scheduler = document.querySelector('smart-scheduler');

scheduler.addEventListener('dragStart', function (event) {
    const details = event.detail;

        if (details.target.label === 'Event') {
            event.preventDefault();
        }
    });
Event dragging can be canceled thanks to the dragStart. This can be achieved by simply calling event.preventDefault() on the event. In the demo above we cancel the dragging operation only on the event object with label 'Event'.
- dragEnd - fired when an event is dropped. The event also contains details regarding the
Scheduler event object that is being dropped. This event is non-cancelable.
Binding to the dragEnd event is the same as shown above.
The event dragging action can also be canceled at any time by pressing the Escape key on the keyboard. As a result the event that is currently dragged will be returned to it's original state.
In order to indicate that an event is dragged an event feedback element is shown next to the mouse pointer. Another feedback element is used to indicate the current drop position as well. Events can be dropped only inside the view cells and only on cells that are not restricted. If the currently hovered cell is available for event dropping the drop feedback is shown by coloring the cell with specific style, like so:
Demo
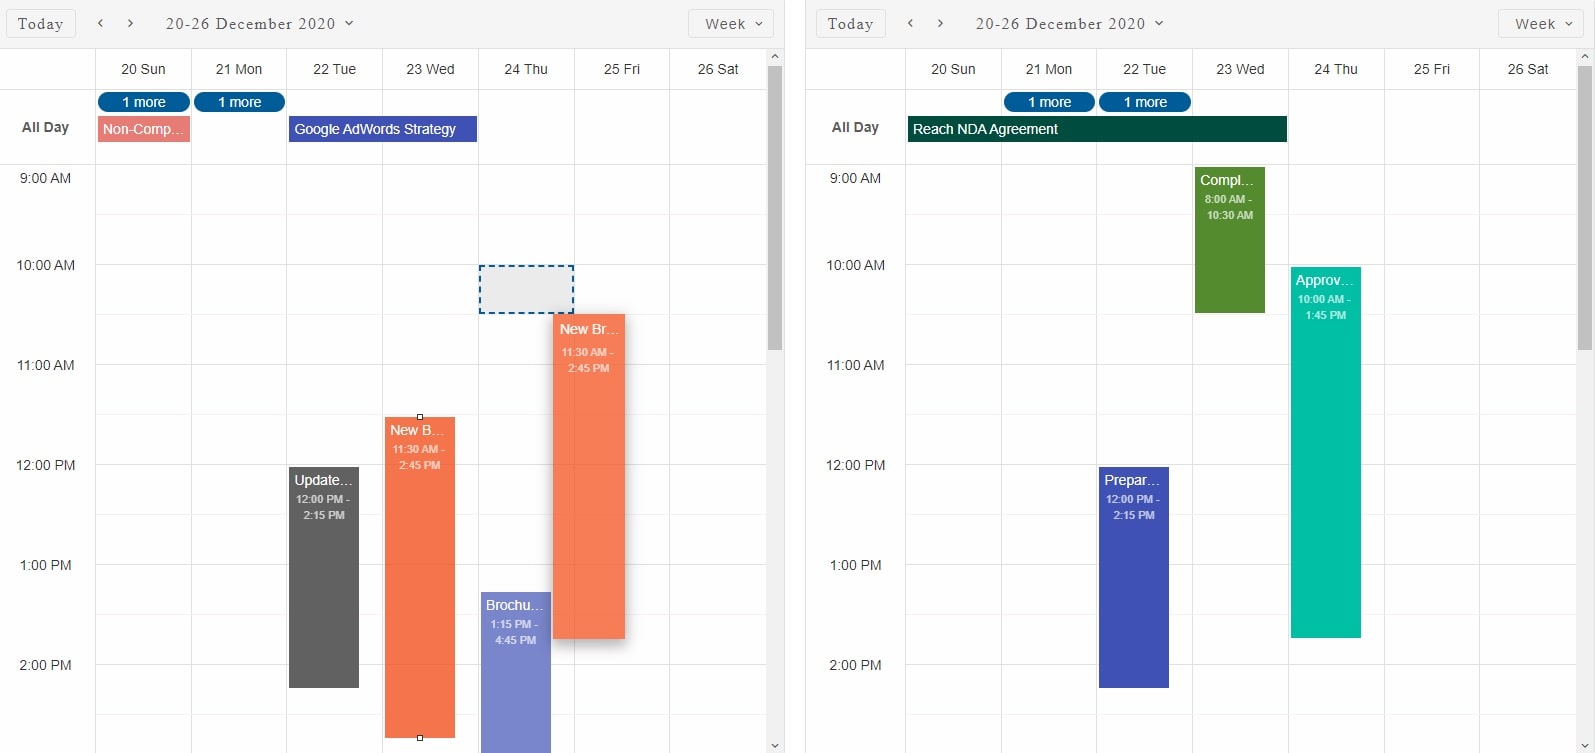
In the demo above there are two Smart.Schedulers and the left one has one of it's events dragged. The event can be dropped in either of the Schedulers.
The event drag feedback appears to be the same as the event element that is dragged with the exception that it's semi-transparent and has a box-shadow. However the content of the feedback element can be customized via the dragFeedbackFormatFunction that has the following parameters:
dragFeedbackFormatFunction(schedulerEventObj: EventObj) {
    return schedulerEventObj.label
}
The funciton should return a
string that will be used as the new content for the drag feedback element. The feedback can also be
styled via CSS selectors. Check the CSS API of the
Smart.Scheduler for more information on that.
Event Resizing
Smart.Scheduler events can be resized inside the Scheduler they are assigned to. Depending on the orientation of the view, events can be resized horizontally or vertically.
Resize indicators are used to show that an event element is resizable. Depending on the view orientation the resizing indicators can be position on the top and bottom sides of an event:
or on the left and right sides:

When these indicators are visible the event can be resized. The indicatos are shown on event hover and focus.
Event resizing can be disabled via the following Smart.Scheduler property:
- disableResize - A boolean property that disables event resizing for the Smart.Sheduler when set to 'true'.
However the same property is also available for individual event objects. Applying it to an event object wii make it non-resizible. Here's how to apply it to a certain event:
window.Smart('#scheduler', class {
    get properties() {
        return {
            //Properties
            view: 'week',
            dataSource: [
                {
                    label: 'Event',
                    dateStart: new Date(currentYear, currentMonth, todayDate - 2, 11, 45),
                    dateEnd: new Date(currentYear, currentMonth, todayDate + 1, 13, 45),
                    disableResize: true
                }
            ]
        };
    }
});
All other events can be resized except the one that has the disableResize property.
There are two Smart.Scheduler events dedicated to event resizing:
- resizeStart - fired when an a Scheduler event is about to be resized. The event contains
details
regarding the Scheduler event object that is about to be resized and other useful information.
The event
details can be reached in the following way:
const scheduler = document.querySelector('smart-scheduler');

    scheduler.addEventListener('resizeStart', function (event) {
         const details = event.detail;

        if (details.target.label === 'Event') {
            event.preventDefault();
        }
    });
Calling event.preventDefault() on resizeStart will cancel the operation.
- resizeEnd - fired when resizing of a Scheduler event is finished. It also contains details about the event object that can be reached via the event.detail property.
The event resizing operation can also be canceled at any time by pressing the Escape key on the keyboard. As a result the event that is being resized will be returned to it's original state.
Scheduler Timeline Auto Scroll
During event resizing and dragging when the mouse pointer is near the edge of the visible view area, if scrollable the Scheduler will automatically scroll the view to the next possible cell until the mouse pointer is moved to a bigger distance from the edge of the timeline.
This feature is called autoScroll and is enabled by default. However it can be disabled via the disasbleAutoScroll property.
The scrolling step can also be customized via the autoScrollStep property. By default it's set to 30.
For AI tooling
Developer Quick Reference
Topic: scheduler-event-drag-resize Component: Scheduler Framework: JavaScript
Main methods: addEventListener()
Common config keys: dataSource
Implementation Notes
Compatibility: Modern browsers / Web Components API access pattern: const component = document.querySelector(...) + component.method()
Lifecycle guidance: Initialize configuration first, then invoke imperative API when element is available in DOM.
Common pitfalls:
- Calling methods before element initialization.
- Reassigning large configuration partially without understanding merge behavior.
- Missing required module script import for component type.
Validation checklist:
- Ensure module scripts and CSS are loaded once.
- Keep data schema aligned with columns/series definitions.
- Verify method calls target initialized component instance.