Build your web apps using Smart Custom Elements
Smart.Scheduler - Events in depth
Events
Smart.Scheduler Events are defined as objects. Each object has specific attributes that surve a purpose and most of them are validated strictly by the element. However the Smart.Scheduler allows setting any other custom attributes to the Events and will always return them event on export.
The dataSource property of the Smart.Scheduler is used to define the array of events that will be loaded to the element.
Scheduer Events have the following properties:
| Property | Type | Description | Optional |
|---|---|---|---|
| label | string | the label for the Event. The label is used to name the event. If an id is not defined for the event, the label is one of the attributes that is used to identify the event. | no |
| dateStart | date | string | the starting date for the Event. The starting date should be of type Date but the element also accepts a valid string representation of a date which will be parsed as a date object later. | no |
| dateEnd | date | string | the ending date for the Event. The end date must not be the same as the start. Similarly to the start date the end also can be set to a string which represents a valid date. | no |
| description | string | the description of the Event. A more detailed description for the event that is visible when the Window Editor is opened. | yes |
| id | string | the unique id of the Event. The id is also applied to the DOM element that represents the event. | yes |
| class | string | the class of the Event. The class value is applied to the DOM element that represents the event. Classes are usefull for styling or when the user wants to mark some of the events. | yes |
| backgroundColor | string | a custom background color for the Event. The color should be defined as a HEX value. The focus/hover background colors are based on this color. If the user wants to set different colors for those states then the apropriate CSS variables should be used. | yes |
| color | string | a custom text color for the Event. The color should be defined as a HEX value. By default a CSS variable is used to set the color for all events. | yes |
| notifications | array | an array of objects which define the notifications for the event. Notificaitons can appear on the same day as the event starts or before that. The attributes of this property are discussed later in this topic. | yes |
| allDay | boolean | indicates that the Event lasts all day and the Scheduler should ignore the time offset. All days events are separated in an all day container when Scheduler view is set to 'day' and 'week'. The All day container is positioned above the Scheduler timeline. Events that last more then 24 hours are automatically set as all day events in 'day' and 'week' view. | yes |
| disableDrag | boolean | disables the abbility to drag the Event | yes |
| disableResize | boolean | disables the abbility to resize the Event | yes |
| repeat | object | defines the repeating settings for the Event. Repeating events have this property assigned. The attributes of this property are discussed later in this topic. | yes |
These are the Event attributes that Smart.Sheduler uses. Any other attributes added to the Event objects will be preserved but not used by the element.
Resources are assigned to the event object as key-value records. Where the key is the resource's value and value is the resource item id. Event resources are discussed later in this topic.
Here's an example of a Scheduler with two Events:
const today = new Date(),
    currentYear = today.getFullYear(),
    currentMonth = today.getMonth(),
    data = [
        {
            label: 'Event 1',
            dateStart: new Date(currentYear, currentMonth, 15, 9, 30),
            dateEnd: new Date(currentYear, currentMonth, 15, 12),
            description: 'This is the first Event'
        }, {
            label: 'Event 2',
            dateStart: new Date(currentYear, currentMonth, 16, 11, 30),
            dateEnd: new Date(currentYear, currentMonth, 16, 14, 15),
            description: 'This is the second Event'
        }
    ];

window.Smart('#scheduler', class {
    get properties() {
        return {
            //Properties
            view: 'week',
            dataSource: data
        };
    }
});
Demo

Repeating Events
Repeating events have this property assigned. Here are it's attributes:
| Property | Type | Description | Optional |
|---|---|---|---|
| repeatFreq | string | represents the repeat frequency for the event. The repeating frequency can be one of the following: 'hourly', 'daily', 'weekly', 'monthly', 'yearly'. By default the events repeat 'hourly'. | no |
| repeatInterval | number | represents the repeat interval of the event. That is the time interval between two occurrences of the event. Depending on the repeating frequency the interval can be hours,days,weeks,months,years. By default it's 1. | no |
| repeatOn | number | array | date | depending on the repeatFreq the event can repeat on specific days or date. The repeatOn value can be an array of numbers which indidate the days of the week for 'weekly' repeating frequency, a number which indicates the date of the month for 'monthly' repeating frequency or a date which indicates the date of the year when repeat frequency is set to 'yearly'. | yes |
| repeatEnd | number | date | the end condition for the repeating event. The event can end on a date or after a number of occurrences. If not set the repeating event will never end. | yes |
| exceptions | array | an array of objects that define the event date exceptions for the repeating event. An exception can contain a different start/end date but it's date property must be equal to an expected repeating date occurence. Exceptions can have different backgroundColor and color attributes. They can also be hidden via the hidden attribute. | yes |
Repeating event occurances are treated as date occurrences of the event instead of being separate events. Each occurrence has a unique date that the event repeats on. An occurrence can be modified. When modifed it is treated as an exception of the repeating Event. Exceptions as well as occurrences are dispalyed with an additional icon at the top right corner of their respective elements inside the Scheduler timeline.
Here's how a repeating event looks

Here's how an exception looks:

Repeating Event Exceptions
Exceptions are defined as normal Event objects as part of the exceptions attribute of a repeating event object. However they have two additional attributes:
| Property | Type | Description | Optional |
|---|---|---|---|
| date | date | represents the occurrence date of the repeating series that will be treated as an exception. This attribute is required to create an exception. If not present in the exception object definition then the exception will be invalid. | no |
| hidden | boolean | determines whether the exception is hidden from the Scheduler timeline or not. Once hidden the exception can be shown again from the Scheduler Window by editing the repeating options of the original event series. When there are hidden execeptions an additional checkbox is present in the repaeting options of the repeating series which allows to reset the exceptions when checked and submited. | yes |
Here is how to reset the exceptions from the repeating series Scheduler Window:

The differences between normal events and exceptions are the following:
- Exceptions must have a unique date attribute - the exception object must have it's date atribute set to a specific repeating occurrence of an event. This is the only required attribute of the exceptions in order for the Scheduler to determine that there's an execption in a future occurrence of the repeating event.
- Exceptions cannot repeat - exceptions are not repeatable. They represent an exception of an occurrence of a repeating event.
- Exceptions can start/end on different date - exceptions can have different start/end date then the original occurrence.
- Exceptions can be hidden - exceptions can be hidden from the Scheduler timeline by setting the hidden attribute.
- Exceptions do not use different resources - exceptions cannot have different resources then the original repeating series. They use the resources of the series.
Here's an example definition of an Event with three exceptions:
const today = new Date(),
    currentYear = today.getFullYear(),
    currentMonth = today.getMonth(),
    data = [
        {
            label: 'Event 1',
            dateStart: new Date(currentYear, currentMonth, 15, 9, 30),
            dateEnd: new Date(currentYear, currentMonth, 15, 12),
            description: 'This is the first Event',
            repeat: {
                repeatFreq: 'daily', // Repeat daily
                repeatInterval: 1, //Repeat every day
                repeatEnd: 10, //Stop after 10 days
                exceptions: [
                    {
                        date: new Date(currentYear, currentMonth, 16, 9, 30),
                        label: 'Official Holliday',
                        backgroundColor: '33b679'
                    },
                    {
                        date: new Date(currentYear, currentMonth, 18, 9, 30),
                        label: 'Day off',
                        hidden: true
                    },
                    {
                        date: new Date(currentYear, currentMonth, 19, 9, 30),
                        label: 'Rescheduled.',
                        dateStart: new Date(currentYear, currentMonth, 19, 15, 30),
                        dateEnd: new Date(currentYear, currentMonth, 19, 18),
                        backgroundColor: '#2196F3'
                    }
                ]
            }
        }, {
            label: 'Event 2',
            dateStart: new Date(currentYear, currentMonth, 16, 11, 30),
            dateEnd: new Date(currentYear, currentMonth, 16, 14, 15),
            description: 'This is the second Event'
        }
    ];

window.Smart('#scheduler', class {
    get properties() {
        return {
            //Properties
            view: 'week',
            dataSource: data
        };
    }
});
Demo:
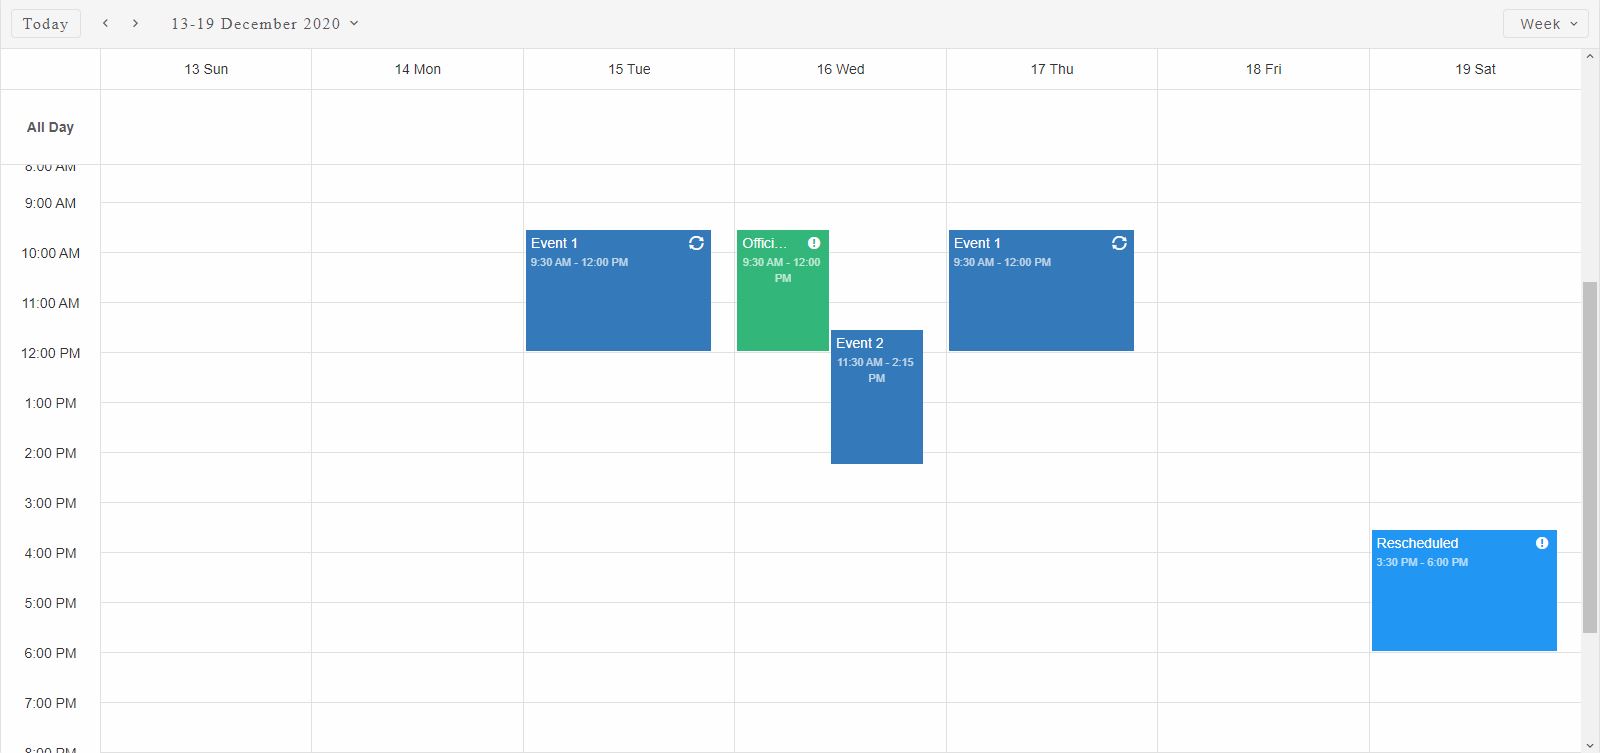
In the demo above we have a repeating event labeled 'Event 1' that will repeat for 10 days starting 15th of the current month but will skip 18th as an exception because of an unexpected day off and the occurance on 19th is rescheduled for a later hour as an exception again.
Smart.Scheduler has public methods that allow to get all or specific occurrences of an Event:
- occurrences - returns all future occurrences of a repeating event. The method has the
following arguments:
- eventObj - a Scheduler event object with repeating options.
- max - a number indicating the number of occurrences to return. Optional. If not set only the first 100 occurrences are returned.
-
occurrencesBetween - returns all future occurrences of a repeating event between two
dates.
The method has the following arguments:
- eventObj - a Scheduler event object with repeating options.
- dateFrom - the start date for the occurrences. Reccurences after this date will be returned.
- dateTo - the end date for the occurrences. Reccurences before this date will be returned.
-
occurrenceAfter - returns the first occurrence of a repeating event after a date.
The method has the following arguments:
- eventObj - a Scheduler event object with repeating options.
- date - the start date for the occurrence. The first occurrence after this date will be returned.
-
occurrenceBefore - returns the first occurrence of a repeating event before a date.
The method has the following arguments:
- eventObj - a Scheduler event object with repeating options.
- date - the end date for the occurrence. The first occurrence before this date will be returned.
Event Notifications
Scheduler Notifications are displayed in the right top corner of the element. They are refreshed when on event or date change. Notifications do not auto close. However on element refresh the past notifications will not be shown again.
Notifications can be customized inside the notification object definition on specific events.
Notification objects have the following properties:
| Property | Type | Description | Optional |
|---|---|---|---|
| interval | numeric | a numeric interval that indicates the number of days/weeks (depending on the notification 'type') on which the notification will appear before the event starts. If set to 0 it means the notification will appear on the same day as it starts. | no |
| type | string | determines the type of the interval. It can be 'days' or 'week'. By default it's days | yes |
| time | array | an array of two numbers that indicate the hours and minutes of the date on which the notificaiton should appear, e.g. [hours, minutes] | no |
Additional non Event related notifications can be displayed at any time via the API methods:
- openNotification - allows to open a new custom notificaiton. The method has the following
arguments:
- message - a string that represents the notification message that will be shown.
- toastSettings - an object with Smart.Toast properties that will be applied to the Toast element that is used to show the notifications. Check the Smart.Toast API for more information on the website
- closeNotifications - closes all visible notifications.
Here's an example on how to define event notification:
const today = new Date(),
    currentYear = today.getFullYear(),
    currentMonth = today.getMonth(),
    data = [
        {
            label: 'Event 1',
            dateStart: new Date(currentYear, currentMonth, 17, 16, 30),
            dateEnd: new Date(currentYear, currentMonth, 17, 18),
            description: 'This is the first Event',
            notifications: [
            {
                interval: 0,
                type: 'days',
                time: [16, 25],
                message: '5 minutes till the event begins !',
            },
            {
                interval: 0,
                type: 'weeks',
                time: [16, 28],
                message: '2 minutes till the event begins !',
                iconType: 'warning'
            }
        ]}, {
            label: 'Event 2',
            dateStart: new Date(currentYear, currentMonth, 16, 11, 30),
            dateEnd: new Date(currentYear, currentMonth, 16, 14, 15),
            description: 'This is the second Event'
        }
    ];

window.Smart('#scheduler', class {
    get properties() {
        return {
            //Properties
            view: 'week',
            dataSource: data
        };
    }
});

window.onload = function() {
    //Open a Custom Notification
    document.querySelector('smart-scheduler').openNotification('Custom Notificaiton');
}
Demo:

Event Resources
Event resources are applied as key-value attributes directly on the Event object. The key of the attribute should match the value property of a Smart.Scheduler resource while the value of the attribute should match the id of one of items defined in the dataSource of the resource that corresponds to the key.
If the Smart.Scheduler has no resources defined then the key-value pair that should set a resource to the event is treated as a common object atftribute.
Resources allow to assign Events to specific entities( for example, assing events to different people).
Resources can also be used to style the Events that have them assigned differently from the rest.
Resources also allow to group the Events inside the Scheduler. When grouped all Events that do not have the appropriate resources assigned will not be displayed.
Here's how Resources can be assigned to Events:
const today = new Date(),
    currentYear = today.getFullYear(),
    currentMonth = today.getMonth(),
    data = [
        {
            label: 'Event 1',
            dateStart: new Date(currentYear, currentMonth, 17, 16, 30),
            dateEnd: new Date(currentYear, currentMonth, 17, 18),
            description: 'This is the first Event',
            priorityId: 1 //Assign the Event to resource 'priorityId' item 1 - Low Priority
           }, {
            label: 'Event 2',
            dateStart: new Date(currentYear, currentMonth, 16, 11, 30),
            dateEnd: new Date(currentYear, currentMonth, 16, 14, 15),
            description: 'This is the second Event',
            priorityId: 2 //Assign the Event to resource 'priorityId' item 2 - Medium Priority
        }
    ];


const priorityData = [
{
    label: 'Low Priority',
    id: 1,
    backgroundColor: '#1e90ff' //Resource specific color
}, {
    label: 'Medium Priority',
    id: 2,
    backgroundColor: '#ff9747' //Resource specific color
}
];

window.Smart('#scheduler', class {
    get properties() {
        return {
            //Properties
            view: 'week',
            dataSource: data,
            resources: [
            {
                label: 'Priority',
                value: 'priorityId',
                dataSource: priorityData
            }
        ]
        };
    }
});
Here we have a single resource with two items - Low and Medium Priority. Each of the items have an event assigned to them.
Demo:

Event Resources can be edited and re-assigned via the Window Editor as shown in the image above.
For AI tooling
Developer Quick Reference
Topic: scheduler-events Component: Scheduler Framework: JavaScript
Main methods: (none detected)
Common config keys: dataSource
Implementation Notes
Compatibility: Modern browsers / Web Components API access pattern: const component = document.querySelector(...) + component.method()
Lifecycle guidance: Initialize configuration first, then invoke imperative API when element is available in DOM.
Common pitfalls:
- Calling methods before element initialization.
- Reassigning large configuration partially without understanding merge behavior.
- Missing required module script import for component type.
Validation checklist:
- Ensure module scripts and CSS are loaded once.
- Keep data schema aligned with columns/series definitions.
- Verify method calls target initialized component instance.