Build your web apps using Smart Custom Elements
Smart.Scheduler - Methods
Methods
Smart.Scheduler has a rich API with methods for event manipulation, state maintenance, Window and Menu management and other. We are going to take a closer look at them in this topic.
The methods are separated in the following categories:
Event Batch Updating
When an Even is dynamically added/removed/updated via the API methods the Smart.Scheduler element is re-rendered in order to display the changes. There are some cases where the user wants to make more than one modification to one or many Events and avoid re-rendering the element on each iteration to improve performance. This is the case where the batch methods come in handy. The following methods for updating of Events are available:
- beginUpdate - marks the begining of a batch Event update. This method should be executed before the user initiates the change sequence which can consist of deleting/updating/adding multiple Events. It sets a flag in the Smart.Scheduler to avoid re-rendering until the flag is reset which is done via the second method.
- endUpdate - marks the end of a batch Event update. This method should be called in order to end the batch update. When executed the Smart.Scheduler will re-render the view to display the changes.
Example usage:
const today = new Date(),
    currentYear = today.getFullYear(),
    currentMonth = today.getMonth(),
    currentDate = today.getDate();

window.Smart('#scheduler', class {
    get properties() {
        return {
            //Properties
            view: 'day',
            dateCurrent: new Date(),
            views: ['day', 'week', 'month'],
            hourStart: 9,
            timelineDayScale: 'halfHour',
        };
    }
});

window.onload = function() {
    const scheduler = document.querySelector('smart-scheduler');

    //Begin Update
    scheduler.beginUpdate();

    //Create 20 Events and add them to the Scheduler
    for(let i = 0; i < 20; i++) {
        scheduler.insertEvent({
            label: `Event ${i}`,
            dateStart: new Date(currentYear, currentMonth, currentDate, i, 0),
            dateEnd: new Date(currentYear, currentMonth, currentDate, i + 1, 30)
        });
    }

    //End Update
    scheduler.endUpdate();
}
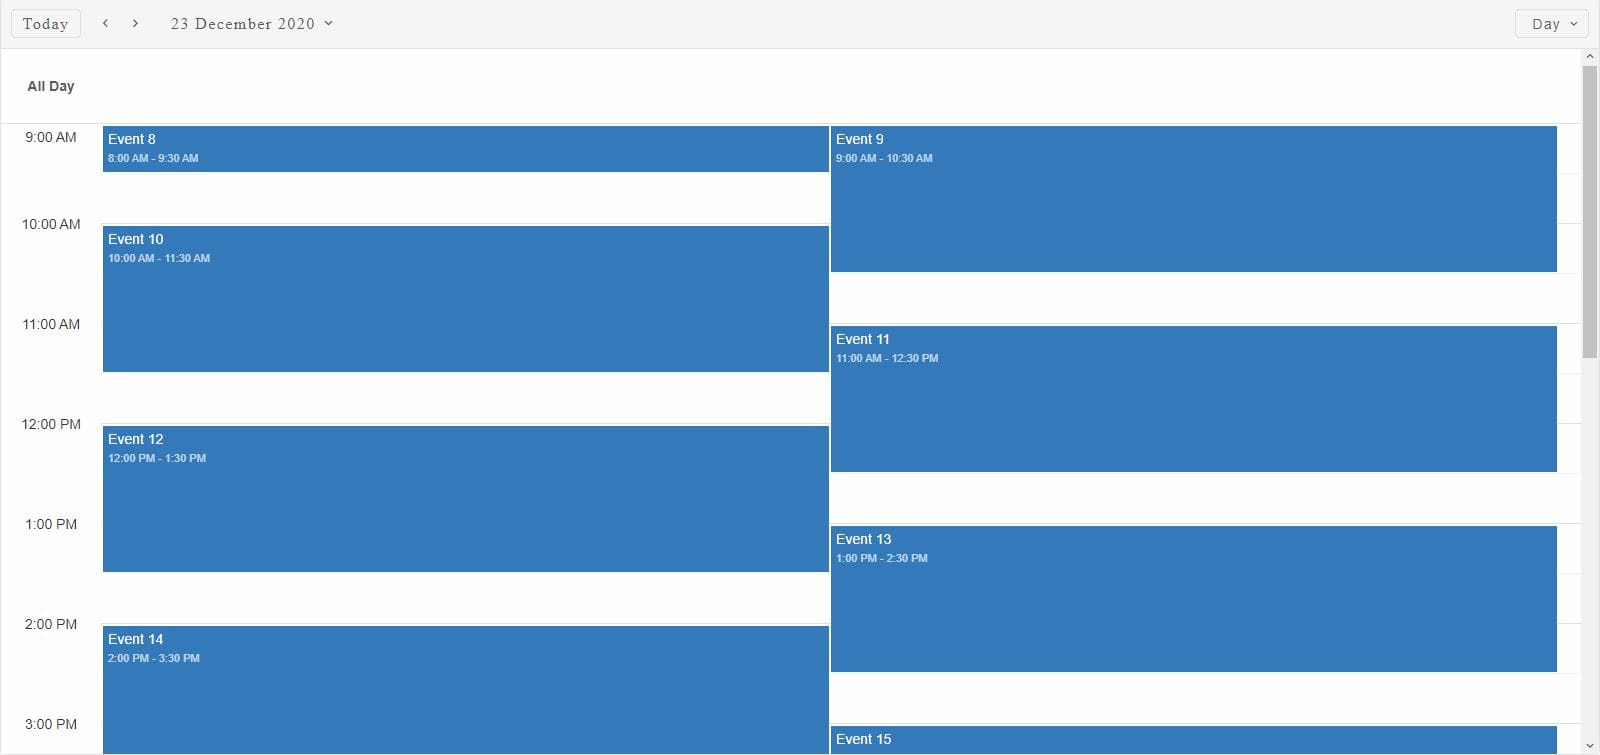
The code above creates 20 Events and adds them via the insertEvent method but the events are displayed when the endUpdate method is called.
beginUpdate and endUpdate methods also fire a corresponding event in order to notify for the action.
Here's the result:
Scheduler State
Smart.Scheduler allows to get a copy of the current state of the element. The state represents an object that contains the currently visible date as dateCurrent and a JSON array of the current Events as dataSource.
The state can later be loaded and the Scheduler will display the events and the saved viewing date.
Saving the state or loading it from local storage requires the Smart.Scheduler element to have an id.
Here are the methods regarding Scheduler state handling:
- clearState - deletes a saved state of the Scheduler from LocalStorage. Depending on the
id of the element this method will try to find a state recrod in the LocalStorage and delete it.
scheduler.clearState()
- getState - returns the current state of the element. As mentioned above this method
returns the dateCurrent and dataSource of the Smart.Scheduler as an object at the
moment the
method was called.
const state = scheduler.getState()
- loadState - loads a previously saved state of the element. The method accepts one
argument - a valid state of the Scheduler to load.
If the method is called without arguments it will look for a saved state of the element inside LocalStorage if the Scheduler has an id. If an id is not provided then nothing will be loaded.
scheduler.loadState()
Here's how to load a specific state of the element by passing the state as an argument to the loadState method:
const state = scheduler.getState();

//make some changes to the Events of the element
//..

//Load back the element to the saved state
scheduler.loadState(state)
- saveState - saves the current state of the element to Local Storage. The Scheduler should
have an id set in order to save the state.
scheduler.saveState()
Event Related Methods
Smart.Scheduler events can be retrieved at any time as an Array via the events getter of the element. Here's an example:
const events = scheduler.events;
Events inside the Scheduler are recognized thanks to their id attribute. If the event does not have an id then the Scheduler tries to find the corresponding event based on it's label and description properties. Event resources are also used to find the correct target.
In order to check if the Scheduler contains a given event, a containsEvent method is available:
- containsEvent - checks whether the event is present in the Scheduler or not. Accepts one
argument - an event object. Returns a boolean depending on the presence of the event.
scheduler.containsEvent({
    label: `Event`,
    dateStart: new Date(2020, 12, 23, 9, 0),
    dateEnd: new Date(2020, 12, 23, 11, 30)
});
The method returns a boolean which indicates whether there's an event inside the Scheduler that matches the target. In the example above if there's an event with label 'Event' that does not have any resources assigned, the method will return true.
If an event is not visible inside the Scheduler timeline it is possible to scroll to it via the scrollToEvent method.
- scrollToEvent - scrolls to an event if the event is part of the Scheduler and is in the
current view date range. The method
takes one argument: scrollToEvent(eventObj: EventObject | number). The eventObj
argument can be a Sheduler event object or it's index.
Usage:
scheduler.scrollToEvent(1);
As a result of calling the method, the Scheduler will scroll to the target event.
Smart.Scheduler Events can be manipulated via the API methods.
The following methods are available for event manipulation:
- insertEvent - inserts a new event to the Smart.Scheduler if it's not already present.
Duplicate events are not allowed.
The method accepts two arguments: insertEvent(eventObj: EventObject, index?: number). The eventObj is an object that represents a Scheduler event while the index represents the index at which the item should be inserted. This property is optional. By default new events are added to the end of the list.
Usage:
scheduler.insertEvent({ label: `Event`, dateStart: new Date(2020, 12, 23, 9, 0), dateEnd: new Date(2020, 12, 23, 11, 30) }); - updateEvent - updates an existing event inside the Scheduler. The method accepts two
arguments:
updateEvent(event: EventObject | number, details: Object). The eventObj
represents the event object that we want to update. It can also be a number which indicates the
index of the event in the events list. The details argument represents an object with
properties that should be applied to the event.
Usage:
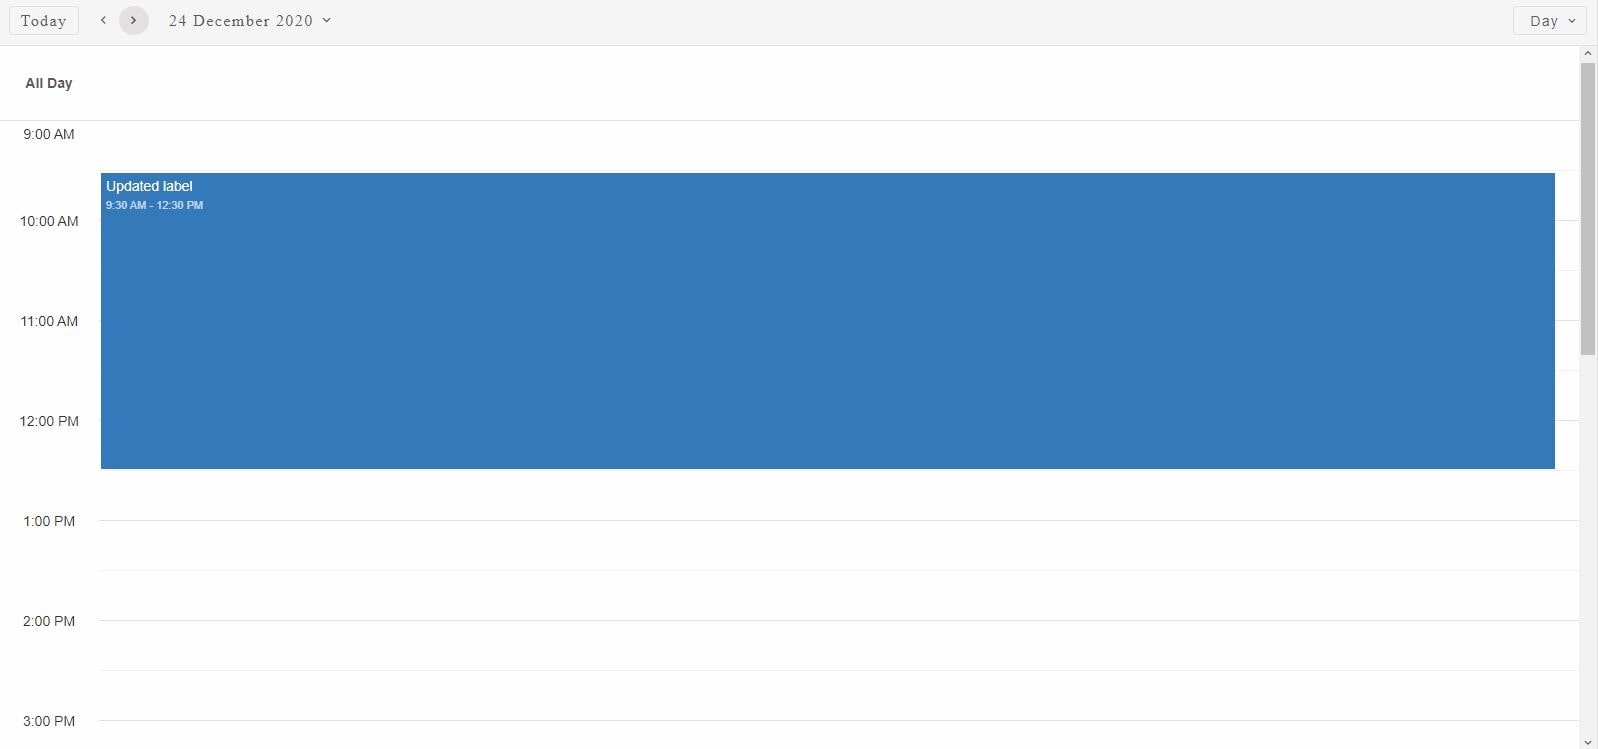
scheduler.updateEvent(1, {
    label: 'Updated label',
    dateStart: new Date(2020, 11, 24, 9, 30),
    dateEnd: new Date(2020, 11, 24, 12, 30)
});
The event item at index 1 will have it's label, dateStart and dateEnd updated.
Here's the result:
- removeEvent - removes an event from the Scheduler. The method accepts only one argument -
removeEvent(event: EventObject | number) -
the event object or it's index that should be removed.
Usage:
scheduler.removeEvent(1);
The event at index 1 will be removed from the Smart.Scheduler.
Repeating events can occur on a numer of dates and if the user wants to know on which there are several method available:
- occurrences - returns all occurrences of an event. By default the number of occurrenes
returned is limited to 100 but this can be changed. The method accepts two arguments:
occurrences(eventObj: EventObject, max?: number)
The event object that is passed to the method doesn't have to be part of the Scheduler to return it's occurrences.
Usage:
scheduler.occurrences({
    label: 'Google AdWords Strategy',
    dateStart: new Date(2020, 11, 10, 9, 0),
    allDay: true,
    backgroundColor: '#F57F17',
    repeat: {
        repeatFreq: 'weekly',
        repeatInterval: 5,
        repeatOn: [0, 2, 5],
        repeatEnd: new Date(2021, 1, 24)
    }
});
The result from calling the operation is an array of 7 dates before January 24th 2021.
- occurrencesBetween - returns the occurrences of an event between two dates. The method
accepts three arguments:
occurrencesBetween(eventObj: EventObj, dateFrom: Date, dateTo: Date)
The eventObj property represents a repeating event object. The dateFrom indicates the date from wihch we want to get the occurrences. The dateTo indicates the date until we want to get the occurrences.
Usage:
scheduler.occurrencesBetween({
label: 'Google AdWords Strategy',
dateStart: new Date(2020, 11, 10, 9, 0),
allDay: true,
repeat: {
    repeatFreq: 'weekly',
    repeatInterval: 5,
    repeatOn: [0, 2, 5],
    repeatEnd: new Date(2021, 6, 24)
    }
}, new Date(2021, 0, 1), new Date(2021, 2, 1));
The result from calling the method is an array of date occurances between the two dates.
- occurrenceAfter - returns the first date occurrence after a specific date. The method
accepts two arguments:
occurrenceAfter(eventObj: EventObject, date: Date)
The eventObj represents a repeating event object. The date argument represents the date after which we want to get the first occurrence of the event.
scheduler.occurrenceAfter({
label: 'Google AdWords Strategy',
dateStart: new Date(2020, 11, 10, 9, 0),
allDay: true,
repeat: {
    repeatFreq: 'weekly',
    repeatInterval: 5,
    repeatOn: [0, 2, 5],
    repeatEnd: new Date(2021, 6, 24)
    }
}, new Date(2021, 1, 1);
The result will be a single date occurrenece from Febuary 2021.
- occurrenceBefore - returns the last date occurrence before the target date. The method
accepts two arguments:
occurrenceBefore(eventObj: EventObject, date: Date)
The eventObj represents a repeating event object. The date argument represents the date before which we want to get the last occurrence of the event.
scheduler.occurrenceBefore({
label: 'Google AdWords Strategy',
dateStart: new Date(2020, 11, 10, 9, 0),
allDay: true,
repeat: {
    repeatFreq: 'weekly',
    repeatInterval: 5,
    repeatOn: [0, 2, 5],
    repeatEnd: new Date(2021, 6, 24)
    }
}, new Date(2021, 1, 1);
The result will be a single date occurrenece which will be the last possible from January 2021.
This methods are very usefull when it comes to creating repeating event exceptions which require a specific occurrence date to be set in order to specify which occurrence will be turned into an exception.
The dates returned from these methods are in local time.
An Event Menu is available in the Smart.Sheduler that pops up when an event is clicked inside the timeline. It shows additional information and a delete shortcut button. However the Event Menu can also be triggered for a specific event via API methods:
- openEventTooltip - opens the Event Menu/Tooltip for a specific event. The method accepts
one argument - a Scheduler Event object or it's index.
Usage:
scheduler.openEventTooltip(1);
The Event Menu will appear for the appropriate event element in the Scheduler view only if the event is in view.
- closeEventTooltip - closes the Event Menu if opened.
Smart.Scheduler can have restricted dates which do not allow events. In order to check if an event starts or ends on or contains a restricted date, a method is available:
- isEventRestricted - returns a boolean indicating whether the event object that was passed
as an
argument to the method starts on, ends on or contains a restricted date which makes it a
restricted event and will not be displayed inside the Scheduler view.
Usage:
const isEventRestricted = scheduler.isEventRestricted({
    label: 'Event',
    dateStart: new Date(2020, 11, 24, 9, 30),
    dateEnd: new Date(2020, 11, 24, 12, 30)
});
The event is restricted if it's dateStart/dateEnd or date in between is one of the dates defined in the restrictedDates property.
Window Methods
Smart.Scheduler window is used to create or edit events. By deault it is triggered when the user interacts with the Scheduler. However it is also possible to open the window via API methods:
- openWindow - opens the Scheduler Window to create or edit an event depending on the
method
argument. The method accepts one argument - a Scheduler event object. If the method is called
with no arguments the Window will appear to create a new event.
Editing an existing event:
scheduler.openWindow(1);
Create a new event:
scheduler.openWindow();
If no argument is passed when calling the method then a new event is created with a dateStart equal to dateCurrent property and duration depending on the timelineDayScale property of the Smart.Scheduler.
- closeWindow - closes the Scheduler Window if opened.
Usage:
scheduler.closeWindow();
Notifications Methods
Smart.Scheduler notifications are defined in the event object definition. However notifications can also be fired via API methods:
- openNotification - opens a new custom notification based on the arguments of the method.
The method accepts two arguments:
openNotification(message: string, toastSettings?: object)
The message parameter represents a string that will be used as the content for the notificaiton.
The toastSettings parameter is optional. It allows to change the properties of the Smart.Toast element that is used to display the notifications. This is useful when the user wants to open a notification at a different position, e.g. 'top-left' or 'bottom-left'.
Usage:
scheduler.openNotification('This is a custom notification', { autoClose: true, type: 'warning' });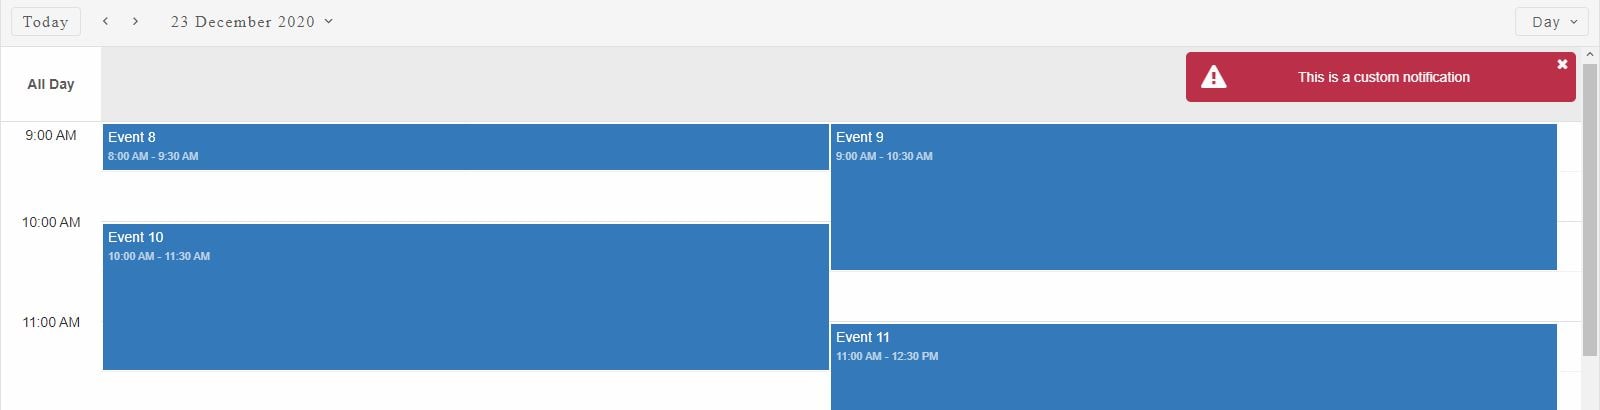
Calling the method with toastSettings parameter passed to the method represents official Smart.Toast properties that will be set to the element. For more information on Smart.Toast element properties check the Docs section on the HTMLElements website.
- closeNotifications - closes all notificaitons.
Usage:
scheduler.closeNotifications();
Additional Methods
The following additional methods are avaialble:
- print - opens a print preview of the Sheduler. The print preview consists of a table with columns for the event properties. This method is part of the Export functionality of the Smart.Sheduler and can be configured. There's a dedicated topic on the matter on the website.
- getCellDateRange - returns the dateStart and dateEnd of a Scheduler view cell element. This method returns an object with the dateStart and dateEnd of the timeline cell element that was passed as an argument.
- isDateRestricted - returns a boolean depending on whether the date passed as an argument
is restricted or not.
restrictedDates is a Smart.Scheduler property that defines an array of dates which do not allow events on. This method allows to check whether a date is restricted or not.
Usage:
scheduler.isDateRestricted(new Date(2020,11,24));
- refresh - refreshes the ScrollBars inside the Smart.Sheduler. The mathod takes one optional parameter of type boolean which indicates whether to do a full refresh or not. A full refresh means that the Scheduler will re-render the view.
- exportData - exports the events of the Smart.Scheduler to a file. The method accepts one argument - the type of file to export. Possible export types include: 'xlsx', 'pdf', 'html', 'ical'. You can read more about Smart.Scheduler Export functionality in a separate topic on the website.
For AI tooling
Developer Quick Reference
Topic: scheduler-methods Component: Scheduler Framework: JavaScript
Main methods: beginUpdate(), insertEvent(), endUpdate(), clearState(), getState(), loadState(), saveState(), containsEvent(), scrollToEvent(), updateEvent()
Common config keys: views
Implementation Notes
Compatibility: Modern browsers / Web Components API access pattern: const component = document.querySelector(...) + component.method()
Lifecycle guidance: Initialize configuration first, then invoke imperative API when element is available in DOM.
Common pitfalls:
- Calling methods before element initialization.
- Reassigning large configuration partially without understanding merge behavior.
- Missing required module script import for component type.
Validation checklist:
- Ensure module scripts and CSS are loaded once.
- Keep data schema aligned with columns/series definitions.
- Verify method calls target initialized component instance.