Build your web apps using Smart Custom Elements
Smart.Scheduler - Windows
Scheduler Windows
The Smart.Scheduler uses a Smart.Window component that allows to edit the events. By default the Window allows to edit the properties that are used by the Smart.Scheduler.
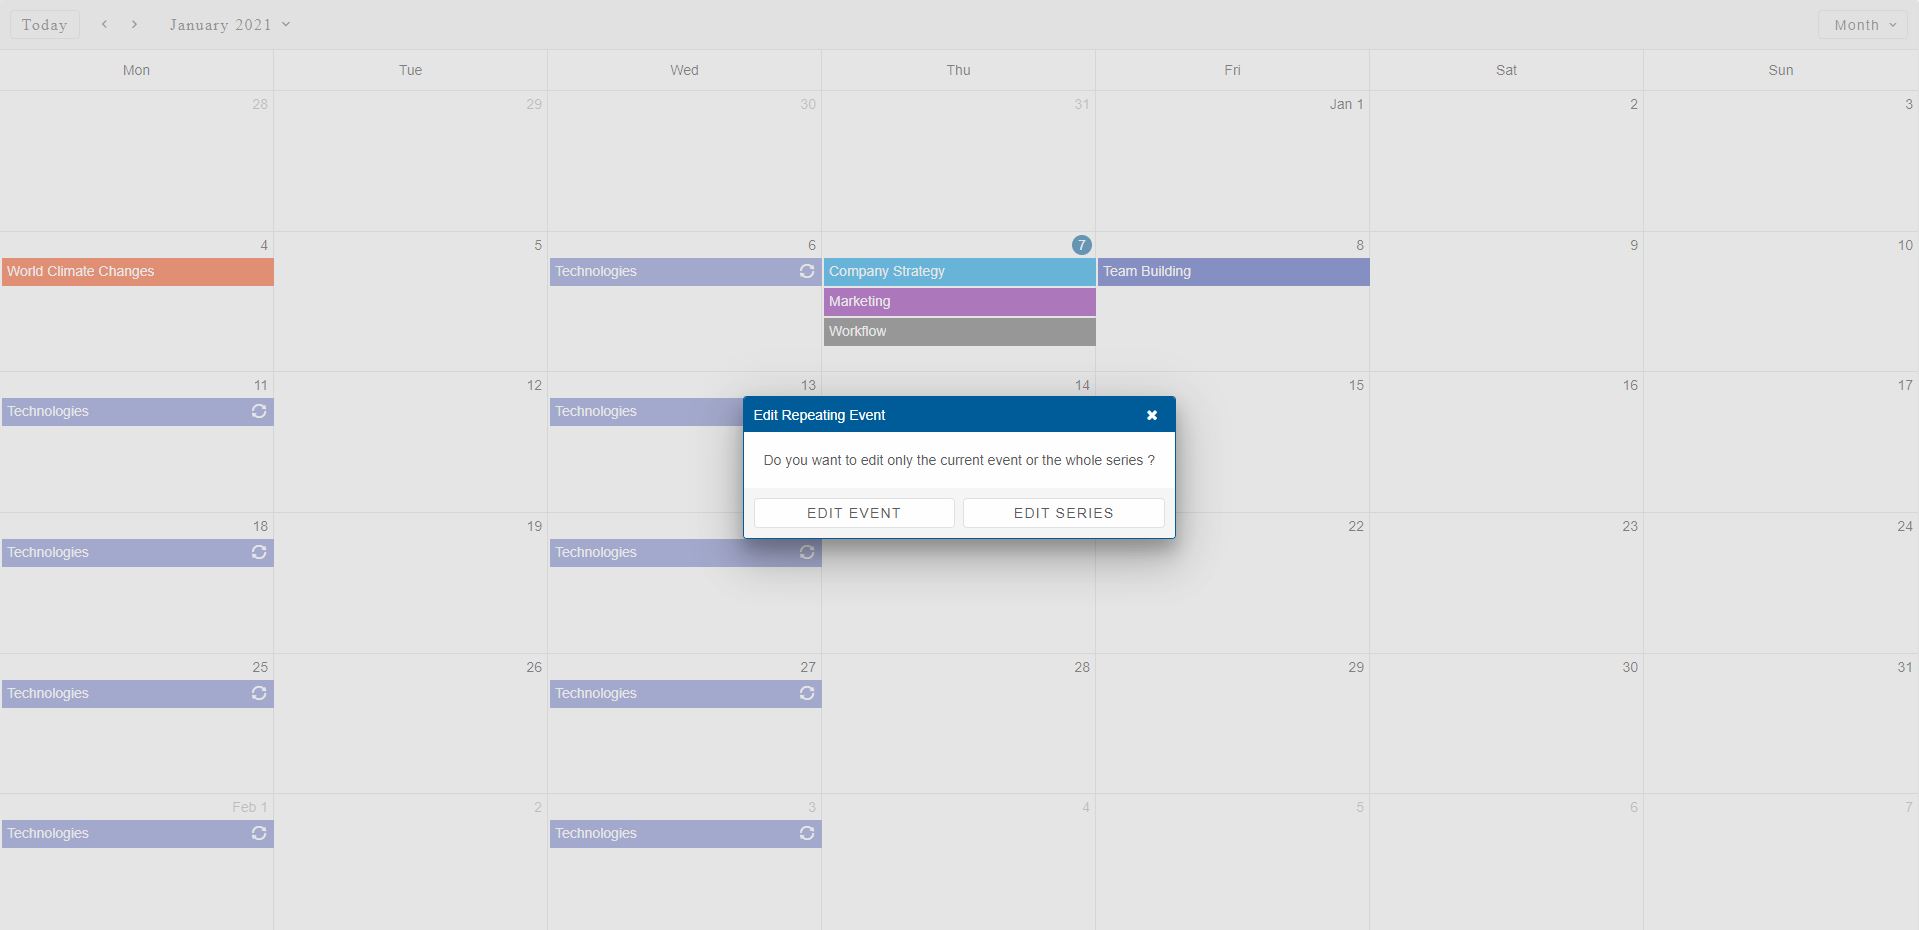
Two types of windows are used inside the Smart.Scheduler: default window and confirm window. The default window is used to edit events while the confirm window is used only for repeating events. It prompts the user to select whether to edit the original repeating series or create an event exception.
Smart.Scheduler windows are modal by default and are placed in the DOM body. The window is always possitioned in the center of the Smart.Scheduler but can be dragged anywhere on the page. The window is configred to always fit in the viewport.
The Smart.Scheduler fires the following events related to the Window:
- editDialogOpening - fired when the Window is going to open. This event is triggered when
the user
is about to open the window and allows to cancel the opening operation.
Here's how to prevent the window from opening:
document.querySelector('smart-scheduler').addEventListener('editDialogOpening', function(event) { //Event details const detail = event.detail; //Prevent the default action of the event - prevents the window from opening event.preventDefault(); }); - editDialogOpen - fired when the window is opened.
document.querySelector('smart-scheduler').addEventListener('editDialogOpen', function(event) { //Event details const detail = event.detail; }); - editDialogClosing - fired when the Window is going to close. This events triggered when
the user
is about to close the window and allows to cancel the closing operation.
document.querySelector('smart-scheduler').addEventListener('editDialogClosing', function(event) { //Event details const detail = event.detail; //Prevent the default action of the event - prevents the window from closing event.preventDefault(); }); - editDialogClose - fired when the window is closed.
document.querySelector('smart-scheduler').addEventListener('editDialogClose', function(event) {
    //Event details
    const detail = event.detail;
});
All window events contain details regarding the event that is triggered and the Scheduler event object that is the target of the operation.
The Smart.Scheduler window can also be manipulated via the API methods. This is usefull when the user wants to create a new scheduler event via the window. The following methods are available:
- openWindow - opens the Scheduler Window in order to edit or create a new event.
The method accepts a single argument - the Scheduler event object that will be edited. If no
arguments are passed to the method then the window will open allowing to create a new event from
the current time.
openWindow(eventObj: object)
The Scheduler object that is passed as an argument to the function is checked whether it exists in the Scheduler or not. If exists then the event will be edited. If not it will be added as a new event.
- closeWindow - closes the currently opened window. The method does not takes any
arguments. It closes the window that is currently opened by not applying the changed made to the
window editors.
closeWindow()
More details about the Scheduler API are available in the DOC section on the website.
Smart.Scheduler windows can be customized. They can have additional content added or can be completely customized for a different purpose.
Event Window
The Scheduler event window consists of two panels:
- Main panel - contains editors for the main properties of the events like: 'label', 'description', 'dateStart', 'dateEnd' and others.
- Repeat panel - contains editors for the repeating properties of the events like: 'repeatInterval', 'repeatFrequency', 'repeatEnd' and others.
By default the Repeating panel is not shown. It is displayed if the edited event is a repeating event or the 'Repeat' button is switched on. When the 'Repeat' switch button is on the additional repeating panel is unfolded.
The Event Window can be triggered by one of the following actions:
- Double click on a Scheduler event
- Right click on a Scheduler event or cell and select the 'Edit Event' or 'Create a new Event' item ( via the Scheduler Context Menu).
- Pressing 'Enter' on a focused cell or event
Let's create a Smart.Scheduler component with a number of events:
const today = new Date();

today.setHours(0, 0, 0, 0);

const data = [
    {
        label: 'World Climate Changes',
        dateStart: new Date(today.getFullYear(), today.getMonth(), today.getDate() - 3, 12, 0, 0),
        dateEnd: new Date(today.getFullYear(), today.getMonth(), today.getDate() - 3, 15, 30, 0),
        allDay: true,
        image: '../images/carousel-square-7.jpg',
        speaker: ['Linda', 'Maria'],
        backgroundColor: '#F4511E'
    },
    {
        label: 'Technologies',
        dateStart: new Date(today.getFullYear(), today.getMonth(), today.getDate() - 1, 10, 0, 0),
        dateEnd: new Date(today.getFullYear(), today.getMonth(), today.getDate() - 1, 12, 0, 0),
        allDay: true,
        image: '../images/smart-home-3148026_1920.jpg',
        speaker: ['Christopher', 'Nina'],
        backgroundColor: '#7986CB'
    },
    {
        label: 'Company Strategy',
        dateStart: new Date(today.getFullYear(), today.getMonth(), today.getDate(), 6, 0, 0),
        dateEnd: new Date(today.getFullYear(), today.getMonth(), today.getDate(), 22, 30, 0),
        allDay: true,
        image: '../images/digital-marketing-1725340_960_720.jpg',
        speaker: ['Michael', 'Ivan'],
        backgroundColor: '#039BE5'
    }, {
        label: 'Marketing',
        dateStart: new Date(today.getFullYear(), today.getMonth(), today.getDate(), 6, 0, 0),
        dateEnd: new Date(today.getFullYear(), today.getMonth(), today.getDate(), 22, 0, 0),
        image: '../images/store.jpg',
        speaker: ['Marian'],
        backgroundColor: '#8E24AA'
    }, {
        label: 'Workflow',
        dateStart: new Date(today.getFullYear(), today.getMonth(), today.getDate(), 8, 0, 0),
        dateEnd: new Date(today.getFullYear(), today.getMonth(), today.getDate(), 18, 0, 0),
        image: '../images/office-1209640_960_720.jpg',
        speaker: ['Michelle', 'Christy', 'Nicole'],
        backgroundColor: '#616161'
    }, {
        label: 'Team Building',
        dateStart: new Date(today.getFullYear(), today.getMonth(), today.getDate() + 1, 10, 0, 0),
        dateEnd: new Date(today.getFullYear(), today.getMonth(), today.getDate() + 1, 18, 30, 0),
        image: '../images/carousel-square-4.jpg',
        speaker: ['Natalie'],
        backgroundColor: '#3F51B5'
    }
];

window.Smart('#scheduler', class {
    get properties() {
        return {
            //Properties
            dataSource: data,
            view: 'month',
            views: [],
            firstDayOfWeek: 1
        }
    }
});
The Scheduler event definitions contain additional properties like 'speaker' and 'image' that are going to be handled differently by customizing the window later in this topic.
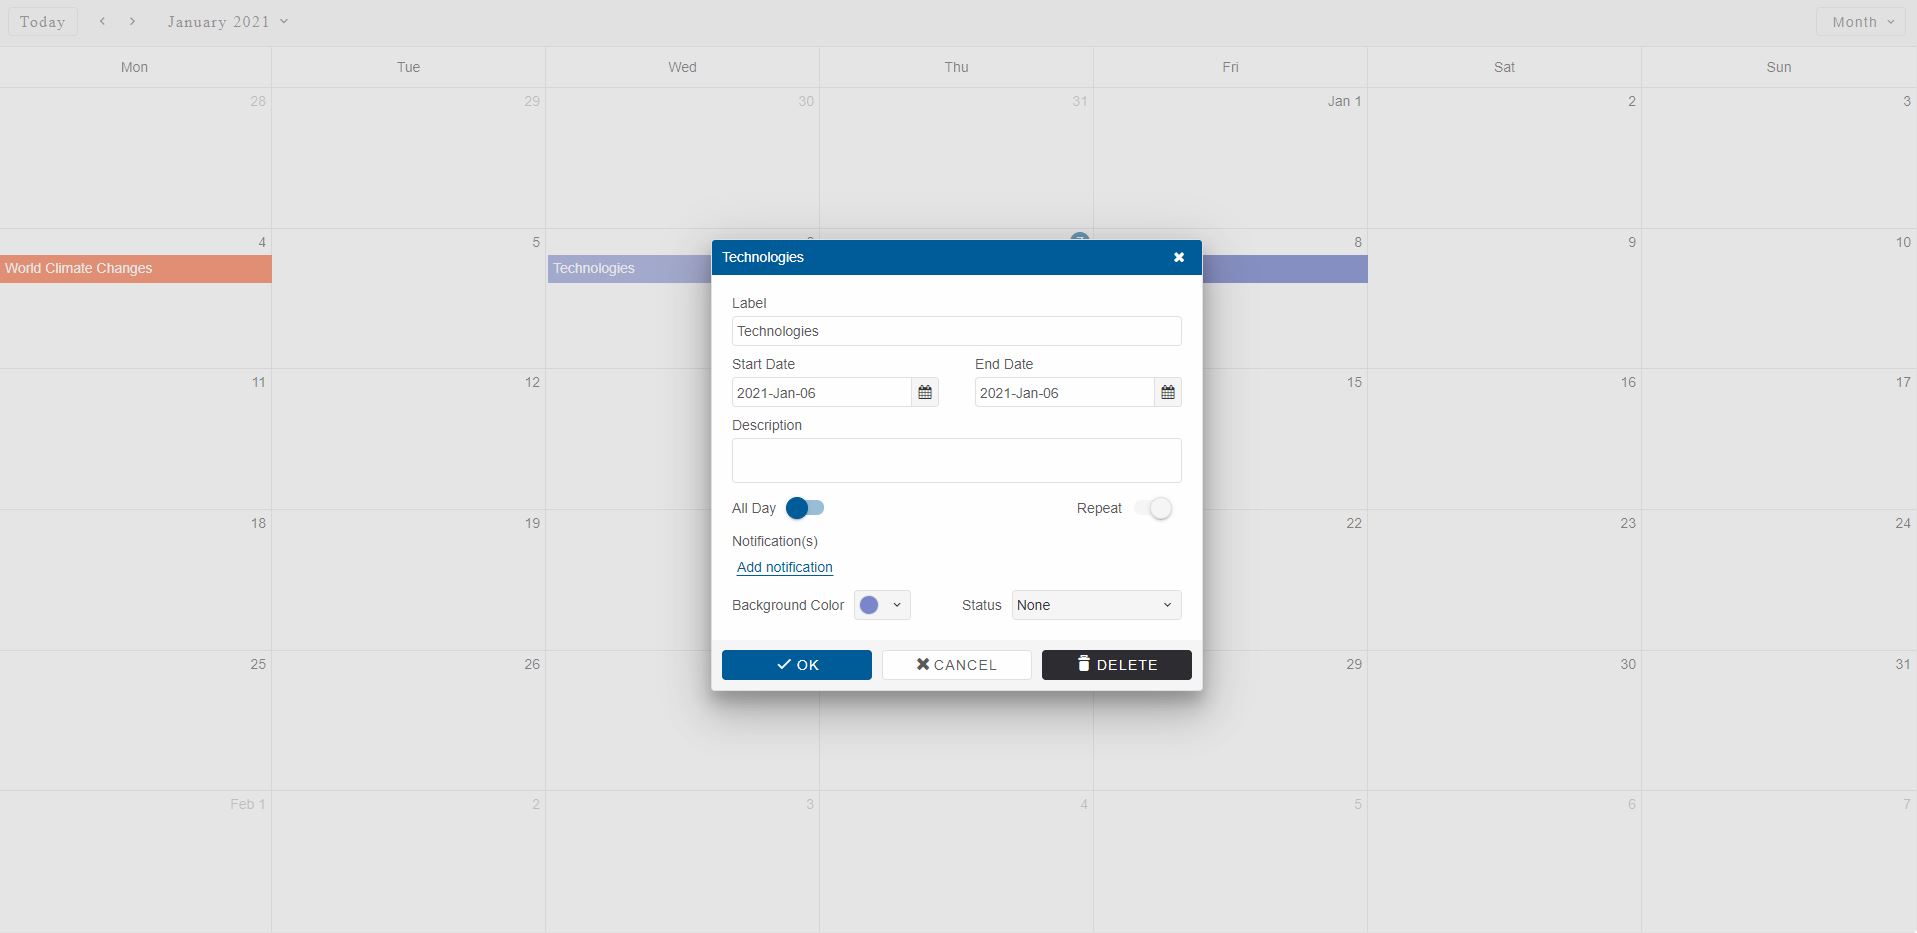
Double clicking on the 'Technologies' event triggers the window:
Demo
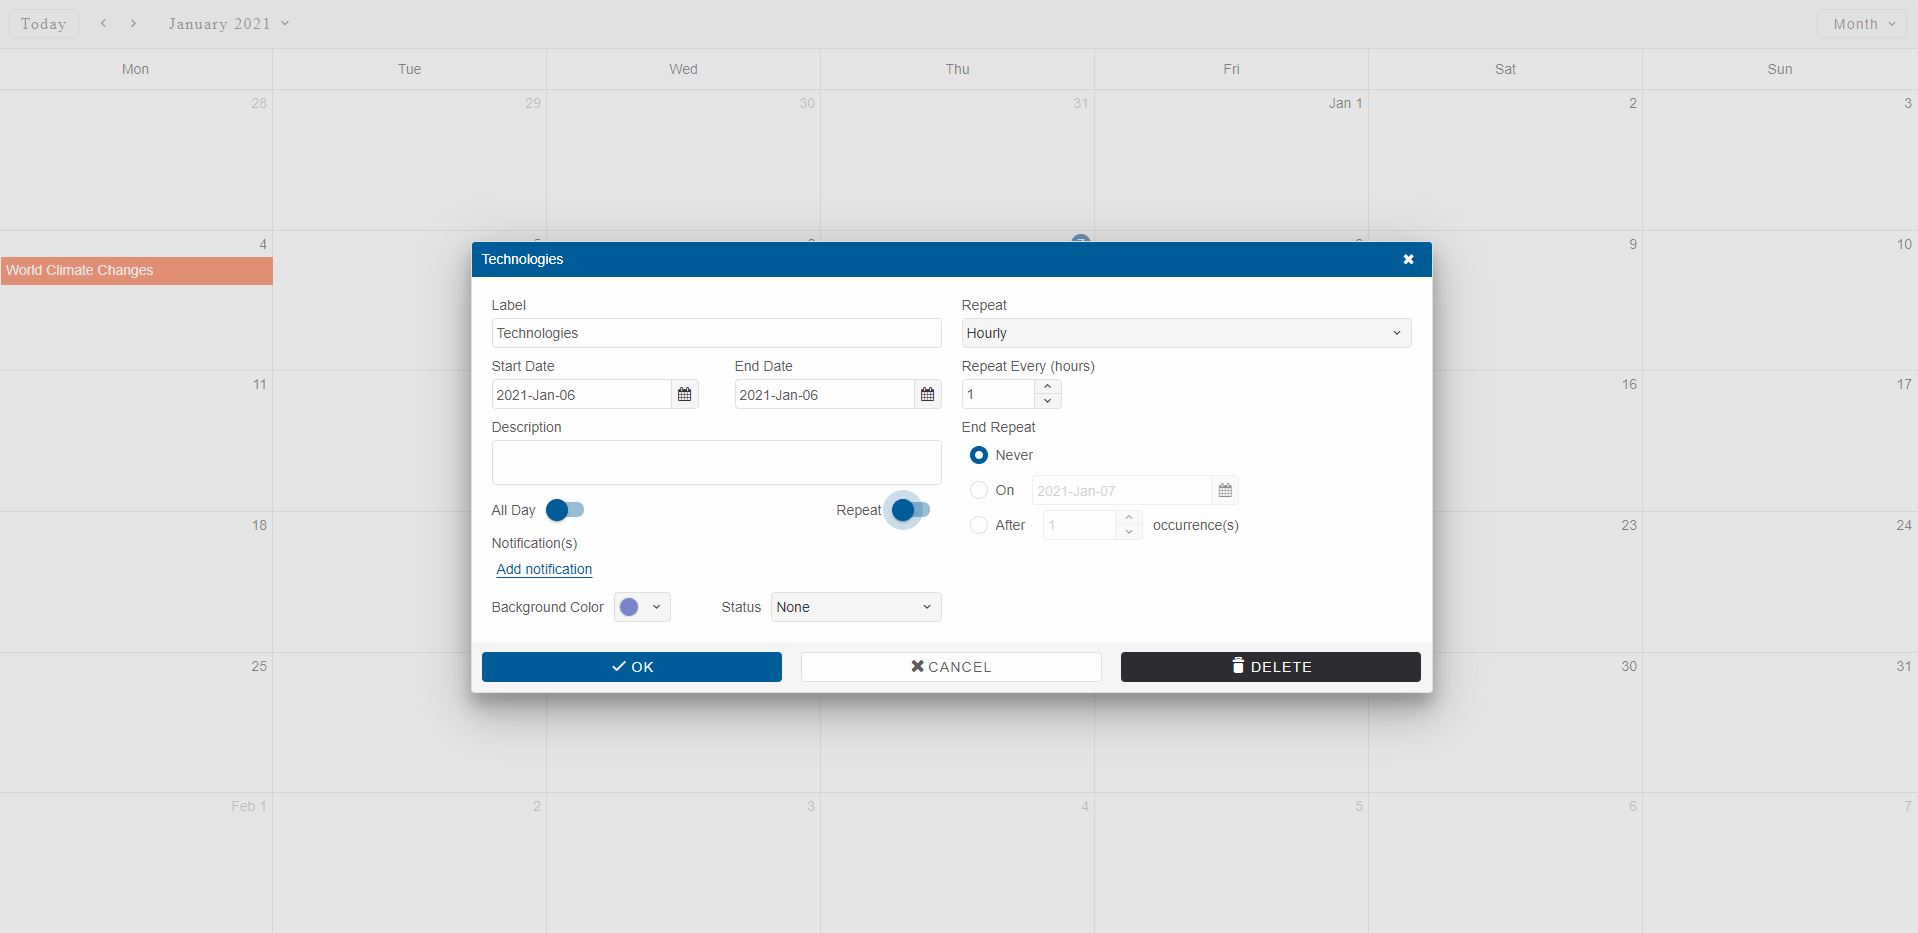
Switching on the 'Reepat' button will display the Repeating options for the event:
Demo
The footer of the window contains three action buttons:
Ok - a button that submits the changes to the event.
Cancel - a button that cancels the changes to the event.
Delete - a button that deletes the event.
The changes made to the editors are not applied until the 'OK' button is pressed.
Smart.Scheduler Window can be completely customized. There are scenarios where the user might want to use the window for a different purpose. The windowCustomizationFunction property allows to customize the content of the window and the window itself.
The property represents a function with the following parameters:
- target - a reference to the Smart.Window component.
- type - the type of window. By defaults it's an empty string which indicates that it's the default window. The only possible option is 'confirm' which indicates that the window is a 'confirm' window.
- eventObj - the Scheduler event object that was clicked in order to open the window.
Here's how to customize the content of the window:
window.Smart('#scheduler', class {
get properties() {
return {
//Properties
dataSource: data,
view: 'month',
views: [],
firstDayOfWeek: 1,
windowCustomizationFunction: function (target, type, event) {
//We want to constomize the event window, so if the window is type 'confirm' return
if (type) {
return;
}
const scheduler = document.querySelector('smart-scheduler'),
events = scheduler.events;
target.footerPosition = 'none';
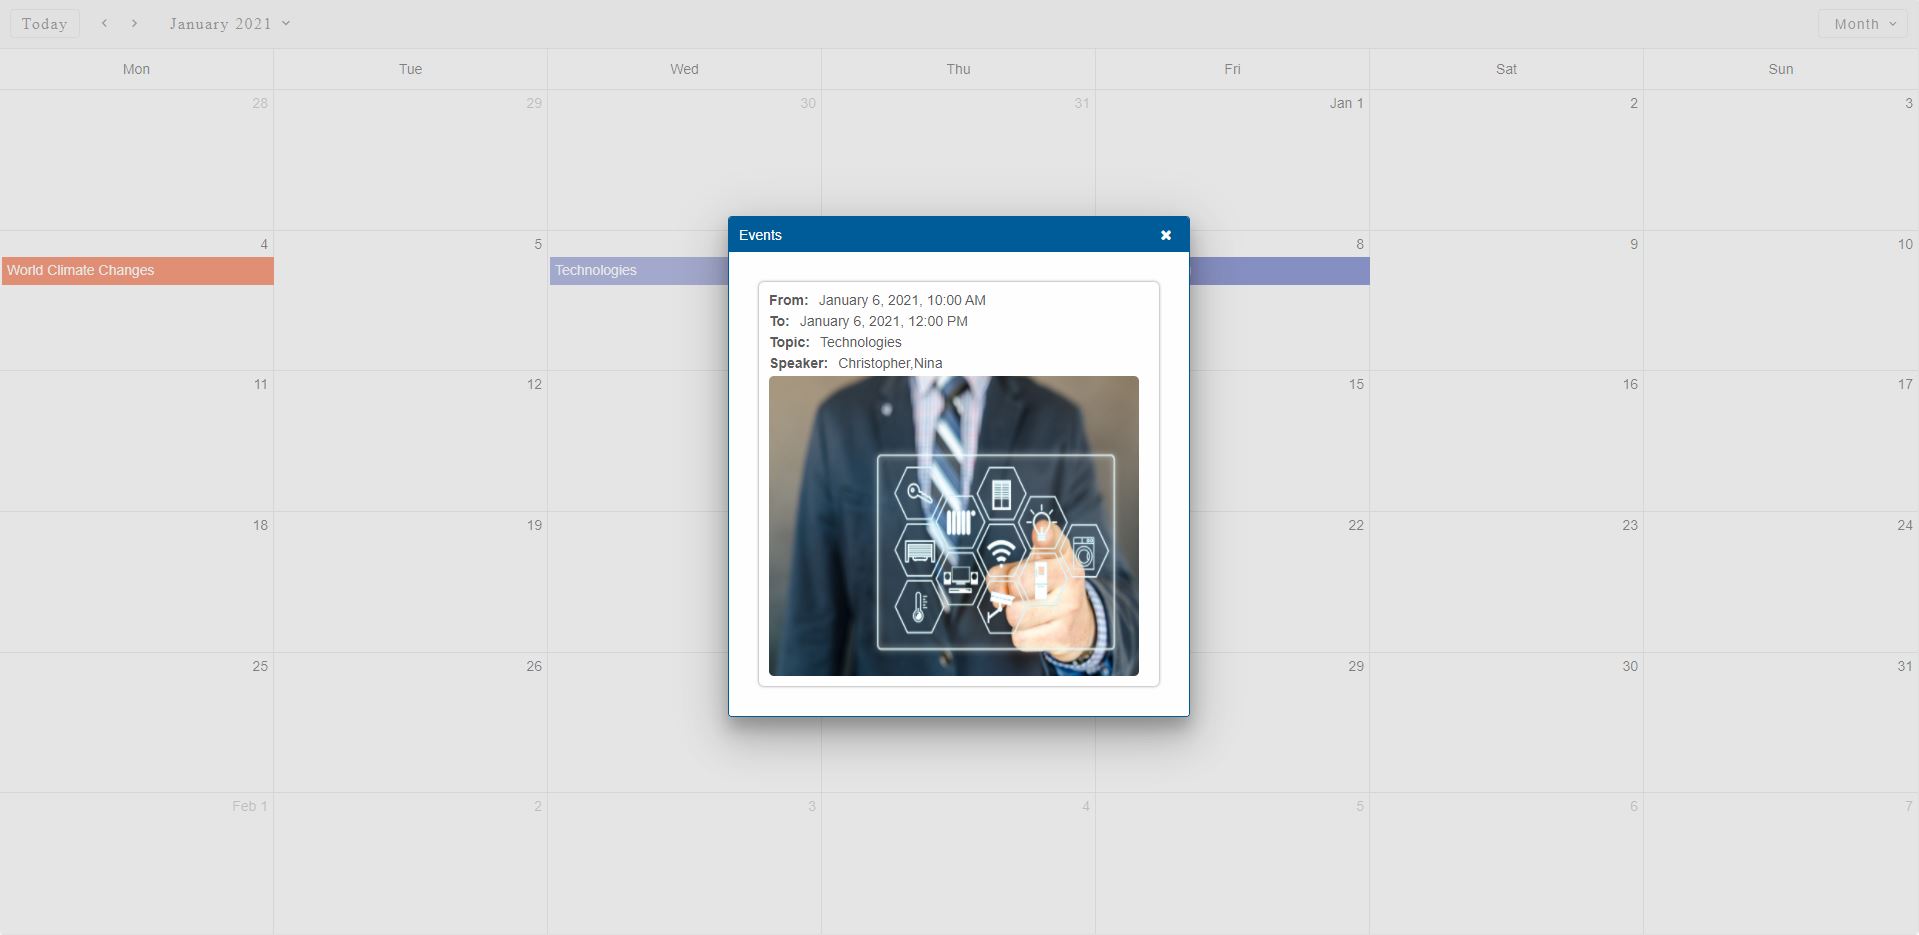
target.label = eventObj.label ? eventObj.label : 'Events';
let container = target.querySelector('.custom-container');
if (!container) {
//Empty the window
target.clear();
container = document.createElement('div');
container.classList.add('custom-container');
}
container.remove();
container.innerHTML = '';
if (!scheduler.containsEvent(event)) {
//A cell is clicked. Show all events for the target cell
for (let i = 0; i < events.length; i++) {
const e = events[i];
if (e.dateStart.getTime() >= event.dateStart.getTime() && e.dateEnd.getTime() <= event.dateEnd.getTime()) {
container.appendChild(createCard(events[i]));
}
}
}
else {
//Event is clicked. Show the event
container.appendChild(createCard(event));
}
//Show placeholder if no events
if (!container.innerHTML) {
container.innerHTML = 'No events at this time';
}
target.appendChild(container);
}
};
}
});
In the example above we also modify the Scheduler window in order to remove the footer and change the window label.
Here's what the window looks like when opened:
Demo
Instead of customizing the whole window, the user might want to make smaller changes to the existing editors or add more. This is also possible via the Smart.Scheduler API.
The Window editors can be customized by the user via the editDialogOpen event which is fired when the window is opened. The event contains details regarding the window editors. Here's how to customize some of the editors and add additional editors for custom Scheduler event properties:
const today = new Date(),
todayDate = today.getDate(),
currentYear = today.getFullYear(),
currentMonth = today.getMonth(),
data = [
{
label: 'Google AdWords Strategy',
dateStart: new Date(currentYear, currentMonth, todayDate, 9, 0),
dateEnd: new Date(currentYear, currentMonth, todayDate, 10, 30),
rating: 4,
progress: 35,
backgroundColor: '#039BE5'
}, {
label: 'New Brochures',
dateStart: new Date(currentYear, currentMonth, todayDate - 1, 11, 30),
dateEnd: new Date(currentYear, currentMonth, todayDate - 1, 14, 15),
rating: 2.5,
progress: 75,
backgroundColor: '#0B8043'
}, {
label: 'Brochure Design Review',
dateStart: new Date(currentYear, currentMonth, todayDate + 2, 13, 15),
dateEnd: new Date(currentYear, currentMonth, todayDate + 2, 16, 15),
rating: 5,
progress: 50,
backgroundColor: '#3F51B5'
}
];
window.Smart('#scheduler', class {
get properties() {
return {
//Properties
view: 'week',
dataSource: data,
firstDayOfWeek: 1
};
}
});
window.onload = function () {
const scheduler = document.querySelector('smart-scheduler');
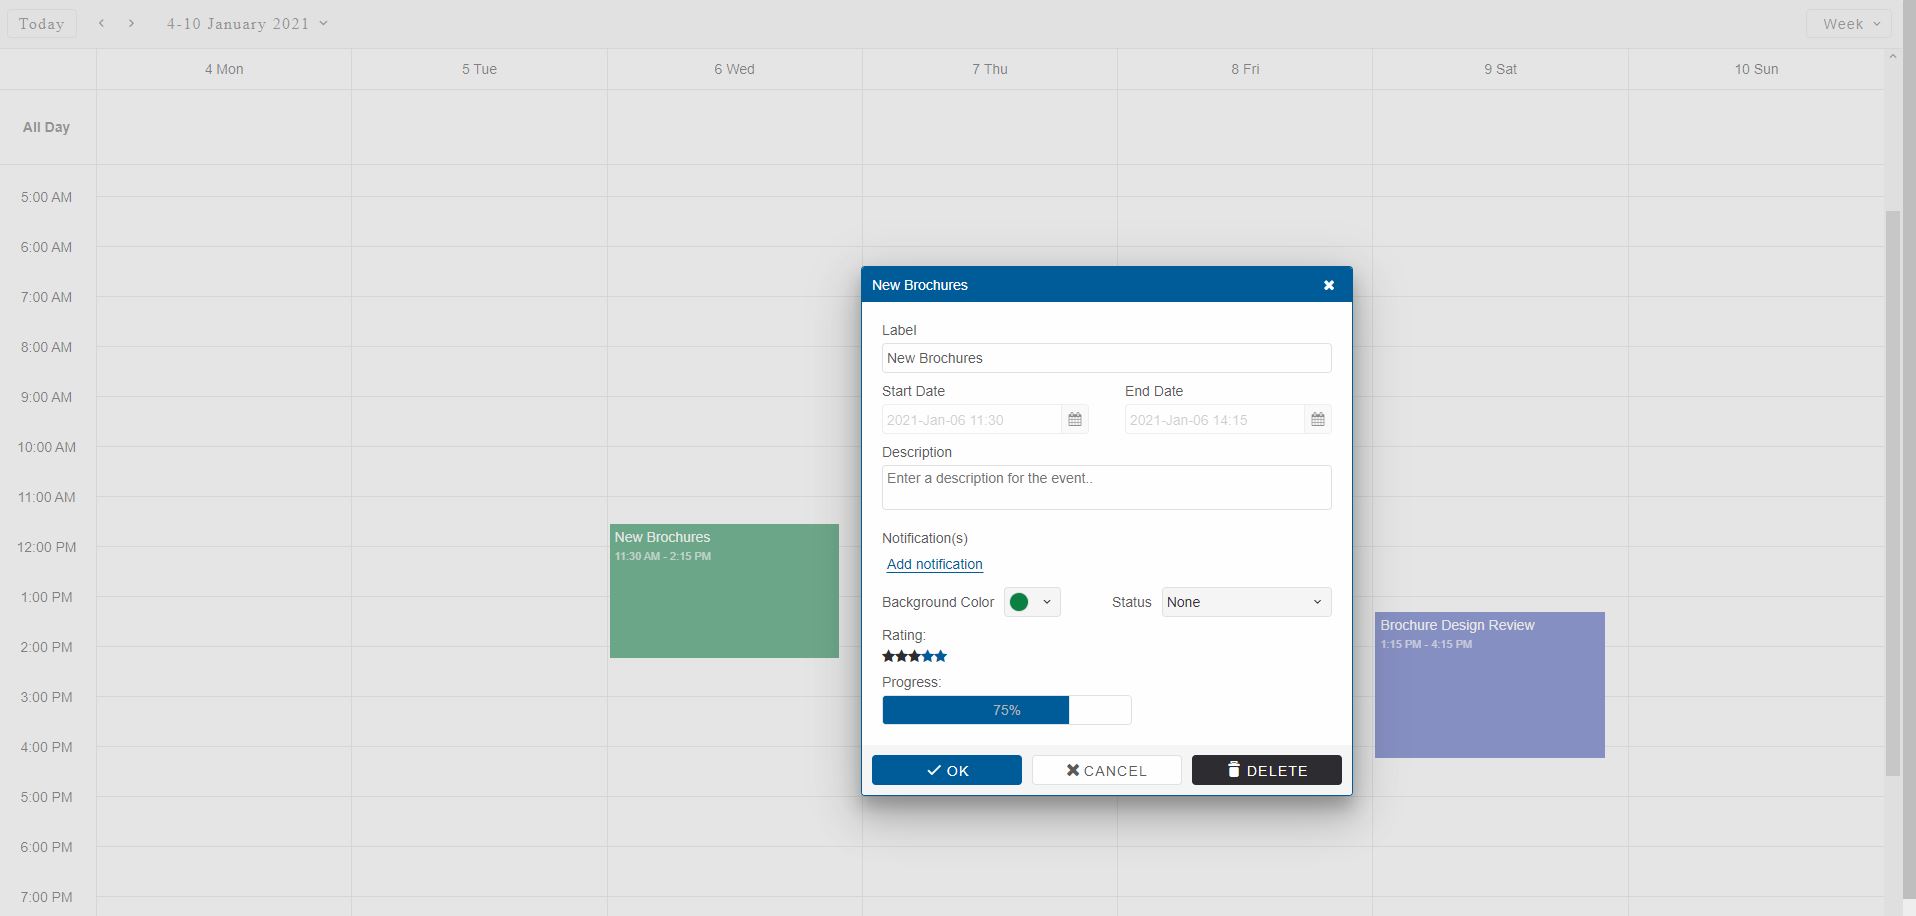
scheduler.addEventListener('editDialogOpen', function (event) {
const editors = event.detail.editors;
if (!editors) {
return;
}
const schedulerEvent = event.detail.item,
descriptionEditor = editors.description,
dateStartEditor = editors.dateStart,
dateEndEditor = editors.dateEnd,
labelEditor = editors.label,
allDayEditor = editors.allDay,
repeatEditor = editors.repeat,
editorsContainer = editors.description.parentElement;
dateStartEditor.querySelector('.smart-element').disabled = true;
dateEndEditor.querySelector('.smart-element').disabled = true;
repeatEditor.classList.add('smart-hidden');
allDayEditor.classList.add('smart-hidden');
labelEditor.querySelector('.smart-element').placeholder = 'Enter a label...';
descriptionEditor.querySelector('.smart-element').placeholder = 'Enter a description for the event..';
//Rating Element
let ratingElement = editorsContainer.querySelector('#eventRating');
if (!ratingElement) {
const elementContainer = document.createElement('div'),
label = document.createElement('label');
label.textContent = 'Rating: ';
elementContainer.classList.add('smart-scheduler-window-editor');
elementContainer.appendChild(label);
ratingElement = document.createElement('smart-rating');
ratingElement.id = 'eventRating';
elementContainer.append(ratingElement);
editorsContainer.appendChild(elementContainer);
}
ratingElement.value = schedulerEvent.rating || 1;
//ProgressBar
let progressElement = editorsContainer.querySelector('#eventProgress');
if (!progressElement) {
const elementContainer = document.createElement('div'),
label = document.createElement('label');
label.textContent = 'Progress: ';
elementContainer.classList.add('smart-scheduler-window-editor');
elementContainer.appendChild(label);
progressElement = document.createElement('smart-progress-bar');
progressElement.id = 'eventProgress';
progressElement.showProgressValue = true;
elementContainer.appendChild(progressElement);
editorsContainer.appendChild(elementContainer);
}
progressElement.value = schedulerEvent.progress || 0;
});
};
The event.detail.editors is an object that contains references to all default Scheduler editors. Each editor is wrapped in a editor container that also contains a label for the editor. All default editors are Smart components and share the same class - 'smart-element' which makes it easy to target them.
In the demo above, the repeating and all day editors are hidden and the dateStart and dateEnd editors are disabled. In addition to that a Smart.ProgressBar and Smart.Rating components are added to display the 'rating' and 'progress' property values of the Scheduler event object.
Here's the result of the customization:
Demo
Repeating Events Confirm Window
The other window type that is used inside the Smart.Scheduler is the 'confirm' window which is used only for Repeating Events. It prompts the user when clicked on a repeating event to choose whether to edit the original repeating series or create/edit an event exception.
Clicking on the 'Edit event' button opens the default window to edit event properties.
Clicking on the 'Edit series' button will open the default window to edit the original repeating event. If the repeating series contains exceptions that are hidden, it is possible to reset them via an additional check box that appears at the bottom of the window repeating panel only when hidden exceptions for the event exist.
Demo
The Repeating Event Confirm window can be eddited in the same way as the default window.
For AI tooling
Developer Quick Reference
Topic: scheduler-windows Component: Scheduler Framework: JavaScript
Main methods: containsEvent(), addEventListener()
Common config keys: dataSource, views
Implementation Notes
Compatibility: Modern browsers / Web Components API access pattern: const component = document.querySelector(...) + component.method()
Lifecycle guidance: Initialize configuration first, then invoke imperative API when element is available in DOM.
Common pitfalls:
- Calling methods before element initialization.
- Reassigning large configuration partially without understanding merge behavior.
- Missing required module script import for component type.
Validation checklist:
- Ensure module scripts and CSS are loaded once.
- Keep data schema aligned with columns/series definitions.
- Verify method calls target initialized component instance.