Create a new Blazor App
To start building .NET apps, download and install the .NET SDK (Software Development Kit).
Check everything installed correctlyOnce you've installed, open a new command prompt and run the following command:
dotnet
If the command runs, printing out information about how to use dotnet, you're good to go.
Got an error?
If you receive a 'dotnet' is not recognized as an internal or external command error, make sure you opened a new command prompt
The Blazor framework provides templates to develop apps for each of the Blazor hosting models:
Blazor WebAssembly (blazorwasm)dotnet new blazorwasm -o BlazorApp
Blazor Server (blazorserver)
dotnet new blazorserver -o BlazorServerApp
Installation
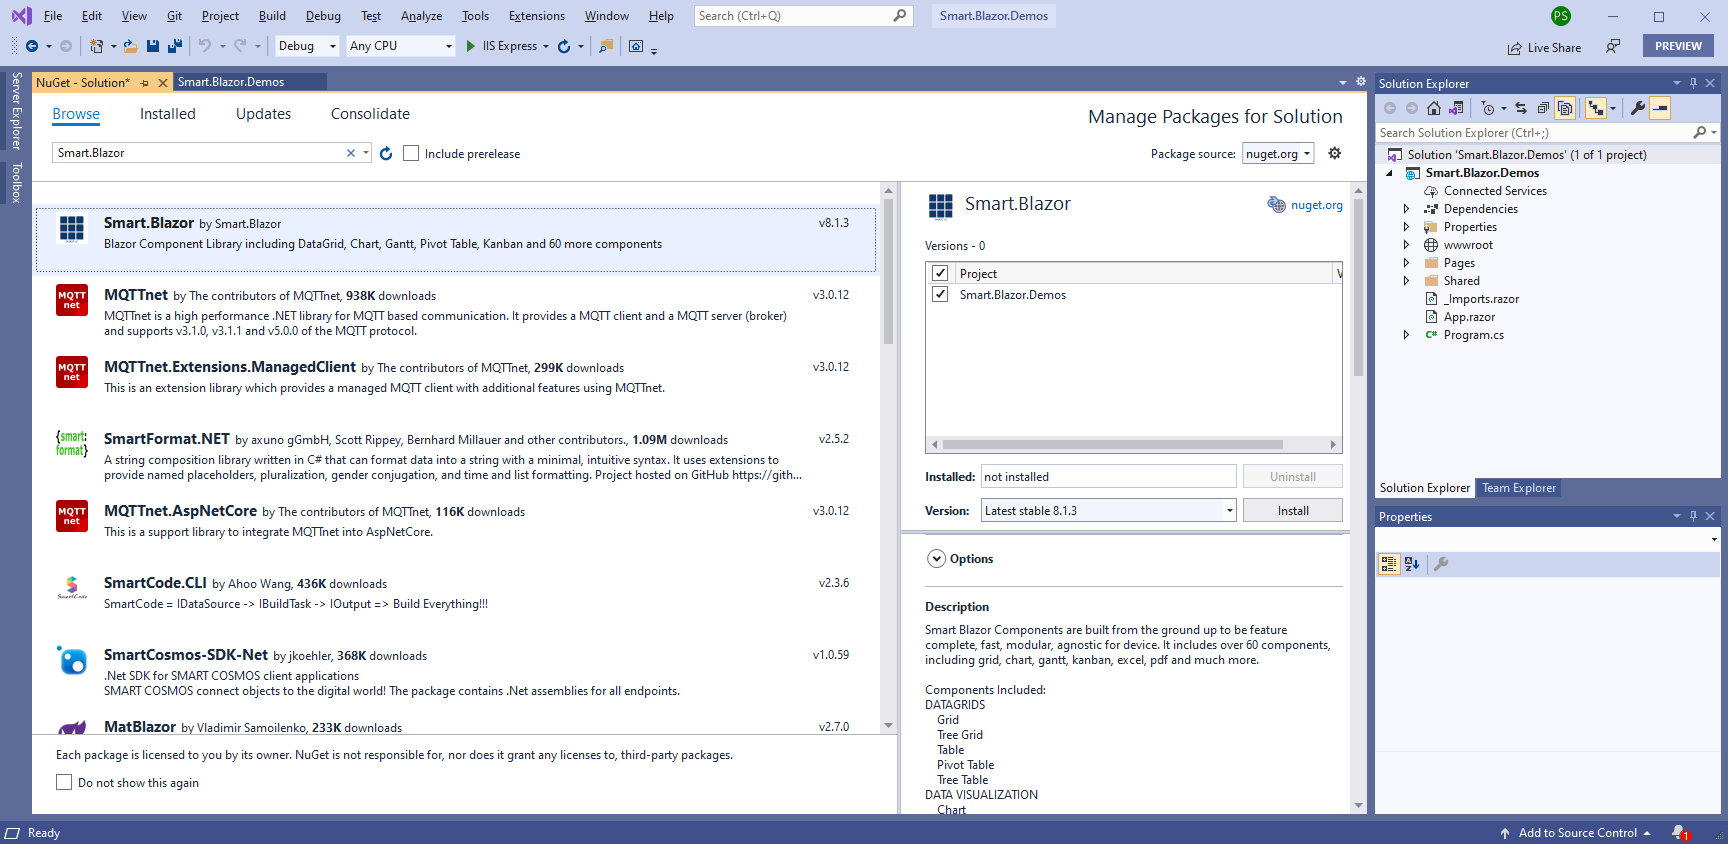
Smart.Blazor Components are distributed as the Smart.Blazor Nuget package. You can use any of the following options:- Install the package from command line by running dotnet add package Smart.Blazor
-
Alternatively, you can add the project from the Visual Nuget Package Manager.
-
Edit the .csproj file and add a project reference
<Project Sdk="Microsoft.NET.Sdk.Web">
	<PropertyGroup>
	<TargetFramework>net5.0</TargetFramework>
	<RootNamespace>BlazorApp</RootNamespace>
		</PropertyGroup>
	<ItemGroup>
	<PackageReference Include="Smart.Blazor" Version="11.0.46" />
	</ItemGroup>
</Project>
Import the Smart.Blazor namespace
Open the \_Imports.razor file of your Blazor application and add `@using Smart.Blazor`
Set a Theme
Open the \_Host.cshtml file (server-side Blazor) or wwwroot/index.html (client-side WebAssembly Blazor) and include a theme CSS file by adding this snippet
<link href="_content/Smart.Blazor/css/smart.default.css" rel="stylesheet" />You can include additional CSS themes for the Controls. Smart.Blazor package comes with Bootstrap and Material Themes.
Source files
Open the _Layout.cshtml(.NET 6, .NET 7) or _Host.cshtml file (server-side Blazor) or wwwroot/index.html (client-side WebAssembly Blazor) and include this snippet
<script src="_content/Smart.Blazor/js/smart.blazor.js"></script>
<script src="_content/Smart.Blazor/js/smart.elements.js"></script>
If you would like to use only a specific component, instead of referring the smart.elements.js, you can refer the component like that:
<script type="module" src="_content/Smart.Blazor/js/modules/smart.table.js"></script>
Registrations
Blazor WebAssembly
This step is mandatory for Blazor WebAssembly(client-side) and also for ASP.NET Core hosted project types. You should place the code into the Program.cs of your client project(.NET 6, .NET 7)
Program.cs
using BlazorApp;
using Microsoft.AspNetCore.Components.Web;
using Microsoft.AspNetCore.Components.WebAssembly.Hosting;
using Smart.Blazor;
var builder = WebAssemblyHostBuilder.CreateDefault(args);
builder.RootComponents.Add<App>("#app");
builder.RootComponents.Add<HeadOutlet>("head::after");
builder.Services.AddScoped(sp => new HttpClient { BaseAddress = new Uri(builder.HostEnvironment.BaseAddress) });
builder.Services.AddSmart();
await builder.Build().RunAsync();
.NET 5
Program.csusing System;
using System.Net.Http;
using System.Collections.Generic;
using System.Threading.Tasks;
using System.Text;
using Microsoft.AspNetCore.Components.WebAssembly.Hosting;
using Microsoft.Extensions.Configuration;
using Microsoft.Extensions.DependencyInjection;
using Microsoft.Extensions.Logging;
using Smart.Blazor;
namespace BlazorApp
{
public class Program
{
public static async Task Main(string[] args)
{
var builder = WebAssemblyHostBuilder.CreateDefault(args);
builder.RootComponents.Add<App>
("#app");
builder.Services.AddSmart();
builder.Services.AddScoped(sp => new HttpClient { BaseAddress = new Uri(builder.HostEnvironment.BaseAddress) });
await builder.Build().RunAsync();
}
}
}
Blazor Server
This step is going only into the Program.cs((.NET 6, .NET 7)) or Startup.cs of your Blazor Server project. You will need to add
services.AddSmart(); in the ConfigureServices method and using Smart.Blazor; in the using statements.
.NET 6, .NET 7
Program.cs
using BlazorApp.Data;
using Microsoft.AspNetCore.Components;
using Microsoft.AspNetCore.Components.Web;
using Smart.Blazor;
var builder = WebApplication.CreateBuilder(args);
// Add services to the container.
builder.Services.AddRazorPages();
builder.Services.AddServerSideBlazor();
builder.Services.AddSingleton<WeatherForecastService>();
// Add Smart UI for Blazor.
builder.Services.AddSmart();
var app = builder.Build();
// Configure the HTTP request pipeline.
if (!app.Environment.IsDevelopment())
{
app.UseExceptionHandler("/Error");
// The default HSTS value is 30 days. You may want to change this for production scenarios, see https://aka.ms/aspnetcore-hsts.
app.UseHsts();
}
app.UseHttpsRedirection();
app.UseStaticFiles();
app.UseRouting();
app.MapBlazorHub();
app.MapFallbackToPage("/_Host");
app.Run();
.NET 5
Startup.csusing System;
using System.Collections.Generic;
using System.Linq;
using System.Threading.Tasks;
using Microsoft.AspNetCore.Builder;
using Microsoft.AspNetCore.Components;
using Microsoft.AspNetCore.Hosting;
using Microsoft.AspNetCore.HttpsPolicy;
using Microsoft.Extensions.Configuration;
using Microsoft.Extensions.DependencyInjection;
using Microsoft.Extensions.Hosting;
using BlazorApp.Data;
using Smart.Blazor;
namespace BlazorApp
{
public class Startup
{
public Startup(IConfiguration configuration)
{
Configuration = configuration;
}
public IConfiguration Configuration { get; }
// This method gets called by the runtime. Use this method to add services to the container.
// For more information on how to configure your application, visit https://go.microsoft.com/fwlink/?LinkID=398940
public void ConfigureServices(IServiceCollection services)
{
services.AddRazorPages();
services.AddServerSideBlazor();
services.AddSingleton<WeatherForecastService>();
services.AddSmart();
}
// This method gets called by the runtime. Use this method to configure the HTTP request pipeline.
public void Configure(IApplicationBuilder app, IWebHostEnvironment env)
{
if (env.IsDevelopment())
{
app.UseDeveloperExceptionPage();
}
else
{
app.UseExceptionHandler("/Error");
// The default HSTS value is 30 days. You may want to change this for production scenarios, see https://aka.ms/aspnetcore-hsts.
app.UseHsts();
}
app.UseHttpsRedirection();
app.UseStaticFiles();
app.UseRouting();
app.UseEndpoints(endpoints =>
{
endpoints.MapBlazorHub();
endpoints.MapFallbackToPage("/_Host");
});
}
}
}
Using Smart.Blazor Components
Use any Smart Blazor component by typing its tag name in a Blazor page e.g.<Button>Click Me</Button> If you are using client-side WebAssembly Blazor also add the following code to your .csproj file (after the closing RazorLangVersion element): <BlazorLinkOnBuild>false</BlazorLinkOnBuild>
Data binding a property
<Input Value="@text"></Input>
@code {
	string text = " Hi from Smart!";
 }
Events Handing
<Calendar id="calendar" OnChange=@OnChange></Calendar>
<div class="options">
	<div class="caption">Events</div>
	<div class="option" id="log">
	@eventLog
	</div>
</div>

@code {
	private string eventLog;

	private void OnChange(Event eventObj)
	{
		CalendarChangeEventDetail detail = eventObj\[" Detail & quot;\];

		eventLog = detail.Value\[0\].ToString();
	}
}
Alternatively you can do that:@page "/calendar"
<Calendar OnReady="OnReady" id="calendar" ></Calendar>
<div class="options">
<div class="caption">Events</div>
<div class="option" id="log">
@eventLog
</div>
</div>
@code {
private string eventLog;
private void OnReady(Calendar calendar)
{
calendar.Changed += delegate (object sender, CalendarChangedEventArgs args)
{
string value = args.Value\[0\].ToString();
eventLog = value;
StateHasChanged();
};
}
}
OnReady callback is called for each Blazor component, after it is initialized and rendered.
Blazor WebAssembly (blazorwasm) Example
1. Create a blazor application:
dotnet new blazorwasm -o BlazorApp
2. Navigate to the application:
cd BlazorApp
3. Add the Smart.Blazor package:
dotnet add package Smart.Blazor
4. Open _Imports.razor and add the following at the bottom:
@using Smart.Blazor
5. Open wwwroot/index.html and add the needed styles and scripts.
<!DOCTYPE html>
<html>

<head>
    <meta charset="utf-8" />
    <meta name="viewport" content="width=device-width, initial-scale=1.0, maximum-scale=1.0, user-scalable=no" />
    <title>Blazor WebAssembly App</title>
    <base href="/" />
    <link href="css/bootstrap/bootstrap.min.css" rel="stylesheet" />
    <link href="css/app.css" rel="stylesheet" />
    <link href="_framework/scoped.styles.css" rel="stylesheet" />
    <link href="_content/Smart.Blazor/css/smart.default.css" rel="stylesheet" />
    <script src="_content/Smart.Blazor/js/smart.blazor.js"></script>
    <script src="_content/Smart.Blazor/js/smart.elements.js"></script>
</head>

<body>
    <div id="app">Loading...</div>

    <div id="blazor-error-ui">
	An unhandled error has occurred.
	<a href="" class="reload">Reload</a>
	<a class="dismiss">🗙</a>
    </div>
    <script src="_framework/blazor.webassembly.js"></script>
</body>

</html>
6. Open Pages/Index.razor and replace the code as follows:@page "/"
@inject HttpClient Http
<h1>Weather forecast</h1>
<p>This component demonstrates fetching data from the server.</p>
@if (forecasts == null)
{
<p><em>Loading...</em></p>
}
else
{
<Table Selection="true" SortMode="TableSortMode.One" class="table">
<table>
<thead>
<tr>
<th>Date</th>
<th>Temp. (C)</th>
<th>Temp. (F)</th>
<th>Summary</th>
</tr>
</thead>
<tbody>
@foreach (var forecast in forecasts)
{
<tr>
<td>@forecast.Date.ToShortDateString()</td>
<td>@forecast.TemperatureC</td>
<td>@forecast.TemperatureF</td>
<td>@forecast.Summary</td>
</tr>
}
</tbody>
</table>
</Table>
}
@code {
private WeatherForecast[] forecasts;
protected override async Task OnInitializedAsync()
{
forecasts = await Http.GetFromJsonAsync<WeatherForecast[]>("sample-data/weather.json");
}
public class WeatherForecast
{
public DateTime Date { get; set; }
public int TemperatureC { get; set; }
public string Summary { get; set; }
public int TemperatureF => 32 + (int)(TemperatureC / 0.5556);
}
}
7. Edit Program.cs
using System;
using System.Net.Http;
using System.Collections.Generic;
using System.Threading.Tasks;
using System.Text;
using Microsoft.AspNetCore.Components.WebAssembly.Hosting;
using Microsoft.Extensions.Configuration;
using Microsoft.Extensions.DependencyInjection;
using Microsoft.Extensions.Logging;
using Smart.Blazor;
namespace BlazorApp
{
public class Program
{
public static async Task Main(string[] args)
{
var builder = WebAssemblyHostBuilder.CreateDefault(args);
builder.RootComponents.Add<App>("#app");
builder.Services.AddSmart();
builder.Services.AddScoped(sp => new HttpClient { BaseAddress = new Uri(builder.HostEnvironment.BaseAddress) });
await builder.Build().RunAsync();
}
}
}
8. Start the app and check the result
dotnet watch run
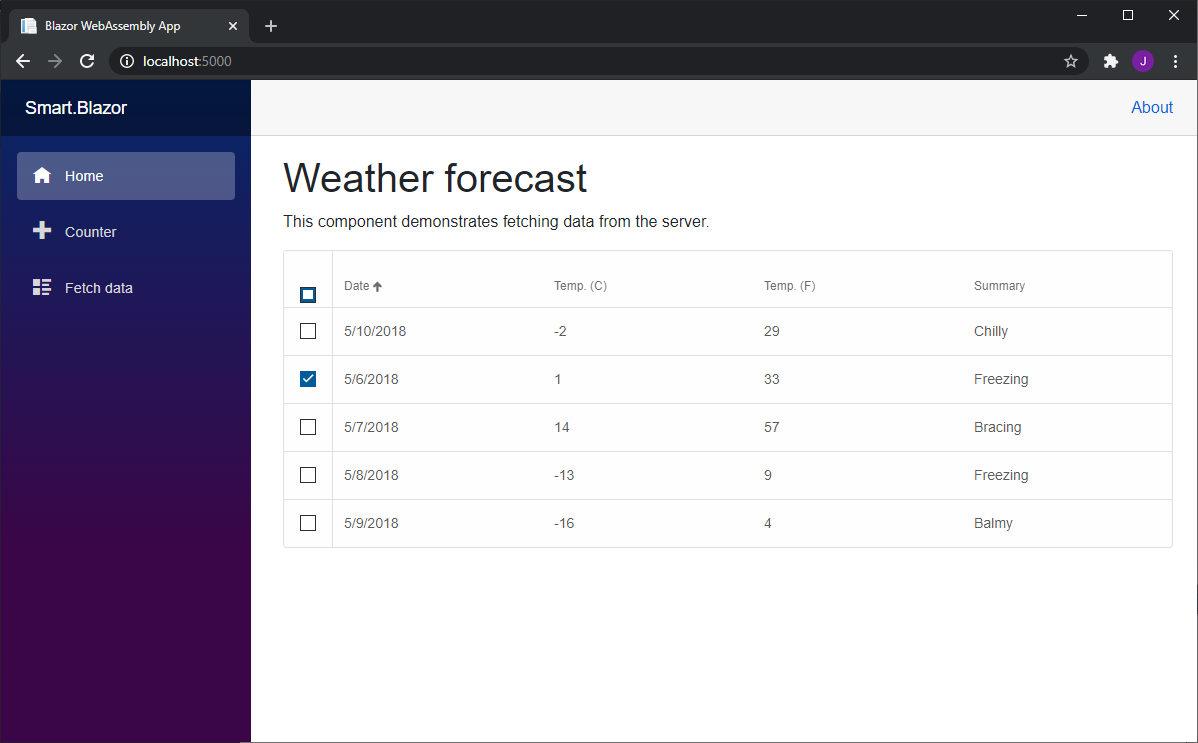
Wait for the app to display that it's listening on http://localhost:5000 and then, open a browser and navigate to that address.
Once you get to the following page, you have successfully run your first Blazor WebAssembly app using Smart UI for Blazor Components!
Output
Blazor Server (blazorserver) Example
1. Create a blazor application:
dotnet new blazorserver -o BlazorServerApp
2. Navigate to the application:
cd BlazorServerApp
3. Add the Smart.Blazor package:
dotnet add package Smart.Blazor
4. Open _Imports.razor and add the following at the bottom:
@using Smart.Blazor
5. Open Pages/_Host.cshtml and add the needed styles and scripts.
@page "/"
@namespace smart_blazor_app.Pages
@addTagHelper *, Microsoft.AspNetCore.Mvc.TagHelpers
@{
Layout = null;
}
<!DOCTYPE html>
<html lang="en">
<head>
<meta charset="utf-8" />
<meta name="viewport" content="width=device-width, initial-scale=1.0" />
<title>smart-blazor-app</title>
<base href="~/" />
<link rel="stylesheet" href="css/bootstrap/bootstrap.min.css" />
<link href="css/site.css" rel="stylesheet" />
<link href="_content/smart-blazor-app/_framework/scoped.styles.css" rel="stylesheet" />
<link href="_content/Smart.Blazor/css/smart.default.css" rel="stylesheet" />
<script src="_content/Smart.Blazor/js/smart.blazor.js"></script>
<script src="_content/Smart.Blazor/js/smart.elements.js"></script>
</head>
<body>
<component type="typeof(App)" render-mode="ServerPrerendered" />
<div id="blazor-error-ui">
<environment include="Staging,Production">
An error has occurred. This application may no longer respond until reloaded.
</environment>
<environment include="Development">
An unhandled exception has occurred. See browser dev tools for details.
</environment>
<a href="" class="reload">Reload</a>
<a class="dismiss">🗙</a>
</div>
<script src="_framework/blazor.server.js"></script>
</body>
</html>
6. Open Pages/Index.razor and replace the code as follows:
@page "/"

@inject HttpClient Http

<h1>Weather forecast</h1>

<p>This component demonstrates fetching data from the server.</p>

@if (forecasts == null)
{
	<p><em>Loading...</em></p>
}
else
{
	<Table Selection="true" SortMode="TableSortMode.One" class="table">
		<table>
			<thead>
				<tr>
					<th>Date</th>
					<th>Temp. (C)</th>
					<th>Temp. (F)</th>
					<th>Summary</th>
				</tr>
			</thead>
			<tbody>
				@foreach (var forecast in forecasts)
				{
					<tr>
						<td>@forecast.Date.ToShortDateString()</td>
						<td>@forecast.TemperatureC</td>
						<td>@forecast.TemperatureF</td>
						<td>@forecast.Summary</td>
					</tr>
				}
			</tbody>
		</table>
	</Table>
}

@code {
	private WeatherForecast[] forecasts;

	protected override async Task OnInitializedAsync()
	{
		forecasts = await Http.GetFromJsonAsync<WeatherForecast[]>("sample-data/weather.json");
	}

	public class WeatherForecast
	{
		public DateTime Date { get; set; }

		public int TemperatureC { get; set; }

		public string Summary { get; set; }

		public int TemperatureF => 32 + (int)(TemperatureC / 0.5556);
	}
}
7. Edit Startup.cs
You will need to add
services.AddSmart(); in the ConfigureServices method and using Smart.Blazor; in the using statements.
using System;
using System.Collections.Generic;
using System.Linq;
using System.Threading.Tasks;
using Microsoft.AspNetCore.Builder;
using Microsoft.AspNetCore.Components;
using Microsoft.AspNetCore.Hosting;
using Microsoft.AspNetCore.HttpsPolicy;
using Microsoft.Extensions.Configuration;
using Microsoft.Extensions.DependencyInjection;
using Microsoft.Extensions.Hosting;
using BlazorServerApp.Data;
using Smart.Blazor;

namespace BlazorServerApp
{
    public class Startup
    {
        public Startup(IConfiguration configuration)
        {
            Configuration = configuration;
        }

        public IConfiguration Configuration { get; }

        // This method gets called by the runtime. Use this method to add services to the container.
        // For more information on how to configure your application, visit https://go.microsoft.com/fwlink/?LinkID=398940
        public void ConfigureServices(IServiceCollection services)
        {
            services.AddRazorPages();
            services.AddServerSideBlazor();
            services.AddSingleton<WeatherForecastService>();
	    services.AddSmart();
	   }

        // This method gets called by the runtime. Use this method to configure the HTTP request pipeline.
        public void Configure(IApplicationBuilder app, IWebHostEnvironment env)
        {
            if (env.IsDevelopment())
            {
                app.UseDeveloperExceptionPage();
            }
            else
            {
                app.UseExceptionHandler("/Error");
                // The default HSTS value is 30 days. You may want to change this for production scenarios, see https://aka.ms/aspnetcore-hsts.
                app.UseHsts();
            }

            app.UseHttpsRedirection();
            app.UseStaticFiles();

            app.UseRouting();

            app.UseEndpoints(endpoints =>
            {
                endpoints.MapBlazorHub();
                endpoints.MapFallbackToPage("/_Host");
            });
        }
    }
}
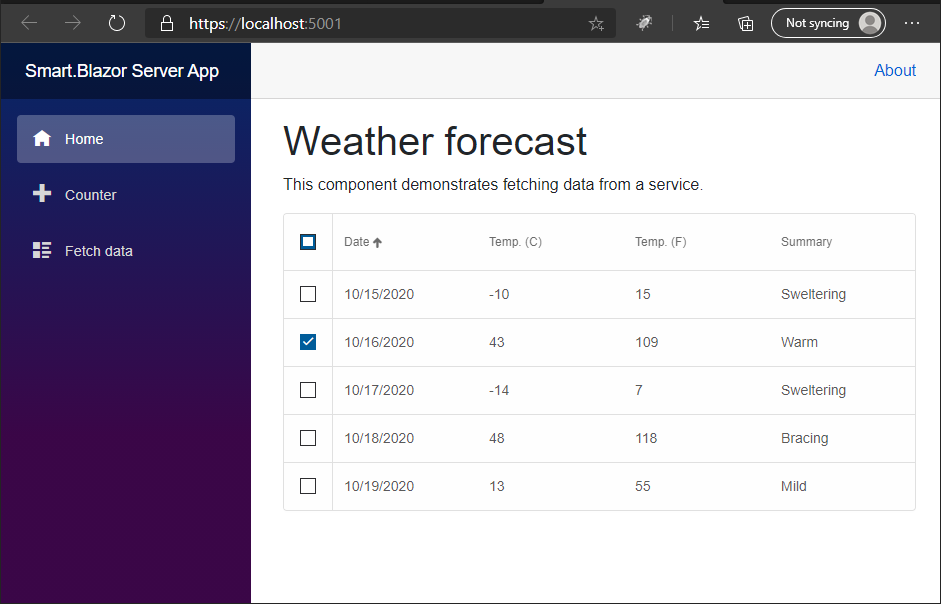
8. Start the app and check the resultdotnet watch run
Wait for the app to display that it's listening on http://localhost:5000 and then, open a browser and navigate to that address. Once you get to the following page, you have successfully run your first Blazor Server app using Smart UI for Blazor Components!
Output