Template-driven forms
Forms are the most common UI in business applications. We use forms to sign in/out, submit a request, place an order, book a flight, schedule a meeting, and other data-entry tasks. Smart UI for Angular provides native experience of building Forms with Angular.
Introduction to Template-driven forms with Smart UI for Angular
The Smart Forms components for Angular have support for two-way data binding, change tracking, validation, and error handling, which you'll learn about on this page. Such components are:- Smart.Input
- Smart.TextBox
- Smart.MultilineTextBox
- Smart.NumericTextBox
- Smart.MaskedTextBox
- Smart.PasswordTextBox
- Smart.Calendar
- Smart.DateTimePicker
- Smart.ColorPicker
- Smart.ColorPanel
- Smart.ListBox
- Smart.DropDownList
- Smart.ComboBox
- Smart.FileUpload
- Smart.Slider
- Smart.Tank
- Smart.Gauge
- Smart.SwitchButton
- Smart.CheckBox
- Smart.RadioButton
- Smart.Rating
- Build an Angular form with a component and template.
- Use ngModel to create two-way data bindings for reading and writing input-control values.
- Validate user input and show validation errors to users and enable/disable form controls.
- Use template refeence variables.
Let's start
- ng new my-project
- cd my-project.
- ng add smart-webcomponents-angular.
- ng-serve and in your browser enter localhost:4200.
- Navigate to the \src\app folder.
- Open app.module.ts and put the following content:
import { NgModule } from '@angular/core'; import { BrowserModule } from '@angular/platform-browser'; import { FormsModule } from '@angular/forms'; import { DropDownListModule } from 'smart-webcomponents-angular/dropdownlist'; import { ButtonModule } from 'smart-webcomponents-angular/button'; import { InputModule } from 'smart-webcomponents-angular/input'; import { AppComponent } from './app.component'; @NgModule({ declarations: [AppComponent], imports: [BrowserModule, FormsModule, DropDownListModule, ButtonModule, InputModule], bootstrap: [AppComponent] }) export class AppModule { } - Create a new Hero class
export class Hero { constructor( public id: number, public name: string, public power: string, public alterEgo?: string ) { } } - Open app.component.ts and put the following content:
import { Component, ViewChild, OnInit, AfterViewInit } from '@angular/core'; import { DropDownListComponent } from 'smart-webcomponents-angular/dropdownlist'; import { Hero } from './hero'; @Component({ selector: 'app-root', templateUrl: './app.component.html', styleUrls: ['./app.component.css'] }) export class AppComponent implements AfterViewInit, OnInit { @ViewChild('power', { read: DropDownListComponent, static: false }) power!: DropDownListComponent; powers = ['Really Smart', 'Super Flexible', 'Super Hot', 'Weather Changer']; model = new Hero(18, 'Dr IQ', this.powers[0], 'Chuck Overstreet'); submitted = false; onSubmit() { this.submitted = true; } ngOnInit(): void { // onInit code. } ngAfterViewInit(): void { // afterViewInit code. this.init(); } init(): void { // init code. } newHero() { this.model = new Hero(42, '', ''); } get diagnostic() { return JSON.stringify(this.model); } } -
Open app.component.html and put the following content:
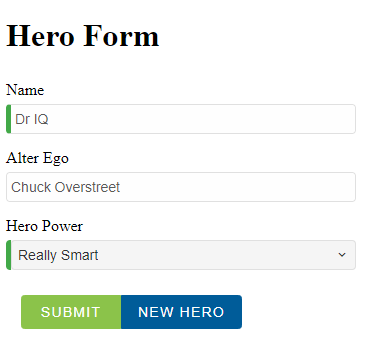
<div [hidden]="submitted" class="container">
    <h1>Hero Form</h1>
    <form (ngSubmit)="onSubmit()" #heroForm="ngForm">
        <div class="form-row">
            <label for="name">Name</label>
            <smart-input required class="form-component" [(ngModel)]="model.name" name="name" id="name" #name="ngModel">
            </smart-input>
            <div [hidden]="name.valid || name.pristine" class="alert alert-danger">
                Name is required
            </div>
        </div>

        <div class="form-row">
            <label for="alterEgo">Alter Ego</label>
            <smart-input class="form-component" [(ngModel)]="model.alterEgo" name="alterEgo" id="alterEgo">
            </smart-input>
        </div>
        <div class="form-row">
            <label for="power">Hero Power</label>
            <smart-drop-down-list required #power="ngModel" class="form-component" [(ngModel)]="model.power"
                name="power" id="power" required>
                <smart-list-item *ngFor="let pow of powers" [value]="pow">{{pow}}</smart-list-item>
            </smart-drop-down-list>
            <div [hidden]="power.valid || power.pristine" class="alert alert-danger">
                Power is required
            </div>
        </div>
        <div class="smart-stack-layout">
            <smart-button [disabled]="!heroForm.form.valid" type="submit" class="success item">Submit</smart-button>
            <smart-button type="submit" (click)="newHero(); heroForm.reset()" class="primary item">New Hero
            </smart-button>
        </div>
    </form>
</div>

<div [hidden]="!submitted">
    <h2>You submitted the following:</h2>
    <div class="row">
        <div class="col-xs-3">Name</div>
        <div class="col-xs-9">{{ model.name }}</div>
    </div>
    <div class="row">
        <div class="col-xs-3">Alter Ego</div>
        <div class="col-xs-9">{{ model.alterEgo }}</div>
    </div>
    <div class="row">
        <div class="col-xs-3">Power</div>
        <div class="col-xs-9">{{ model.power }}</div>
    </div>
    <br>
    <smart-button class="primary" (click)="submitted=false">Edit</smart-button>
</div>
<br /><br />
<h2>Changes Log:</h2>
{{diagnostic}}
ngFor
Note this code:
<div class="form-row">
	<label for="power">Hero Power</label>
	<smart-drop-down-list required #power="ngModel" class="form-component" [(ngModel)]="model.power"
		name="power" id="power" required>
		<smart-list-item *ngFor="let pow of powers" [value]="pow">{{pow}}</smart-list-item>
	</smart-drop-down-list>
	<div [hidden]="power.valid || power.pristine" class="alert alert-danger">
		Power is required
	</div>
</div>
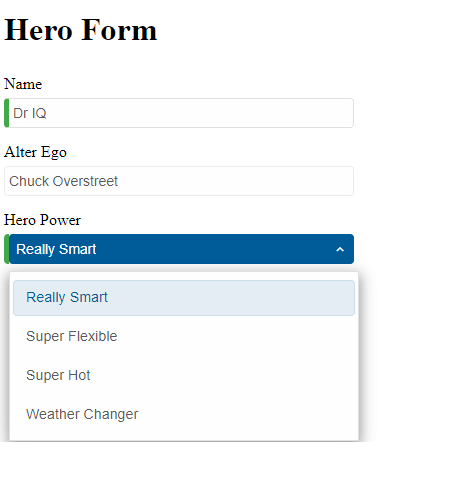
It generates a DropDownlist and adds powers with *ngFor. This code repeats the <smart-list-item> tag for each power in the list of powers. The pow template input variable is a different power in each iteration; you display its name using the interpolation syntax.
ngModel
The Two-way data binding is achieved with ngModel. Note the [(ngModel)]="model.name", [(ngModel)]="model.alterEgo", [(ngModel)]="model.power" in the template above.You also need a template reference variable to access the input box's Angular control from within the template.
<smart-input required class="form-component" [(ngModel)]="model.name" name="name" id="name" #name="ngModel"></smart-input>Here you created a variable called name and gave it the value "ngModel".
Note the Form tag declaration. It includes NgForm directive, which supplements the form element with additional features. It keeps information about the components with ngModel and name attribute. It watches their properties and validation. NgForm also has a valid property which is true only if every contained component is valid.
One of the additional benefits of using ngModel in a form is that it gives you more than just two-way data binding. It also keeps track of the components state - whether the component is touched or the value is changed.
| State | Class if true | Class if false |
|---|---|---|
| The control has been visited. | ng-touched | ng-untouched |
| The control's value has changed. | ng-dirty | ng-pristine |
| The control's value is valid. | ng-valid | ng-invalid |
Form Validation
Form validation is used to improve the data quality by validating user input for accuracy and completeness. Every time the value of a form control changes, Angular runs its built-in validation and generates either a list of validation errors, which results in an INVALID status, or null, which results in a VALID status. The "Name" and "Power" fields on this form are marked as required. Required fields have a green bar on the left to make them easy to spot. If you delete the hero name, the form displays a validation error in an attention-grabbing style: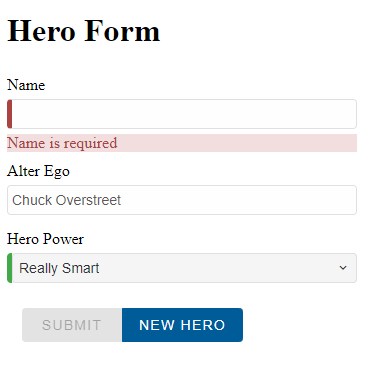
The Submit button is disabled, and the "required" bar to the left of the input control changes from green to red.
Validation-related attributes
The following attributes are used to describe validation constraints:
| Attribute | Form controls supporting the attribute | Possible values | Constraint description | Associated violation |
|---|---|---|---|---|
| pattern | smart-input, smart-text-box, smart-password-text-box, smart-mulitiline-text-box, smart-textarea | A JavaScript regular expression, ignoreCase, and multiline flags disabled) | The value must match the pattern. | patternMismatch constraint violation |
| min | smart-slider, smart-tank, smart-gauge, smart-numeric-text-box | A valid number | The value must be greater than or equal to the value. | rangeUnderflow constraint violation |
| smart-date-time-picker, smart-calendar | A valid date | |||
| datetime, datetime-local, time | A valid date and time | |||
| max | smart-slider, smart-tank, smart-gauge, smart-numeric-text-box | A valid number | The value must be less than or equal to the value | rangeOverflow constraint violation |
| date, month, week | A valid date | |||
| datetime, datetime-local, time | A valid date and time | |||
| required | All Form controls | none as it is a Boolean attribute: its presence means true, its absence means false | There must be a value (if set). | valueMissing constraint violation |
| minlength | smart-input, smart-text-box, smart-password-text-box, smart-mulitiline-text-box, smart-textarea | An integer length | The number of characters (code points) must not be less than the value of the attribute, if non-empty. All newlines are normalized to a single character (as opposed to CRLF pairs) for <textarea>. | tooShort constraint violation |
| maxlength | smart-input, smart-text-box, smart-password-text-box, smart-mulitiline-text-box, smart-textarea | An integer length | The number of characters (code points) must not exceed the value of the attribute. | tooLong constraint violation |
Let's look at the Template below:
<smart-input id="name" name="name" class="form-control"
      required minlength="4"
      [(ngModel)]="hero.name" #name="ngModel" ></smart-input>

<div *ngIf="name.invalid && (name.dirty || name.touched)"
    class="alert alert-danger">

  <div *ngIf="name.errors.required">
    Name is required.
  </div>
  <div *ngIf="name.errors.minlength">
    Name must be at least 4 characters long.
  </div>
</div>
- The <smart-input> element carries the HTML validation attributes: required and minlength.
- #name="ngModel" exports NgModel into a local variable called name. NgModel mirrors many of the properties of its underlying FormControlvalid and dirty. For a full list of control properties, see the AbstractControl API reference.
- The *ngIf on the <div> element reveals a set of nested message divs but only if the name is invalid and the control is either dirty or touched.
- Each nested <div> can present a custom message for one of the possible validation errors. There are messages for required, minlength.
Submit the Form with ngSubmit
The user should be able to submit this form after filling it in. The Submit button in the Form triggers a form submit on click. That is because of its type (type="submit").On submit, the onSubmit function is called and it changes the submitted flag to true. You can now note the View changes after the form submission. Our main Form is visible, when the form is not submitted. After submitting the Form, the Form's submit information is displayed. This is achieved by using the [hidden] attribute and binding it to the submitted variable.
<div [hidden]="!submitted">
    <h2>You submitted the following:</h2>
    <div class="row">
        <div class="col-xs-3">Name</div>
        <div class="col-xs-9">{{ model.name }}</div>
    </div>
    <div class="row">
        <div class="col-xs-3">Alter Ego</div>
        <div class="col-xs-9">{{ model.alterEgo }}</div>
    </div>
    <div class="row">
        <div class="col-xs-3">Power</div>
        <div class="col-xs-9">{{ model.power }}</div>
    </div>
    <br>
    <smart-button class="primary" (click)="submitted=false">Edit</smart-button>
</div>