Build your web apps using Smart Custom Elements
Smart.Grid - Integration with Firebase and OAuth2.0
Overview
The following tutorial will teach how to use Google Firebase as backend Database to store/update data via the Smart.Grid. The DB operations will require authentication via Google OAuth 2.0.
There are several ways to use Google's Firebase NoSQL cloud database service:
- By downloading the NPM packages for Firebase.
- Using CDN references to load the required files directly from the web
In this topic we are going to load Firebase using CDN references. Everything we need is a stable internet connection and a browser(Google Chrome).
For the purpose of the demo we are going to create a simple Firebase App from the Firebase web site. The app will have it's own collection of items that will represent "suggestions". Each suggestion will have data that will be displayed by the grid in a local html demo. For authentication we are going to configure Firebase to use OAuth 2.0 and setup a test google account to login/logout. Logged in users will be able to edit the data via the Grid and update the DB when finished. While others will just observe the data until they log in.
The next steps will guide you through the process of creating and running the application.
Creating the Database
First thing we need to to is setup the DB.
- Go to the Firebase console
- Click on "Add Project" called my-firebase-app
- Select the "Database" option
- Start a new "suggestions" collection - a collection represents a DB table that wll contain records.
- Create a document to define the collection schema - a document represents a single data record in the table.
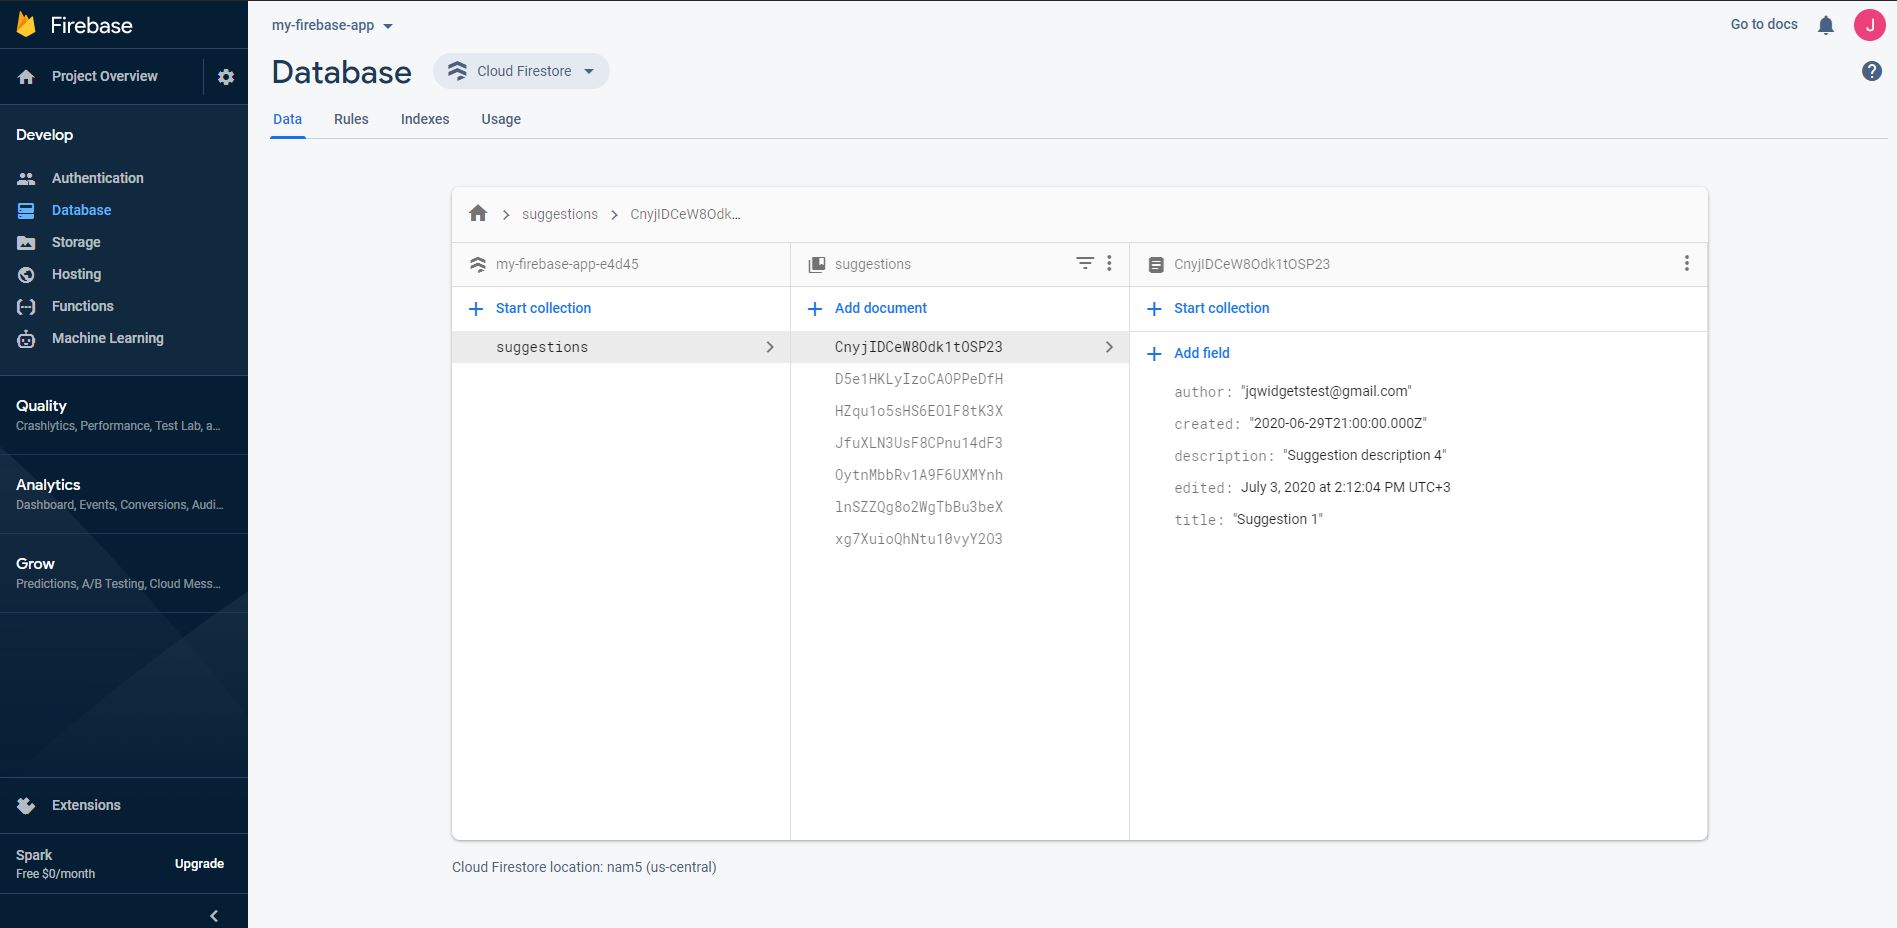
Here's how the DB configuration looks like in the Firebase console:
Securing the Database
After we've created the DB we need to add security rules for accessing/modifying the collection.
From your current location navigate to the Rules tab next to the current one in the Firebase console and add the following rules:
rules_version = '2';
service cloud.firestore {
  match /databases/{database}/documents {
    match /{document=**} {
        // 1} anyone can read
       allow read: if true;

       // 2} logged-in users can add suggestions
       allow create: if isLoggedIn();

       // 3} logged-in users can update suggestions
       allow update: if isLoggedIn();

       // 4) authors can edit and delete suggestions ...
       allow update: if isLoggedIn();
       allow delete: if isLoggedIn();

       // functions
       function eMail() { // get the current user's e-mail
         return request.auth.token.email;
       }

       function isLoggedIn() { // user is logged in
         return eMail() != null;
       }
    }
  }
}
These rules ensure that:
- Anyone can read the data form the DB.
- Only logged in users can add/update/delete new data.
In order to determine whether a user is logged in or not, we will be using the isLoggedIn function that will check whether a user is logged in and has an email.
Since we are going to use OAuth 2.0 for authentication only users that have logged in using their Google accounts will have email addresses. A Request Authentication Token is created for each logged in user by default.
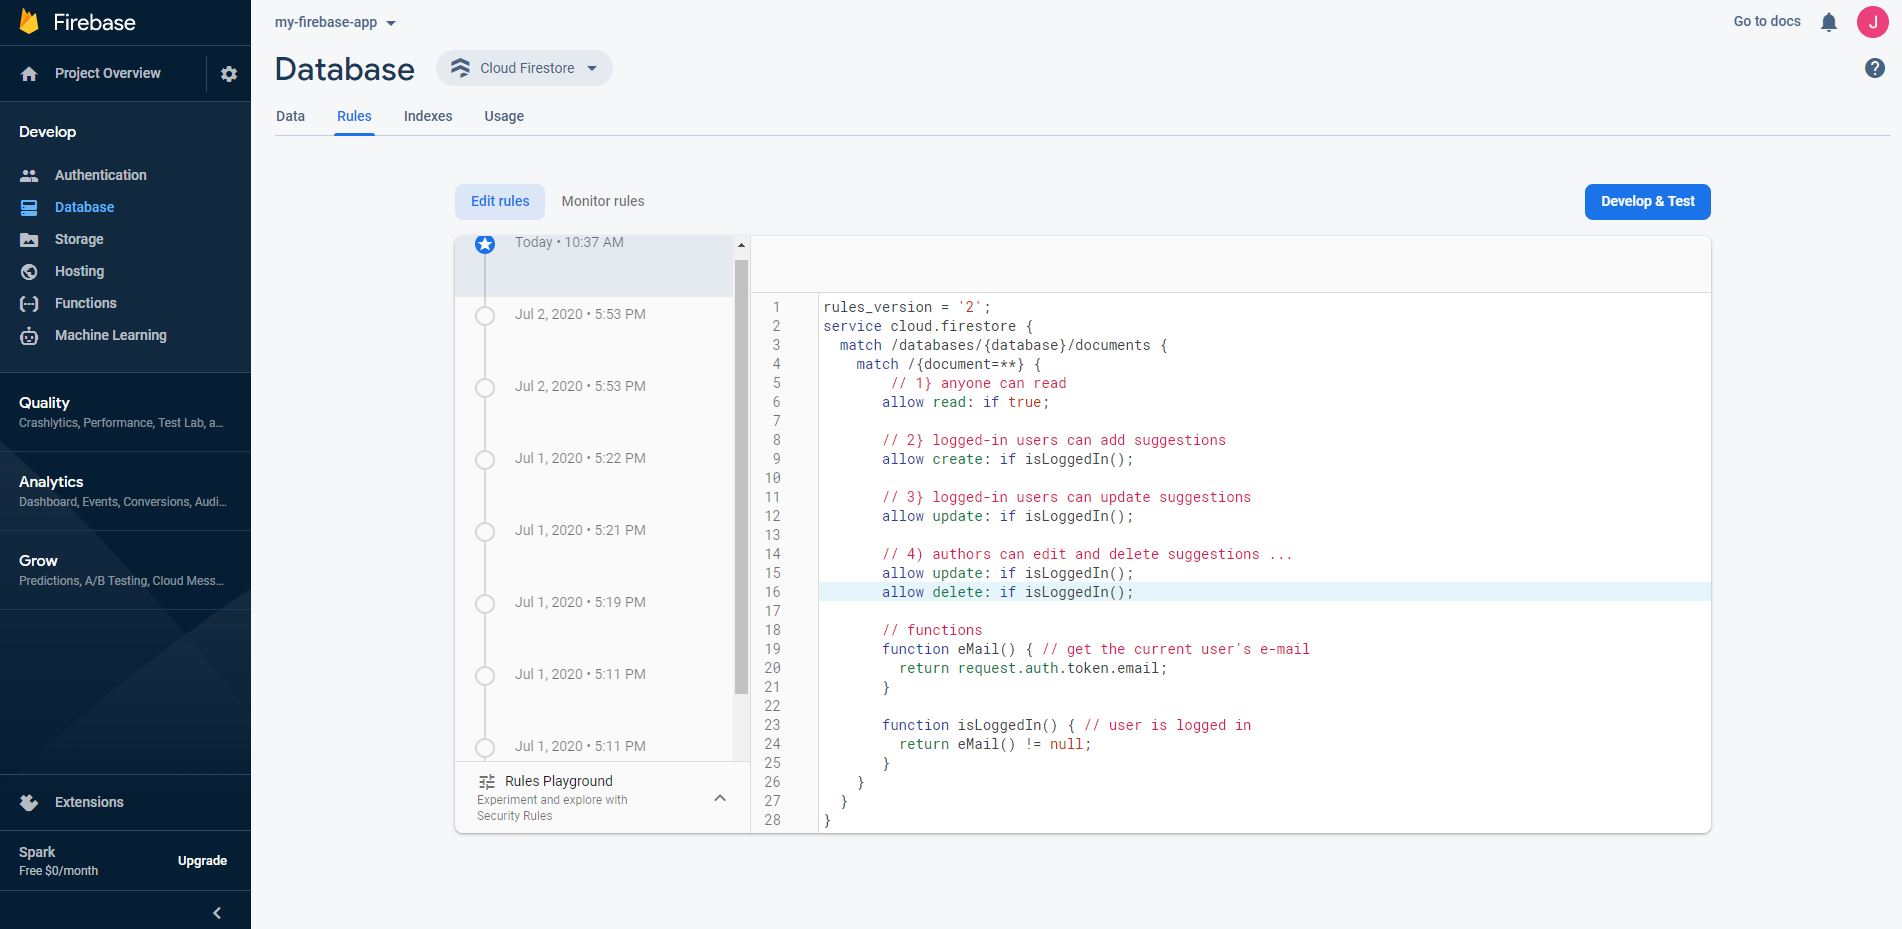
Here's what the Rules tab looks like in the Firebase console:
Database Authentication
Next step is to setup OAuth 2.0 authentication for our Firebase app.
To do so from the Firebase console:
- Click on the Authentication option in the Develop list in the Firebase menu.
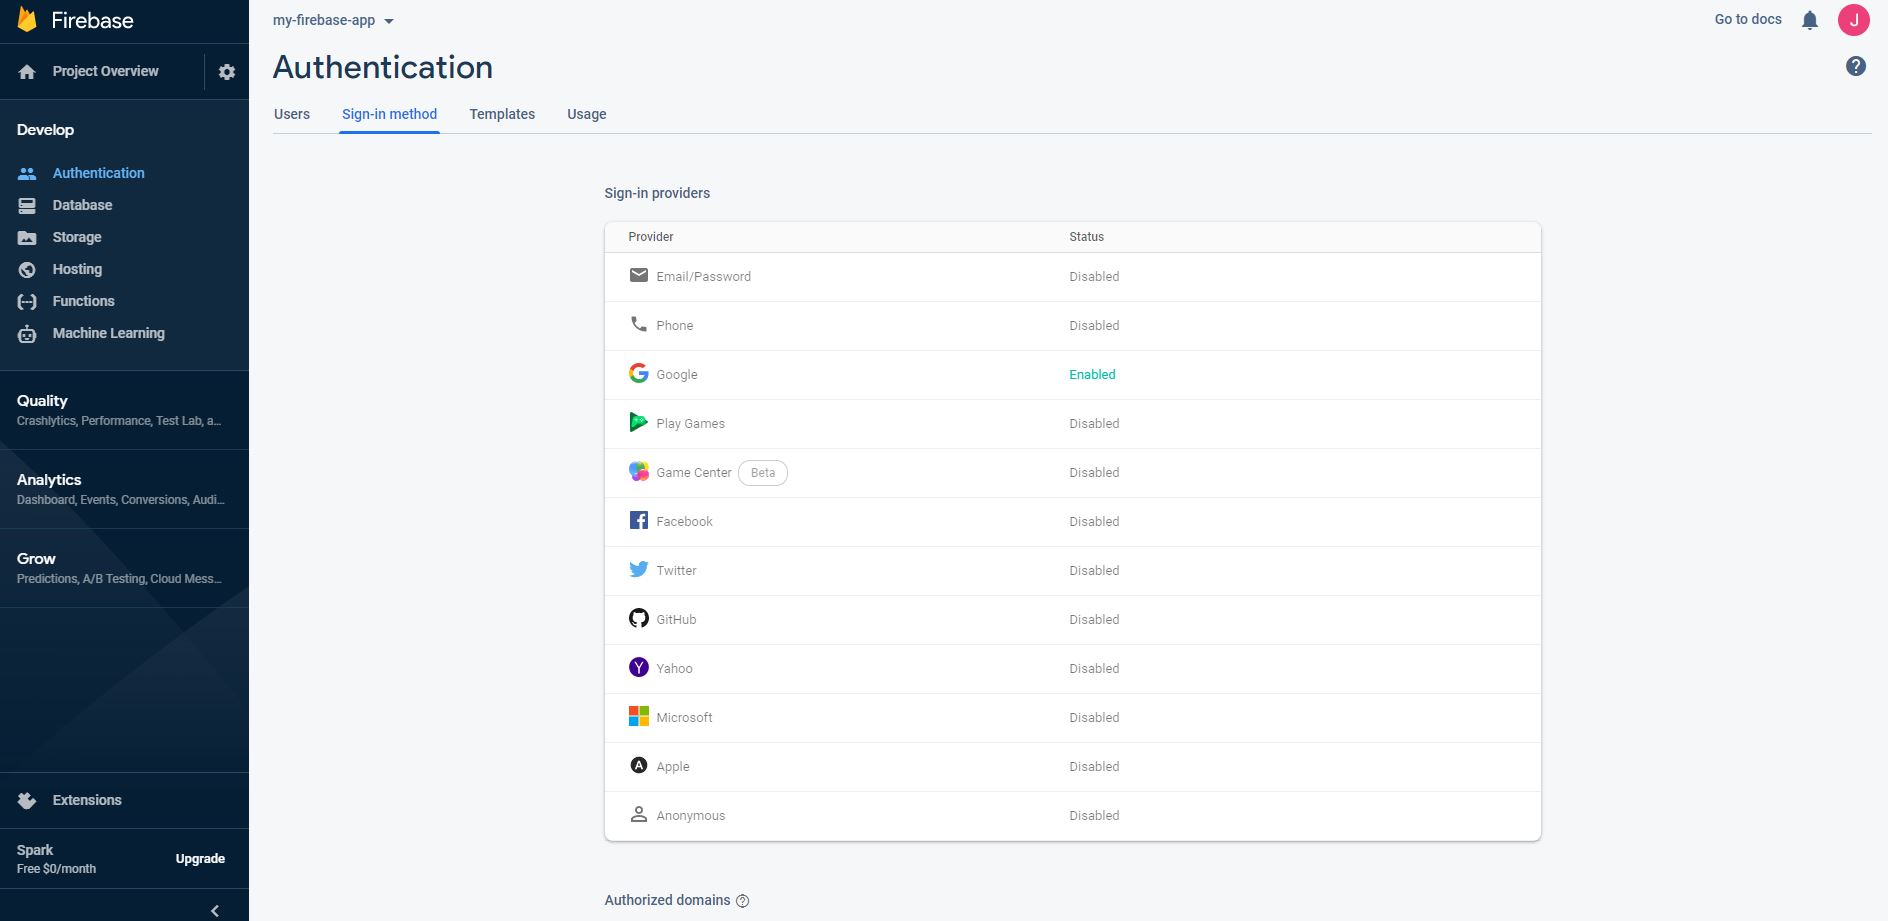
- Navigate to the Sign-in-method and Enable Google authentication.
Here's what it look likes like after enabing it for our application:
Creating the Demo Application
-
In your local drive, create a new folder. From inside the folder create a package.json via the following command:
npm init
-
Install the SmartElements library from NPM via the following command:
npm i smart-webcomponents
-
Create the following files:
- index.htm - the Index page for the application. Here's the content of the page:
<!DOCTYPE html>
<html xmlns="http://www.w3.org/1999/xhtml">
<head>
	<title>Google Firebase and OAuth 2.0 integration with Smart.Grid</title>
	<meta http-equiv="X-UA-Compatible" content="IE=edge" />
	<meta http-equiv="Content-Type" content="text/html; charset=utf-8" />
	<meta name="viewport" content="width=device-width, initial-scale=1.0, maximum-scale=1.0" />
	<link rel="stylesheet" type="text/css" href="./node_modules/smart-webcomponents/source/styles/smart.default.css" />
	<link rel="stylesheet" type="text/css" href="styles.css" />
	<link rel="stylesheet" href="https://cdnjs.cloudflare.com/ajax/libs/font-awesome/4.7.0/css/font-awesome.css">
</head>
<body class="viewport">
	<div class="header">
		<div id="userDetails">Please sign-in to edit the Grid</div>
		<smart-button id="authButton" class="sign-in">Sign In</smart-button>
	</div>
	<div class="demo-description">
		<h2>Google Firebase and OAuth 2.0 integration with Smart.Grid</h1>
	</div>

	<smart-grid id="grid"></smart-grid>

	<!-- scripts -->
	<script type="module" src="./node_modules/smart-webcomponents/source/modules/smart.grid.js"></script>

	<!-- Firebase App (the core Firebase SDK) is always required and must be listed first -->
	<script src="https://www.gstatic.com/firebasejs/7.15.5/firebase-app.js"></script>

	<!-- Add Firebase products that you want to use -->
	<script src="https://www.gstatic.com/firebasejs/7.15.5/firebase-auth.js"></script>
	<script src="https://www.gstatic.com/firebasejs/7.15.5/firebase-firestore.js"></script>

	<script type="module" src="index.js"></script>
</body>
</html>
We are going to use a Smart.Button to login/logout users in our application. When a user is logged in the username will be displayed inside the header and the button will be updated to allow logging out.
Smart elements are referenced from the NPM package that we previously downloaded.
-
index.js - here we add the necessary code for Smart.Grid initialization
and Firebase integration
First we initialize the Smart.Grid without data:
//Grid settings
window.window.Smart('#grid', class {
    get properties() {
        return {
            editing: {
                enabled: false,
                action: 'click',
                addDialog: {
                    enabled: true
                }
            },
            selection: {
                enabled: true,
                mode: 'one'
            },
            pager: {
                visible: true
            },
            paging: {
                enabled: true
            },
            layout: {
                rowHeight: 'auto'
            },
            columns: [
                {
                    label: 'Title', dataField: 'title'
                },
                { label: 'Description', dataField: 'description' },
                { label: 'Author', dataField: 'author' },
                { label: 'Created', dataField: 'created', align: 'right', cellsAlign: 'right', cellsFormat: 'yyy-MM-dd HH:mm:ss' },
                { label: 'Edited', dataField: 'edited', align: 'right', cellsAlign: 'right', cellsFormat: 'yyy-MM-dd HH:mm:ss' }
            ]
        };
    }
});
Then during window.onload we add the Firebase and OAuth 2.0 configuration:
window.onload = function () {
    const grid = document.querySelector('smart-grid');

    connectionToDB();
    loadDataFromDB();

    const firebase = window.firebase,
        db = window.firebase.firestore();

    grid.addEventListener('endEdit', function (event) {
        const editedRowData = event.detail.row.data,
            docId = event.detail.row.data.id;

        if (!firebase.auth().currentUser) {
            alert('You are not signed in. The changes will be applied locally only.');
        }
        else {
            db.collection('suggestions').doc(docId).update({
                title: editedRowData.title,
                description: editedRowData.description,
                author: editedRowData.author,
                edited: new Date()
            })
                .then(function () {
                    console.log('Updating the DB is Successful');
                })
                .catch(function () {
                    console.error('Updating the DB failed');
                });
        }
    });

    const GoogleAuth = new firebase.auth.GoogleAuthProvider();

    //Add necessary scopes
    GoogleAuth.addScope("https://www.googleapis.com/auth/userinfo.email");
    GoogleAuth.addScope("https://www.googleapis.com/auth/firebase.database");

    //Listen for sign-in state changes.
    firebase.auth().onAuthStateChanged(setSigninStatus);

    const signInButton = document.getElementById('authButton');

    signInButton.addEventListener('click', function () {
        if (signInButton.classList.contains('sign-in')) {
            firebase.auth().signInWithPopup(GoogleAuth).then(function (result) {
                setSigninStatus();
            }).catch(function () {
                // Handle Errors here.
            });
        }
        else {
            firebase.auth().signOut();
        }
    });
}
Let's take a closer look at what we are doing here:- connectionToDB - this is a helper function that allows to connect to the
Firebase application that we created in the previous steps. It should be
added to index.js. Here's what it looks like:
//Connect to Firebase DB
function connectionToDB() {
    //FireBase loaded from CDN
    const firebase = window.firebase;

    // Initialize Cloud Firestore through Firebase
    firebase.initializeApp({
        apiKey: 'AIzaSyDE4GqvwdPvhNs_wfyrsrFfZbjc9g00i-A',
        authDomain: 'my-firebase-app-e4d45.firebaseapp.com',
        databaseURL: 'https://my-firebase-app-e4d45.firebaseio.com',
        projectId: 'my-firebase-app-e4d45'
    });
}
When initializing the Firebase app you need to specify the apiKey, authDomain, databaseURL and projectId. All of that can be gathered from the Google API Console and Firebase console that we used in the begining.
- loadDataFromDB - this is another helper function that loads the
collection from the Firebase DB to the Smart.Grid. Here's the code for
it:
//Load the Data from the DB
function loadDataFromDB() {
    const db = window.firebase.firestore();

    db.collection('suggestions').get().then((querySnapshot) => {
        let data = [];

        querySnapshot.forEach((doc) => {
            const entry = doc.data();

            for (let ent in entry) {
                if (entry[ent].seconds) {
                    entry[ent] = new Date(entry[ent].seconds * 1000);
                }
            }

            entry.id = doc.id;
            data.push(entry);
        });

        const grid = document.querySelector('smart-grid');

        grid.dataSource = new window.Smart.DataAdapter({
            dataSource: data,
            dataFields: [
                'id: string',
                'title: string',
                'description: string',
                'author: string',
                'created: date',
                'edited: date'
            ]
        });
    });
}
Data comming from the DB represents a QuerySnapshot. This is a Google specific type that allows to get each record from it and create an Array with the data.
- endEdit a Smart.Grid Event - this event allows to get the freshly edited Grid data and update Firebase if the user is logged in. If not an alert is shown to notify the user to log in.
- firebase.auth.GoogleAuthProvider() - allows to add scopes in order to acces the user email and firebase database.
- firebase.auth().onAuthStateChanged(setSigninStatus) - 'onAuthStateChanged' is a event handler that allows to listen for successful authentication attemps. This means that when a user logs in or out of the application the setSigninStatus callback will be called.
-
setSigninStatus - is another helper function that updates the content of
the SignIn/Out button and the user information inside the header of the
application. Here's the code that should be added to index.js:
function setSigninStatus(user) { const grid = document.querySelector('smart-grid'); const authButton = document.getElementById('authButton'), userDetails = document.getElementById('userDetails') if (user) { authButton.innerHTML = 'Sign Out'; userDetails.innerHTML = 'Welcome, ' + user.displayName; authButton.classList.remove('sign-in'); grid.editing.enabled = true; console.log('You are currently signed in and have granted access to this app.'); } else { authButton.innerHTML = 'Sign In'; userDetails.innerHTML = 'Please sign-in to edit the Grid'; authButton.classList.add('sign-in'); grid.editing.enabled = false; console.log('You have not authorized this app or you are signed out.'); } } - signInButton Click Event Handler - this handler allows to login/logout via Google account.
- connectionToDB - this is a helper function that allows to connect to the
Firebase application that we created in the previous steps. It should be
added to index.js. Here's what it looks like:
- styles.css - the index page CSS file containing styles for the application:
#grid {
    height: auto;
    width: auto;
}

#authButton button::before {
    font-family: FontAwesome;
    content:"\f08b";
    margin-right: 10px;
}

#authButton.sign-in button::before {
    content:"\f090";
}

.header {
    display: flex;
    position: static;
    justify-content: space-between;
    background: var(--smart-surface);
    box-shadow: 0px 1px 5px -2px black;
    padding: 5px;
    align-items: center;
}
- index.htm - the Index page for the application. Here's the content of the page:
Run the Application
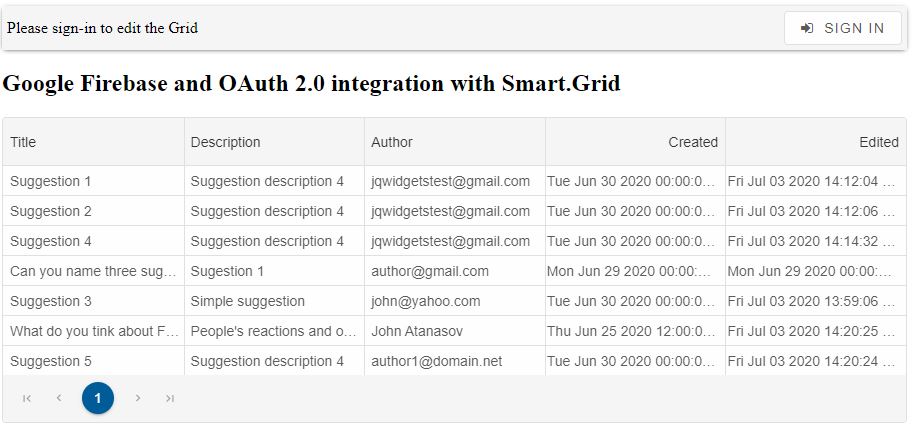
Run the application on your localhost server and open a new tab in the browser that links to http://localhost:8080/
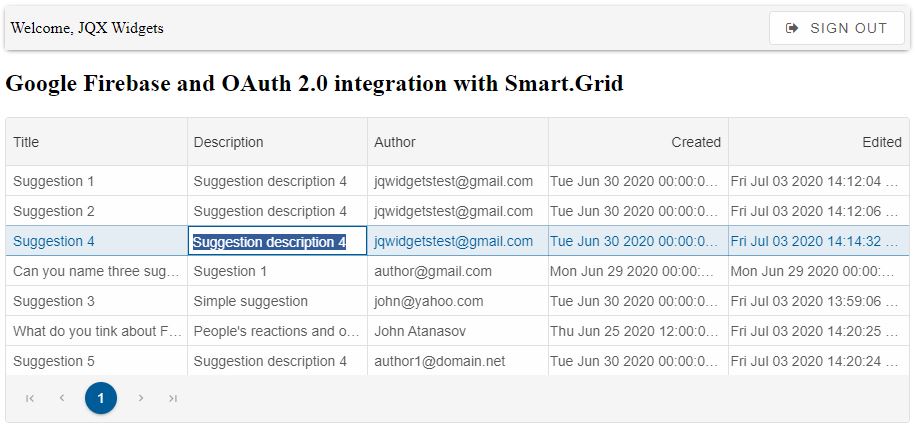
This is the expected result when the application is loaded:
And this is how the application looks after a user has signed in by clicking the SignIn button and has starting editing of a Grid row: