Create Angular and React Applications Together With Nx and Smart HTML Elements
Companies usually use more than one javascript framework. Today, most popular are Angular and React. With the help of NX, we can create full-stack applications and share code between the backend and the frontend.
Creating a New Nx Workspace
We start by creating a new Nx workspace. The easiest way to do this is to use npx.
npx --ignore-existing create-nx-workspace myApp --preset=empty
Creating an Angular Application
An empty workspace has no application or libraries: nothing to run and nothing to test. Let’s add an Angular application into it by running ng g app angularapp --framework=angular. The generated main.ts, will look as follows:
	import { enableProdMode } from '@angular/core';

	import { platformBrowserDynamic } from '@angular/platform-browser-dynamic';
	import { AppModule } from './app/app.module';

	import { environment } from './environments/environment';

	if (environment.production) {
	  enableProdMode();
	}

	platformBrowserDynamic()
	  .bootstrapModule(AppModule)
	  .catch(err => console.error(err));
And the template of the generated component will look as follows:
	<div style="text-align:center">
	  Welcome to {{title}}!
	  <img
	   width="300"
	   src="https://raw.githubusercontent.com/nrwl/nx/master/nx-logo.png"
	  />
	</div>

	This is an Angular app built with Nx.
Creating a React Application
Generating a React application is just as easy.ng g app reactapp --framework=react and this is what we will see:
Where main.ts looks like this:
	import * as React from 'react';
	import * as ReactDOM from 'react-dom';

	import { App } from './app/app';

	 ReactDOM.render(<App />, document.querySelector('myApp-root'));
	and app.tsx contains the following component:


	import * as React from 'react';
	import { Component } from 'react';

	import './app.css';

	export class App extends Component {
	  render() {
		const title = 'reactapp';
		return (
		<div>
		 <div style={{ textAlign: 'center' }}>
		  <h1>Welcome to {title}!</h1>
		  <img
		   width="300"
		   src="https://raw.githubusercontent.com/nrwl/nx/master/nx-logo.png"
		  />
		 </div>
		 <p>
		  This is a React app built with <a href="https://nx.dev">Nx</a>.
		 </p>
		</div>
		);
	  }
	}

	Nx has first-class React support, so all the commands we use to develop Angular applications work for React as well:
- ng serve reactapp serves the React app
- ng build reactapp builds the React app
- ng test reactapp tests the React app using Jest
- ng e2e reactapp-e2e tests the React app using Cypress
Install Smart Web Components
Run: npm i @smarthtmlelements/smart-elements
Using the Smart Custom Elements in our Angular App
To use the Smart Web Components in the Angular app, let’s start with changing the output target to es2015 in tsconfig.json because Custom Elements requires ES2015 Classes.
	{
	  "extends": "../../tsconfig.json",
	  "compilerOptions": {
		"target": "es2015",
		"types": ["node", "jest"]
	  },
	  "include": ["**/*.ts"]
	}
Importing the Library
Next, let’s include the new library in app.module.ts.
	import { BrowserModule } from '@angular/platform-browser';
	import { NgModule, CUSTOM_ELEMENTS_SCHEMA  } from '@angular/core';
	import { AppComponent } from './app.component';
	import '@smart-elements'; // <-- the new library
	@NgModule({
	  declarations: [AppComponent],
	  imports: [BrowserModule],
	  providers: [],
	  schemas: [CUSTOM_ELEMENTS_SCHEMA],
	  bootstrap: [AppComponent]
	})
	export class AppModule {}
CUSTOM_ELEMENTS_SCHEMA
CUSTOM_ELEMENTS_SCHEMA tells the Angular compiler not to error when seeing non-standard element tags in components’ templates.Using Smart ListBox Custom Element with Angular
Open app.component.html and add the
<div style="text-align:center">
<h1>Welcome to {{ title }}!</h1>
<img
width="450"
src="https://raw.githubusercontent.com/nrwl/nx/master/nx-logo.png"
/>
</div>
<p>This is an Angular app built with <a href="https://nx.dev">Nx
Updating angular.json and tsconfig.json
Now, open angular.json and add the smart.default.css Style to
"styles":
[
"apps/angularapp/src/styles.css",
"node_modules/@smarthtmlelements/smart-elements/source/styles/smart.default.css"
]
Update the tsconfig.json to add the @smart-elements path which we use.
{
"compileOnSave": false,
"compilerOptions": {
"sourceMap": true,
"declaration": false,
"moduleResolution": "node",
"emitDecoratorMetadata": true,
"experimentalDecorators": true,
"importHelpers": true,
"target": "es5",
"module": "es2015",
"typeRoots": ["node_modules/@types"],
"lib": ["es2017", "dom"],
"skipLibCheck": true,
"skipDefaultLibCheck": true,
"baseUrl": ".",
"paths": {
"@smart-elements": ["node_modules/@smarthtmlelements/smart-elements/source/smart.elements.js"],
"@smart-elements-css": ["node_modules/@smarthtmlelements/smart-elements/source/styles/smart.default.css"] }
},
"exclude": ["node_modules", "tmp"]
}
Run: ng serve angularapp
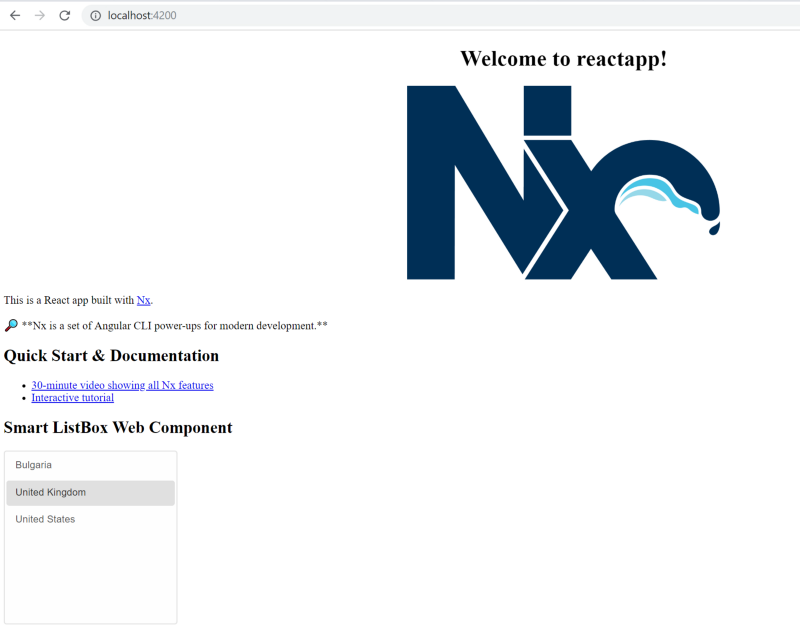
The result is: 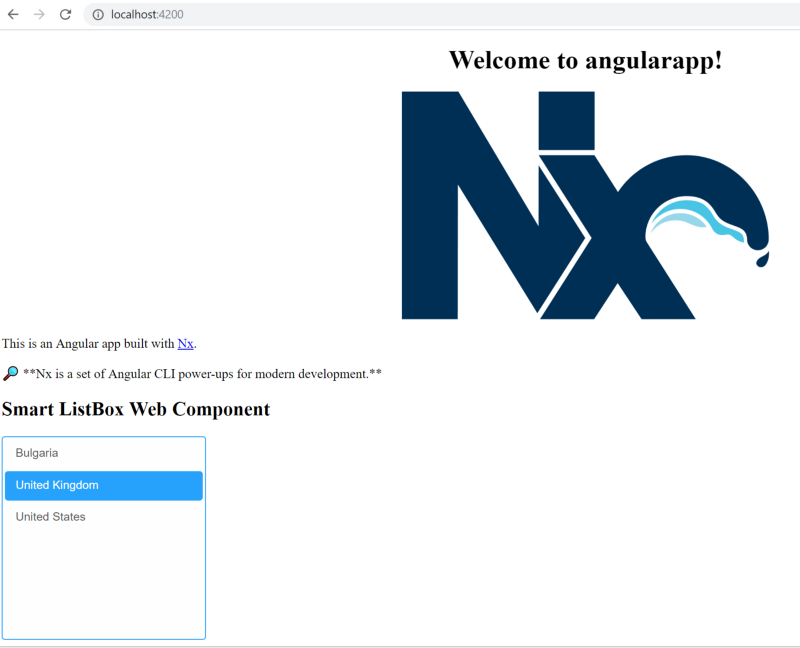
Using the Smart ListBox Element in our React App
Let’s change the target to es2015 in tsconfig.json
{
"extends": "../../tsconfig.json",
"compilerOptions": {
"jsx": "react",
"target": "es2015",
"allowJs": true,
"types": ["node", "jest"]
},
"include": ["**/*.ts", "**/*.tsx"]
}
Importing Library
Next, let’s include the new library in main.tsx.
import * as React from 'react';
import * as ReactDOM from 'react-dom';
import { App } from './app/app';
import '@smart-elements';
ReactDOM.render(
Adding Intrinsic Types
With React, Instead of registering CUSTOM_ELEMENTS_SCHEMA, we use something similar, called Intrinsic Types. Create a intrinsic.d.ts file in the same folder where the main.tsx is. Then, add the following to the file:
declare namespace JSX {
interface IntrinsicElements {
[elemName: string]: any;
}
}
Run: ng serve reactapp
The result is: