Reactive forms
Reactive forms provide a model-driven approach to handling form inputs whose values change over time. The Smart's Form controls are:
Introduction to Reactive forms with Smart UI for Angular
The Smart Forms components for Angular have support for two-way data binding, change tracking, validation, and error handling, which you'll learn about on this page. Such components are:- Smart.Input
- Smart.TextBox
- Smart.MultilineTextBox
- Smart.NumericTextBox
- Smart.MaskedTextBox
- Smart.PasswordTextBox
- Smart.Calendar
- Smart.DateTimePicker
- Smart.ColorPicker
- Smart.ColorPanel
- Smart.ListBox
- Smart.DropDownList
- Smart.ComboBox
- Smart.FileUpload
- Smart.Slider
- Smart.Tank
- Smart.Gauge
- Smart.SwitchButton
- Smart.CheckBox
- Smart.RadioButton
- Smart.Rating
This page shows you how to build a simple reactive form from scratch. It is based on https://angular.io/guide/reactive-forms. To learn more about the difference between template-driven forms and reactive forms, please refer to: https://angular.io/guide/forms-overview Along the way you'll learn how to:
- Build an Angular Reactive Form with a component and template.
- Create and update a Form control.
- Use Multiple Controls in a Group.
- Validate user input and show validation errors to users and enable/disable form controls.
Let's start
- ng new my-project
- cd my-project.
- ng add smart-webcomponents-angular.
- ng-serve and in your browser enter localhost:4200.
- Navigate to the \src\app folder.
- Open app.module.ts and put the following content:
import { NgModule } from '@angular/core'; import { BrowserModule } from '@angular/platform-browser'; import { ReactiveFormsModule } from '@angular/forms'; import { DropDownListModule } from 'smart-webcomponents-angular/dropdownlist'; import { ButtonModule } from 'smart-webcomponents-angular/button'; import { InputModule } from 'smart-webcomponents-angular/input'; import { AppComponent } from './app.component'; @NgModule({ declarations: [AppComponent], imports: [BrowserModule, ReactiveFormsModule, DropDownListModule, ButtonModule, InputModule], bootstrap: [AppComponent] }) export class AppModule { } - Open app.component.ts and put the following content:
import { Component, ViewChild, OnInit, AfterViewInit } from '@angular/core'; import { FormControl, FormGroup, AbstractControl, ValidatorFn, Validators } from '@angular/forms'; export class Hero { constructor( public id: number, public name: string, public power: string, public alterEgo?: string ) { } } export function forbiddenNameValidator(nameRe: RegExp): ValidatorFn { return (control: AbstractControl): { [key: string]: any } | null => { const forbidden = nameRe.test(control.value); return forbidden ? { 'forbiddenName': { value: control.value } } : null; }; } @Component({ selector: 'app-root', templateUrl: './app.component.html', styleUrls: ['./app.component.css'] }) export class AppComponent implements AfterViewInit, OnInit { powers = ['Really Smart', 'Super Flexible', 'Super Hot', 'Weather Changer']; heroForm = new FormGroup({ name: new FormControl('Dr IQ', [ Validators.required, Validators.minLength(4), forbiddenNameValidator(/bob/i)]), power: new FormControl(this.powers[0]), alterEgo: new FormControl('Chuck Overstreet') }); get name() { return this.heroForm.get('name'); } get alterEgo() { return this.heroForm.get('alterEgo'); } get power() { return this.heroForm.get('power'); } submitted = false; onSubmit() { this.submitted = true; } ngOnInit(): void { // onInit code. } ngAfterViewInit(): void { // afterViewInit code. this.init(); } init(): void { // init code. } newHero() { this.name.setValue(''); this.alterEgo.setValue(''); this.power.setValue(''); } get diagnostic() { return JSON.stringify({ name: this.name.value, alterEgo: this.alterEgo.value, power: this.power.value }); } } -
Open app.component.html and put the following content:
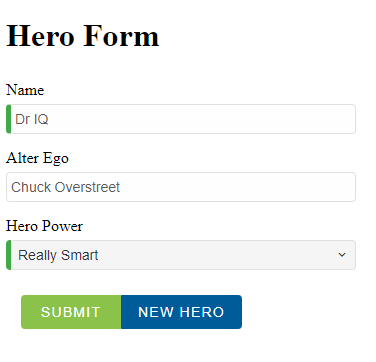
<div [hidden]="submitted" class="container"> <h1>Hero Form</h1> <form [formGroup]="heroForm" (ngSubmit)="onSubmit()"> <div class="form-row"> <label for="name">Name</label> <smart-input required class="form-component" formControlName="name"> </smart-input> <div *ngIf="name.invalid && (name.dirty || name.touched)" class="alert alert-danger"> <div *ngIf="name.errors.required"> Name is required. </div> <div *ngIf="name.errors.minlength"> Name must be at least 4 characters long. </div> <div *ngIf="name.errors.forbiddenName"> Name cannot be Bob. </div> </div> <div class="form-row"> <label for="alterEgo">Alter Ego</label> <smart-input class="form-component" formControlName="alterEgo"> </smart-input> </div> <div class="form-row"> <label for="power">Hero Power</label> <smart-drop-down-list required class="form-component" formControlName="power" required> <smart-list-item *ngFor="let pow of powers" [value]="pow">{{pow}}</smart-list-item> </smart-drop-down-list> <div [hidden]="power.valid || power.pristine" class="alert alert-danger"> Power is required </div> </div> <div class="smart-stack-layout"> <smart-button [disabled]="!heroForm.valid" type="submit" class="success item">Submit</smart-button> <smart-button type="button" (click)="newHero(); heroForm.reset()" class="primary item">New Hero </smart-button> </div> </div> </form> </div> <div [hidden]="!submitted"> <h2>You submitted the following:</h2> <div class="row"> <div class="col-xs-3">Name</div> <div class="col-xs-9">{{ name.value }}</div> </div> <div class="row"> <div class="col-xs-3">Alter Ego</div> <div class="col-xs-9">{{ alterEgo.value }}</div> </div> <div class="row"> <div class="col-xs-3">Power</div> <div class="col-xs-9">{{ power.value }}</div> </div> <br> <smart-button class="primary" (click)="submitted=false">Edit</smart-button> </div> <br /><br /> <h2>Changes Log:</h2> {{diagnostic}} -
Example
Form Group
A form group tracks the status and changes for each of its controls, so if one of the controls changes, the parent control also emits a new status or value change. The model for the group is maintained from its members. After you define the model, you must update the template to reflect the model in the view. Each control in a form group instance is tracked by name when creating the form group. The formControlName input binds each individual input to the form control defined in FormGroup.Handling Updates
When updating the value for a form group instance that contains multiple controls, you may only want to update parts of the model. This section covers how to update specific parts of a form control data model.Angular provides two ways to update the model value
-
Use the
setValue()method to set a new value for an individual control. ThesetValue()method strictly adheres to the structure of the form group and replaces the entire value for the control. -
Use the
patchValue()method to replace any properties defined in the object that have changed in the form model.
Reactive Form Validation
With Reactive Forms, validator functions are used and Angular calls these functions whenever the value of the control changes. There are two types of validator functions: sync validators and async validators.- Sync validators: functions that take a control instance and immediately return either a set of validation errors or null. You can pass these in as the second argument when you instantiate a FormControl.
- Async validators: functions that take a control instance and return a Promise or Observable that later emits a set of validation errors or null. You can pass these in as the third argument when you instantiate a FormControl.
The following code adds a "required" validator to a Reactive Form. The Reactive Form is created by using the Angular FormBuilder.
import { Component, OnInit, AfterViewInit } from '@angular/core';
import { Validators, FormBuilder, FormArray } from '@angular/forms';


@Component({
	selector: 'app-root',
	templateUrl: './app.component.html',
	styleUrls: ['./app.component.css']
})

export class AppComponent {
	profileForm = this.fb.group({
		firstName: ['', Validators.required],
		lastName: [''],
		address: this.fb.group({
			street: [''],
			city: [''],
			state: [''],
			zip: ['']
		}),
		aliases: this.fb.array([
			this.fb.control('')
		])
	});

	get aliases() {
		return this.profileForm.get('aliases') as FormArray;
	}

	constructor(private fb: FormBuilder) { }


	updateProfile() {
		this.profileForm.patchValue({
			firstName: 'Nancy',
			address: {
				street: '123 Drew Street'
			}
		});
	}

	addAlias() {
		this.aliases.push(this.fb.control(''));
	}

	onSubmit() {
		// TODO: Use EventEmitter with form value
		console.warn(this.profileForm.value);
	}
}
app.component.html
<form [formGroup]="profileForm" (ngSubmit)="onSubmit()">
    <label>
        First Name:
        <smart-input type="text" formControlName="firstName" required></smart-input>
    </label>

    <label>
        Last Name:
        <smart-input type="text" formControlName="lastName"></smart-input>
    </label>

    <div formGroupName="address">
        <h3>Address</h3>

        <label>
            Street:
            <smart-input type="text" formControlName="street"></smart-input>
        </label>

        <label>
            City:
            <smart-input type="text" formControlName="city"></smart-input>
        </label>

        <label>
            State:
            <smart-input type="text" formControlName="state"></smart-input>
        </label>

        <label>
            Zip Code:
            <smart-input type="text" formControlName="zip"></smart-input>
        </label>
    </div>

    <div formArrayName="aliases">
        <h3>Aliases</h3> <button (click)="addAlias()">Add Alias</button>

        <div *ngFor="let alias of aliases.controls; let i=index">
            <!-- The repeated alias template -->
            <label>
                Alias:
                <smart-input type="text" [formControlName]="i"></smart-input>
            </label>
        </div>
    </div>

    <smart-button type="submit" class="primary" [disabled]="!profileForm.valid">Submit</smart-button>
</form>

<hr>


<p>
    Form Value: {{ profileForm.value | json }}
</p>


<p>
    Form Status: {{ profileForm.status }}
</p>

<p>
    <button (click)="updateProfile()">Update Profile</button>
</p>
The code above also uses Nested Form Groups - the address is a form group nested in the profileForm. Form groups are useful, when we create complex forms. By using nested form groups, we can break forms into smaller chunks.