Using Custom Elements with Vue 2.x

*Note If you are using Vue 3.x, jump to Using Smart UI with Vue 3
What is Vue.js?
Vue is a progressive framework for building user interfaces. It is designed from the ground up to be incrementally adoptable, and can easily scale between a library and a framework depending on different use cases. It consists of an approachable core library that focuses on the view layer only, and an ecosystem of supporting libraries that helps you tackle complexity in large Single-Page Applications.Vue.js has full support for Custom Elements.
Handling data with Vue and Custom Elements
By default, Vue passes all data to Custom Elements as attributes. However, Vue also provides syntax to instruct its bindings to use properties instead. To bind to a Custom Element property use :foo.prop="bar".Handling events with Vue and Custom Elements
Vue can listen to native DOM events dispatched from Custom Elements. It supports all styles of events (lowercase, camelCase, kebab-case, etc).Creating projects with vue-cli
Let's install vue-cli
npm install -g @vue/cli
Then we can start creating our Vue.js projects with:
vue create my-project
Install Smart Custom Elements
Open the "my-project" folder and run:
npm install smart-webcomponents
Ignored Elements
Make Vue ignore custom elements defined outside of Vue (e.g., using the Web Components APIs). Otherwise, it will throw a warning about an Unknown custom element, assuming that you forgot to register a global component or misspelled a component name.
	import Vue from 'vue'
	import App from './App.vue'

	Vue.config.productionTip = false
	Vue.config.ignoredElements = [
	  'smart-list-box',
	  'smart-list-item'
	]

	new Vue({
	  render: h => h(App),
	}).$mount('#app')
Import Smart Elements
In order to use Web Components, we need to import them. We will do that within the script section of the HelloWorld.vue component.import 'smart-webcomponents/source/modules/smart.listbox.js'; import 'smart-webcomponents/source/styles/smart.default.css';
The full code of the HelloWorld.vue is:
<template>
<div>
<h2>{{msg}}</h2>
<smart-list-box :data-source.prop="items">
</smart-list-box>
</div>
</template>
<script>
	import 'smart-webcomponents/source/modules/smart.listbox.js';
	import 'smart-webcomponents/source/styles/smart.default.css';
export default {
name: 'HelloWorld',
props: {
msg: String,
items: Array
}
}
</script>
<!-- Add "scoped" attribute to limit CSS to this component only -->
<style scoped>
h3 {
margin: 40px 0 0;
}
ul {
list-style-type: none;
padding: 0;
}
li {
display: inline-block;
margin: 0 10px;
}
a {
color: #42b983;
}
</style>
Within the template, we define the ListBox Custom Element and bind its dataSource property to the items property defined in our component's "props".App.vue
Within the App.vue we add the HelloWorld component and bind its items property. This property will be used for a dataSource of the ListBox Custom Element in the
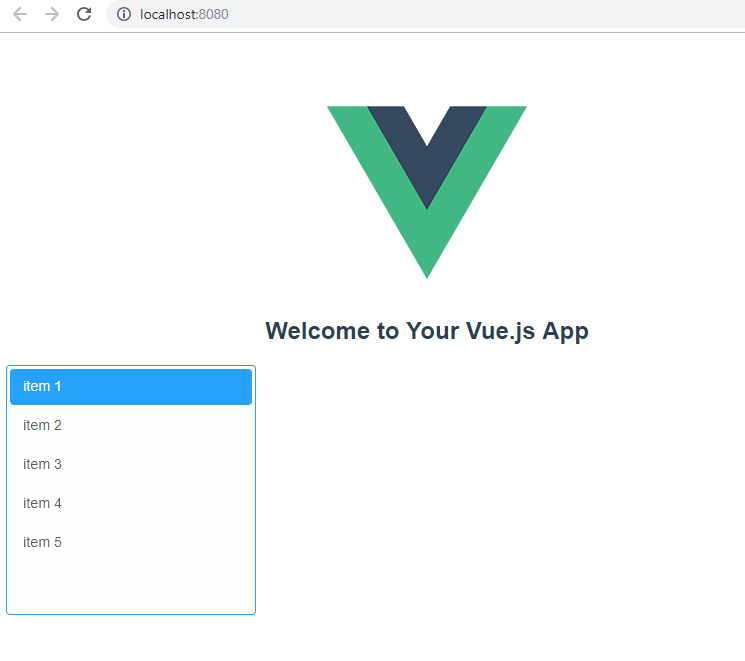
	 <template>
	  <div id="app">
	   <img alt="Vue logo" src="./assets/logo.png">
	   <HelloWorld :items="items" msg="Welcome to Your Vue.js App"/>
	  </div>
	 </template>
	 <script>
	 import HelloWorld from './components/HelloWorld.vue'
	 export default {
	  name: 'app',
	  components: {
	   HelloWorld
	  },
	  data: function () {
		   return {
			   items: [
					'item 1',
					'item 2',
					'item 3',
					'item 4',
					'item 5'
			   ]
		   }
	  }
	 }
	 </script>
	 <style>
	 #app {
	  font-family: 'Avenir', Helvetica, Arial, sans-serif;
	  -webkit-font-smoothing: antialiased;
	  -moz-osx-font-smoothing: grayscale;
	  text-align: center;
	  color: #2c3e50;
	  margin-top: 60px;
	 }
	 </style>
Run the Vue application
npm run serve