Using Web Components with SharePoint Framework(SPFx)
This document provides a complete guide on how to build and use the Smart library with the SharePoint Framework.
Prerequisities
- Node.js
- IDE (e.g. Visual Studio )
Setup development environment
-
Create a new folder called smart-sharepoint and open a command prompt from inside the directory. Install the required SharePoint client-side development tools with global flag
on Windows:
npm i -g yo gulp @microsoft/generator-sharepoint
on Linux:
sudo npm i -g yo gulp @microsoft/generator-sharepoint
The Yeoman SharePoint web part generator @microsoft/generator-sharepoint helps to create a SharePoint client-side project using Yeoman tool.
-
Create a new client-side web part by running the Yeoman SharePoint Generator.
yo @microsoft/sharepoint
-
Set up the following options when the above command is prompted:
- Enter a solution name, e.g. smart-sharepoint Enter.
- Choose SharePoint 2016 onwards, including 2019 and SharePoint Online and press Enter key.
- Press Enter when prompted to select the place to place the files in order to use the same directory.
- Choose WebPart as the client-side component type to be created.
Next, it will ask the specific information about the web part.
- Enter the name for the Web part CalendarComponent and then Enter key.
- Enter the Web part description CalendarComponent description and then press Enter key.
- Accept the default No javascript framework as the framework and then press Enter key.
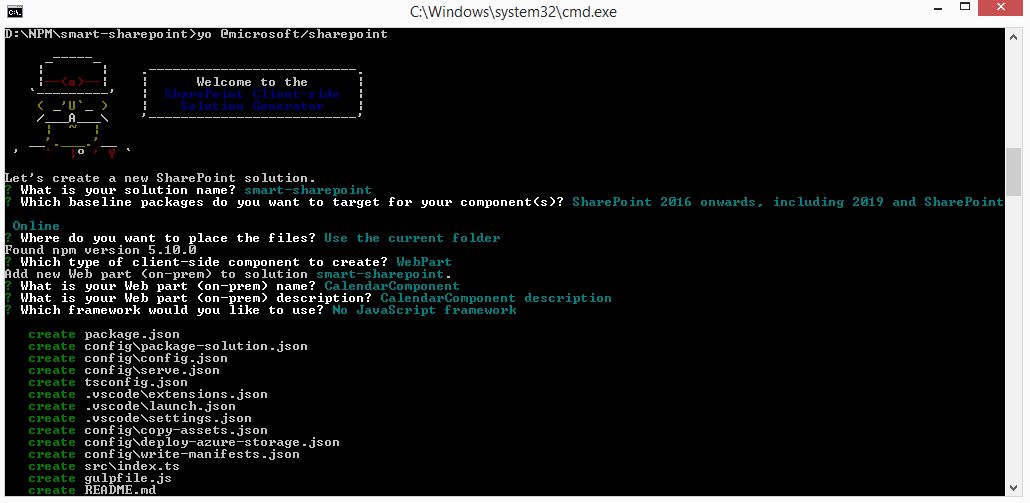
- The Yeoman generator will create a a client-side SharePoint web part in the new folder smart-sharepoint and install the required dependencies.
Configure a Smart element in the new application
-
Install the smart-webcomponents npm package in the application folder using the following colland line
npm i smart-webcomponents
The Calendar will be used as the getting started element for the new appplication.
-
Open the typescript file containing the web part located in ~/src/webparts/calendarComponent/CalendarComponentWebPart.ts
-
Add the imports for the Smart elements and CSS.
...

import styles from './CalendarComponentWebPart.module.scss';
import * as strings from 'CalendarComponentWebPartStrings';

// import Smart Calendar element
import 'smart-webcomponents/source/modules/smart.calendar.js';

// import Smart default CSS file
import 'smart-webcomponents/source/styles/smart.default.css';

...
}
-
Add the smart-calendar tag to the domElement inside the render method in order to initialize the Calendar element.
...

import styles from './CalendarComponentWebPart.module.scss';
import * as strings from 'CalendarComponentWebPartStrings';

// import Smart Calendar element
import 'smart-webcomponents/source/modules/smart.calendar.js';

// import Smart default CSS file
import 'smart-webcomponents/source/styles/smart.default.css';

...

export default class CalendarComponentWebPart extends BaseClientSideWebPart <ICalendarComponentWebPartProps> {

  public render(): void {
    this.domElement.innerHTML = `
       <div class="${ styles.calendarComponent }">
            <span class="${ styles.title }">Welcome to SharePoint!</span>
            <smart-calendar></smart-calendar>
       </div>`;

    //Additional code can be added here
  }

...
}
-
Add the imports for the Smart elements and CSS.
-
Run the following command in order to build the app and run the server. The Calendar element will be rendered in a new tab in the browser.
gulp serve
NOTE If the browser does not allow to view the page because of a security risk (the lack of HTTPS certificate), an additional step has to be taken:
-
Inside the root directory of the project, open the package.json file and add the following entry to the scripts section:
... "scripts": { ... "smart": "set NODE_NO_HTTP2=1 && gulp serve" }, ... -
Run the following command:
npm run smart
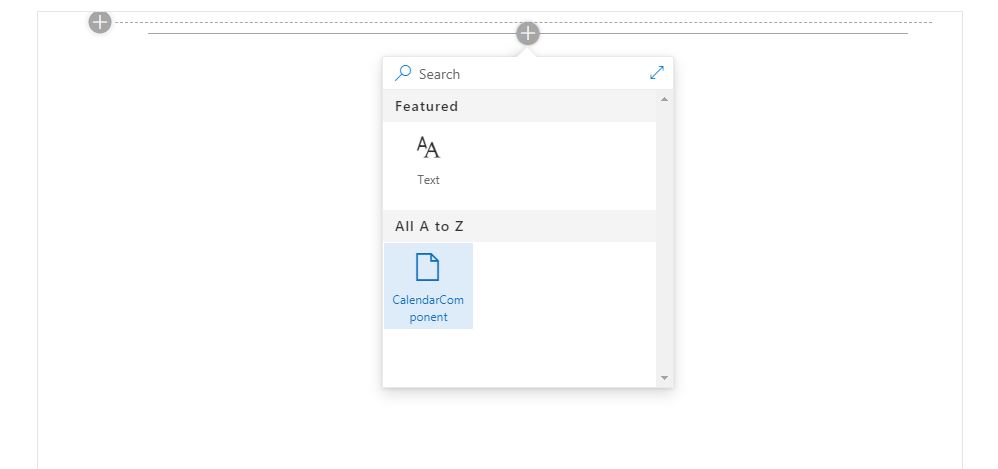
Click on Add a new web part in the column one and select CalendarComponent web part in order to render the element.
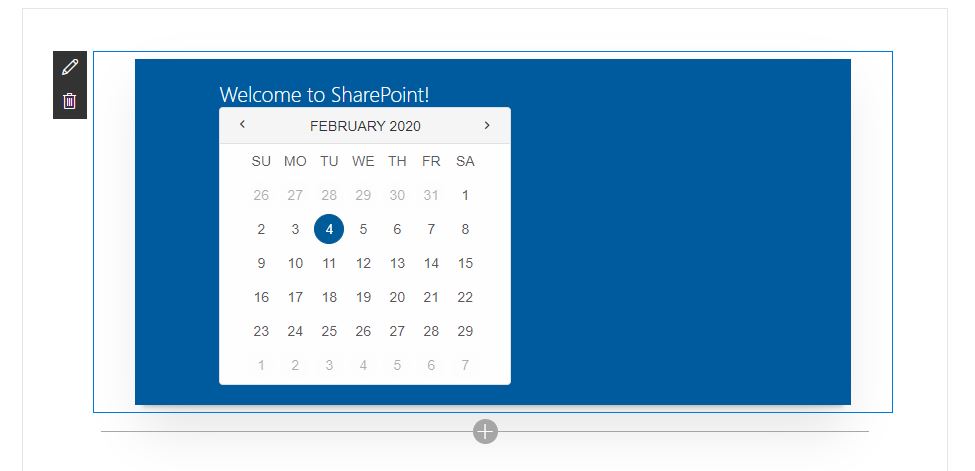
Smart Calendar component will be rendered in the SharePoint Framework client-side web part.
-
Inside the root directory of the project, open the package.json file and add the following entry to the scripts section:
Fonts and Images
NOTE: If the build fails with the following error:
Error - [webpack] 'dist':
./~/smart-webcomponents/source/styles/font/smart-icons.woff
Module parse failed: D:\NPM\sharepoint-test\node_modules\@smarthtmlelemen
f2 Unexpected character ' ' (1:4)
You may need an appropriate loader to handle this file type.
(Source code omitted for this binary file)
 @ ./~/css-loader?{"minimize":true}!./~/smart-webcomponents
4-760499
 @ ./~/smart-webcomponents/source/styles/smart.default.css
 @ ./lib/webparts/calendarApp/CalendarAppWebPart.js
A new loader will have to be configured to load the woff2 file in SPFx:
-
First, install the the url-loader via NPM:
npm i url-loader
-
Open the gulpfile.js file located at the root folder of the project /smart-sharepoint/gulpfile.js and configure SPFx to use the new loader:
const build = require('@microsoft/sp-build-web'); build.configureWebpack.mergeConfig({ additionalConfiguration: (generatedConfiguration) => { generatedConfiguration.module.rules.push( { test: /\.woff2(\?v=[0-9]\.[0-9]\.[0-9])?$/, loader: 'url-loader', query: { limit: 10000, mimetype: 'application/font-woff2' } } ); return generatedConfiguration; } }); build.initialize(require('gulp')); - Run the build again