Build your web apps using Smart Custom Elements
Smart.Scheduler - Real-time Application with ASP.NET Core SignalR Tutorial
Smart.Scheduler with SignalR
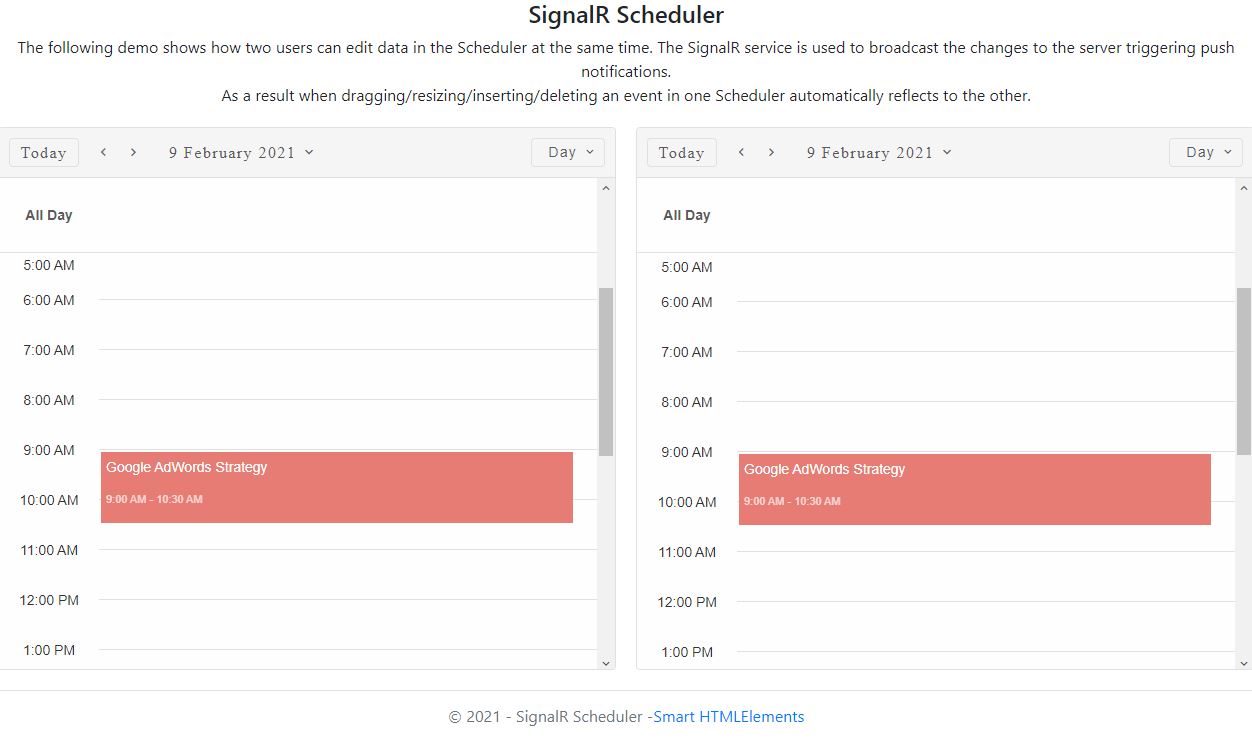
The following tutorial shows how to setup a real-time SignalR web app with Smart.Scheduler. The application will contain two Smart.Schedulers that will use the same dataSource and when an event is dragged/resized/inserted/removed a push notification will be sent to the SignalR server to notify the other Smart.Scheduler on the page to update the corresponding event as well.
What is SignalR?
ASP.NET SignalR is a library for ASP.NET developers that simplifies the process of adding real-time web functionality to applications. Real-time web functionality is the ability to have server code push content to connected clients instantly as it becomes available, rather than having the server wait for a client to request new data.
SignalR can be used to add any sort of "real-time" web functionality to your ASP.NET application. While chat is often used as an example, you can do a whole lot more.
In order to create a Real-time Web Application with Smart.Scheduler and SignalR, the following steps should be taken:
Prerequisites:
- Visual Studio Code
- C# for Visual Studio Code Plug-in
- .NET Core 3.1 SDK or later
Steps:
- Create a new web app project -
Open the VS Code terminal inside the folder where the new web app should be created and run the
following command:
dotnet new webapp -o SignalRScheduler
Then browse to the newly created folder via the following command:
cd SignalRScheduler
-
Add the SignalR client librarty - the SignalR server library is included in the ASP.NET
Core 3.1 framework. However the JavaScript client library is not included in the project. In
order to obtain it we are going to use Library Manager (LibMan) to get the client library from
unpkg.
Open the VS Code integrated terminal and enter the following command in order to install LibMan:
dotnet tool install -g Microsoft.Web.LibraryManager.Cli
Then install the SignalR client library via the following command:
libman install @microsoft/signalr@latest -p unpkg -d wwwroot/js/signalr --files dist/browser/signalr.js --files dist/browser/signalr.min.js
The parameters of the command specify the following options:
- Use the unpkg provider.
- Copy files to the wwwroot/js/signalr destination.
- Copy only the specified files.
The following output should be displayed in the terminal when the command is executed:
wwwroot/js/signalr/dist/browser/signalr.js written to disk
wwwroot/js/signalr/dist/browser/signalr.min.js written to disk
Installed library "@microsoft/signalr@latest" to "wwwroot/js/signalr"
- Create a SignalR Hub - from inside the SignalRScheduler folder create a new folder called
Hubs and inside that folder a new file called SchedulerHub.cs with the following content:
using Microsoft.AspNetCore.SignalR;
using System.Threading.Tasks;

namespace SignalRSchedulerSync.Hubs
{
    public class SchedulerHub : Hub
    {
        public async Task UpdateEvent(object schedulerId, object eventObj)
        {
            await Clients.All.SendAsync("EventUpdated", schedulerId, eventObj);
        }

        public async Task RemoveEvent(object schedulerId, object eventObj)
        {
            await Clients.All.SendAsync("EventRemoved", schedulerId, eventObj);
        }

        public async Task InsertEvent(object schedulerId, object eventObj)
        {
            await Clients.All.SendAsync("EventInserted", schedulerId, eventObj);
        }
    }
}
That file will contain the methods for the SignalR service that will be called from the client in order to push a notification to all of the clients of the app.
-
Configure SignalR - The SignalR server must be configured to pass SignalR requests to
SignalR. In order to do the Startup.cs file located in the SignalRScheduler project
folder should be updated like so:
using System;
using System.Collections.Generic;
using System.Linq;
using System.Threading.Tasks;
using Microsoft.AspNetCore.Builder;
using Microsoft.AspNetCore.Hosting;
using Microsoft.AspNetCore.HttpsPolicy;
using Microsoft.Extensions.Configuration;
using Microsoft.Extensions.DependencyInjection;
using Microsoft.Extensions.Hosting;
using SignalRSchedulerSync.Hubs; //Import the newly created Scheduler Hub

namespace SignalRScheduler
{
    public class Startup
    {
        public Startup(IConfiguration configuration)
        {
            Configuration = configuration;
        }

        public IConfiguration Configuration { get; }

        // This method gets called by the runtime. Use this method to add services to the container.
        public void ConfigureServices(IServiceCollection services)
        {
            services.AddRazorPages();
            services.AddSignalR(); //Add the SignalR service
        }

        // This method gets called by the runtime. Use this method to configure the HTTP request pipeline.
        public void Configure(IApplicationBuilder app, IWebHostEnvironment env)
        {
            if (env.IsDevelopment())
            {
                app.UseDeveloperExceptionPage();
            }
            else
            {
                app.UseExceptionHandler("/Error");
                // The default HSTS value is 30 days. You may want to change this for production scenarios, see https://aka.ms/aspnetcore-hsts.
                app.UseHsts();
            }

            app.UseHttpsRedirection();
            app.UseStaticFiles();

            app.UseRouting();

            app.UseAuthorization();

            app.UseEndpoints(endpoints =>
            {
                endpoints.MapRazorPages();
                endpoints.MapHub<SchedulerHub>("/schedulerHub"); //Map the Scheduler Hub to the endpoints
            });
        }
    }
}
These changes add SignalR to the ASP.NET Core dependency injection and routing systems.
-
Download the smart-webcomponents NPM package - in order to use the Smart.Scheduler, the
smart-webcomponents NPM package should be downloaded first. From inside the
SignalRScheduler\wwwroot\js folder open a terminal and execute the following command:
npm init
The npm init command will create a package.json file that will allow to install NPM dependencies to the project.
Next install the Smart library with the following command:
npm i smart-webcomponents
As a result a new folder called node_modules should be created in the current directory containing the smart-webcomponents library files.
-
Add the SignalR client - the necessary JS files for the SignalR client will be added to
the Pages\Sahred\_Layout.cshtml file. It contains the layout HTML structure of the
application. The file should contain the following code:
<!DOCTYPE html>
<html lang="en">

<head>
    <meta charset="utf-8" />
    <meta name="viewport" content="width=device-width, initial-scale=1.0" />
    <title>@ViewData["Title"] - SignalRScheduler</title>
    <link rel="stylesheet" href="~/lib/bootstrap/dist/css/bootstrap.min.css" />
    <link rel="stylesheet" href="~/js/node_modules/smart-webcomponents/source/styles/smart.default.css"
        type="text/css" />
    <link rel="stylesheet" href="~/css/site.css" />
</head>

<body>
    <header>
        <h4>SignalR Scheduler</h4>
        <p>The following demo shows how two users can edit data in the Scheduler at the same time. The SignalR
            service is used to broadcast the changes to the server triggering push notifications.</p>

        <p> As a result when
            dragging/resizing/inserting/deleting an event in one Scheduler automatically reflects to the other.</p>
    </header>
    <main>
        @RenderBody()
    </main>

    <footer class="border-top footer text-muted">
        © 2021 - SignalR Scheduler - <a href="https://www.htmlelements.com/">Smart HTMLElements</a>
    </footer>

    <script src="~/lib/jquery/dist/jquery.min.js"></script>
    <script src="~/lib/bootstrap/dist/js/bootstrap.bundle.min.js"></script>
    <script src="~/js/site.js" asp-append-version="true"></script>
    <script src="~/js/signalr/dist/browser/signalr.js"></script>

    <script type="module" src="~/js/node_modules/smart-webcomponents/source/modules/smart.scheduler.js"></script>
    <script type="module" src="~/js/schedule.js"></script>

    @await RenderSectionAsync("Scripts", required: false)
</body>

</html>
Notice the smart.default.css style reference in the header section. It imports all necessary styles for the Smart components. Also notice the imported module scripts at the bottom of the Body section.
-
Configure the App Main Section - update the content of the index.cshtml file
located in
the SignalRScheduler\Pages folder like so:
@page
@model IndexModel
@{
    ViewData["Title"] = "SignalR with Smart.Scheduler";
}

<smart-scheduler id="scheduler"></smart-scheduler>
<smart-scheduler id="scheduler2"></smart-scheduler>
This file contains the main section of the application with two Smart.Schedulers that will be used to demonstrate real-time event manipulation.
-
Create the 'schedule.js' file - this file handles the demo logic. It creates a connection
to the SignalR server and updates the Smart.Scheduler on event change. Here's what the content
of the file looks like:
const connection = new window.signalR.HubConnectionBuilder().withUrl('/schedulerHub').build(),
    scheduler = document.getElementById('scheduler'),
    scheduler2 = document.getElementById('scheduler2'),
    today = new Date(),
    todayDate = today.getDate(),
    currentYear = today.getFullYear(),
    currentMonth = today.getMonth(),
    data = [
        {
            label: 'Google AdWords Strategy',
            dateStart: new Date(currentYear, currentMonth, todayDate, 9, 0),
            dateEnd: new Date(currentYear, currentMonth, todayDate, 10, 30),
            backgroundColor: '#E67C73'
        }, {
            label: 'New Brochures',
            dateStart: new Date(currentYear, currentMonth, todayDate - 1, 11, 30),
            dateEnd: new Date(currentYear, currentMonth, todayDate - 1, 14, 15),
            backgroundColor: '#8E24AA'
        }, {
            label: 'Brochure Design Review',
            dateStart: new Date(currentYear, currentMonth, todayDate + 2, 13, 15),
            dateEnd: new Date(currentYear, currentMonth, todayDate + 2, 16, 15),
            backgroundColor: '#039BE5'
        }
    ];

window.Smart('#scheduler', class {
    get properties() {
        return {
            dataSource: data,
            view: 'day'
        }
    }
});

window.Smart('#scheduler2', class {
    get properties() {
        return {
            dataSource: data,
            view: 'day'
        }
    }
});

//Disable send button until connection is established
scheduler.disabled = scheduler2.disabled = true;

//Listen for real-time changes to the Schedulers
connection.on('EventUpdated', function (schedulerId, eventObj) {
    if (schedulerId === scheduler.id) {
        scheduler2.updateEvent(eventObj, eventObj);
    }
    else {
        scheduler.updateEvent(eventObj, eventObj);
    }
});

connection.on('EventRemoved', function (schedulerId, eventObj) {
    if (schedulerId === scheduler.id) {
        scheduler2.removeEvent(eventObj, eventObj);
    }
    else {
        scheduler.removeEvent(eventObj, eventObj);
    }
});

connection.on('EventInserted', function (schedulerId, eventObj) {
    if (schedulerId === scheduler.id) {
        scheduler2.insertEvent(eventObj);
    }
    else {
        scheduler.insertEvent(eventObj);
    }
});

connection.start().then(function () {
    scheduler.disabled = scheduler2.disabled = false;
}).catch((err) => console.error(err.toString()));

//Update Scheduler on task Update
scheduler.addEventListener('dragStart', updateDropTarget);
scheduler.addEventListener('dragEnd', updateEvent);
scheduler.addEventListener('resizeEnd', updateEvent);
scheduler.addEventListener('itemRemove', removeEvent);
scheduler.addEventListener('itemInsert', insertEvent);

scheduler2.addEventListener('dragEnd', updateEvent);
scheduler2.addEventListener('dragStart', updateDropTarget);
scheduler2.addEventListener('resizeEnd', updateEvent);
scheduler2.addEventListener('itemRemove', removeEvent);
scheduler2.addEventListener('itemInsert', insertEvent);

function updateDropTarget(event) {
    if (event.target.id === scheduler.id) {
        scheduler2.disableDrop = true;
    }
    else {
        scheduler.disableDrop = true;
    }
}

function updateEvent(event) {
    const details = event.detail,
        eventObj = details.item;

    if (event.type === 'resizeEnd') {
        const itemDateRange = details.itemDateRange;

        eventObj.dateStart = itemDateRange.dateStart;
        eventObj.dateEnd = itemDateRange.dateEnd;
    }
    else if (event.type === 'dragEnd') {
        scheduler.disableDrop = scheduler2.disableDrop = false;
    }

    connection.invoke('UpdateEvent', event.target.id, eventObj).catch((err) => console.error(err.toString()));
}

function removeEvent(event) {
    const details = event.detail,
        eventObj = details.item;

    connection.invoke('RemoveEvent', event.target.id, eventObj).catch((err) => console.error(err.toString()));
}

function insertEvent(event) {
    const details = event.detail,
        eventObj = details.item;

    connection.invoke('InsertEvent', event.target.id, eventObj).catch((err) => console.error(err.toString()));
}
By adding EventListeners to the Scheduler for their 'dragEnd', 'resizeEnd', 'itemInsert', 'itemRemove' events we can push a notification to the SignalR service by invoking the corresponding server method. Then via the connection.on method we are able to listen for the notifications and update the Schedulers.
-
Run the Application - in order to run the application open a terminal inside the root
folder of the project - SignalRScheduler and execute the following command:
dotnet watch run -p SignalRScheduler.csproj
Open https://localhost:5001/ in any browser to view the Application.
Demo
For AI tooling
Developer Quick Reference
Topic: scheduler-signal-r-integration Component: Scheduler Framework: JavaScript
Main methods: updateEvent(), removeEvent(), insertEvent(), addEventListener()
Common config keys: dataSource
Implementation Notes
Compatibility: Modern browsers / Web Components API access pattern: const component = document.querySelector(...) + component.method()
Lifecycle guidance: Initialize configuration first, then invoke imperative API when element is available in DOM.
Common pitfalls:
- Calling methods before element initialization.
- Reassigning large configuration partially without understanding merge behavior.
- Missing required module script import for component type.
Validation checklist:
- Ensure module scripts and CSS are loaded once.
- Keep data schema aligned with columns/series definitions.
- Verify method calls target initialized component instance.