Build your web apps using Smart Custom Elements
Smart.Scheduler - Next.js Integration
Next.js
Next.js is a React Framework that provides a solution to all of the following ReactJS problems:
- Code has to be bundled using a bundler like webpack and transformed using a compiler like Babel.
- You need to do production optimizations such as code splitting.
- You might want to statically pre-render some pages for performance and SEO. You might also want to use server-side rendering or client-side rendering.
- You might have to write some server-side code to connect your React app to your data store.
In the following tutorial we will be creating a new Next.js project that will use the Smart.Scheduler component.
Document content sections:
Setup
First, let's make sure that the development environment is prepared. The following requiremets should be met:
- Node.js installed - version 10.13 or later.
- A Text editor and a terminal.
-
Create a new Next.js App
To create a new Next.js app open a new terminal from the desired project location and enter the following command:
npx create-next-app nextjs-scheduler --use-npm
This command will create the app.
-
Download smart-webcomponents-react library
Navigate to the nextjs-scheduler and open a CMD from inside the folder and run the following command:
npm i smart-webcomponents-react
This command will download the Smart Webcomponent React Components which includes the Smart.Scheduler.
-
Configure the Home Page of the App
Navigte to
nextjs-scheduler/pages/index.js
the file which contains the home page of the application.Every page represents a React components. Let's modify it in order to include a Smart.Scheduler React component.
The index.js file should have the following contents:
import Head from 'next/head'; import dynamic from 'next/dynamic'; import 'smart-webcomponents-react/source/styles/smart.default.css'; import styles from '../styles/Home.module.css'; //Dynamically import the Smart.Scheduler component const Scheduler = dynamic(() => import('smart-webcomponents-react/scheduler'), { ssr: false, //no server-side rendering loading: () =>Loading...
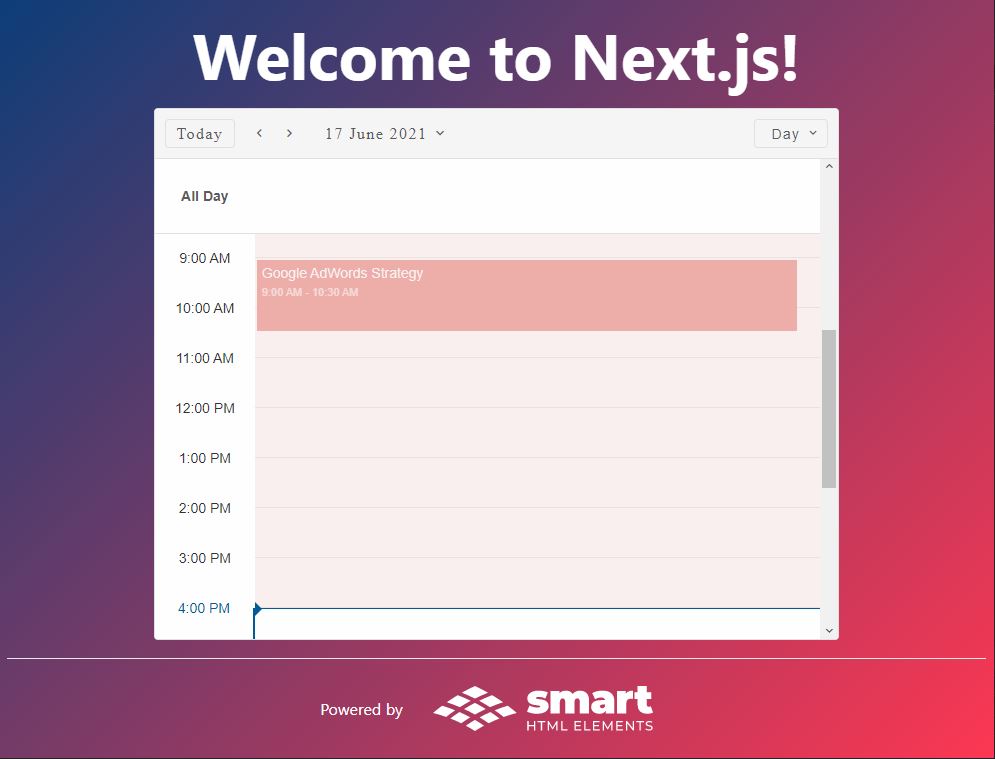
}); function Home() { const today = new Date(), todayDate = today.getDate(), currentYear = today.getFullYear(), currentMonth = today.getMonth(), dataSource = [ { label: 'Google AdWords Strategy', dateStart: new Date(currentYear, currentMonth, todayDate, 9, 0), dateEnd: new Date(currentYear, currentMonth, todayDate, 10, 30), backgroundColor: '#E67C73' }, { label: 'New Brochures', dateStart: new Date(currentYear, currentMonth, todayDate - 1, 11, 30), dateEnd: new Date(currentYear, currentMonth, todayDate - 1, 14, 15), backgroundColor: '#8E24AA' }, { label: 'Brochure Design Review', dateStart: new Date(currentYear, currentMonth, todayDate + 2, 13, 15), dateEnd: new Date(currentYear, currentMonth, todayDate + 2, 16, 15), backgroundColor: '#039BE5' } ], currentTimeIndicator = true, shadeUntilCurrentTime = true, view = 'day', views = ['day', 'week', 'month', 'timelineDay', 'timelineWeek', 'timelineMonth'], firstDayOfWeek = 1; return ( <div className={styles.container}> <Head> <title>Create Next App</title> <meta name="description" content="Generated by create next app" /> <link rel="icon" href="/favicon.ico" /> </Head> <main className={styles.main}> <h1 className={styles.title}> Welcome to Next.js! </h1> <Scheduler className={styles.scheduler} id="scheduler" currentTimeIndicator={currentTimeIndicator} shadeUntilCurrentTime={shadeUntilCurrentTime} dataSource={dataSource} view={view} views={views} firstDayOfWeek={firstDayOfWeek}></Scheduler> </main> <footer className={styles.footer}> <a href="https://www.htmlelements.com/react/demos/scheduler/current-time-indicator/" target="_blank" rel="noopener noreferrer" > Powered by{' '} <img src="https://www.htmlelements.com/wp-content/design/assets/images/logo-htmlelements.svg" className={styles.imgLogo} /> </a> </footer> </div> ); } export default Home;The Smart.Scheduler component is loaded dynamically because we don't want the component to be rendered on the Server side.
Remember to include the smart.default.css file which contains the Styles for the Smart Library.
-
Add additional page styles
The page styles are defined inside the Home.module.css which is located at
nextjs-scheduler/styles/Home.module.css
Add the following selectors to the bottom of the file:
@media (max-width: 600px) {
  .grid {
    width: 100%;
    flex-direction: column;
  }

  .main {
    width: 100%;
  }

  .scheduler {
    margin: 20px auto;
  }
}

.imgLogo {
  padding: 20px;
  margin-left: 10px;
}

.scheduler {
  width: 100%;
}
We will also modify the styles of the page sections a bit with the following changes:
.container {
  min-height: 100vh;
  padding: 0 0.5rem;
  display: flex;
  flex-direction: column;
  justify-content: center;
  align-items: center;
  background: linear-gradient(135deg, rgb(12, 61, 120) 0px, rgb(252, 55, 82) 100%);
  color: white;
}

.main {
  flex: 1;
  display: flex;
  flex-direction: column;
  justify-content: center;
  align-items: center;
  width: 70%;
  justify-content: space-evenly;
}
Build The Application
Running the Dev ServerNavigate to the new nextjs-scheduler folder that contains the app and from there open a new terminal and run the following command:
npm run dev
This command will run the development server on port 3000 by default.
The result of executing the command should be the following:
> nextjs-scheduler@0.1.0 dev C:\Users\Dell\Documents\GitHub\Team\demos\scheduler\nextjs-scheduler
> next dev

ready - started server on 0.0.0.0:3000, url: http://localhost:3000
info  - Using webpack 5. Reason: Enabled by default https://nextjs.org/docs/messages/webpack5
event - compiled successfully
event - build page: /next/dist/pages/_error
wait  - compiling...
event - compiled successfully
Open a browser and go to the http://localhost:3000 link in order to view the app
The result should be the following: