DockingLayout for React
React version of this topic (compatible with React 19+). Keep the same configuration logic from JavaScript and pass it as component props.
What this topic covers: practical setup, the framework-specific API access pattern, and copy-adapt guidance for the examples in this page.
import React, { useMemo, useRef } from 'react';
import { DockingLayout } from 'smart-webcomponents-react/dockinglayout';
import 'smart-webcomponents-react/source/styles/smart.default.css';

export default function App() {
  const componentRef = useRef(null);
  const componentProps = useMemo(() => ({
    // Copy this topic's JavaScript configuration here.
  }), []);

  return <DockingLayout ref={componentRef} {...componentProps}></DockingLayout>;
}
Use componentRef.current for API methods in this topic.
Build your web apps using Smart UI
Smart.DockingLayout - Leaflet configuration and usage
Overview
The following tutorial will show how to integrate custom component - Leaflet maps with the DockingLayout component.
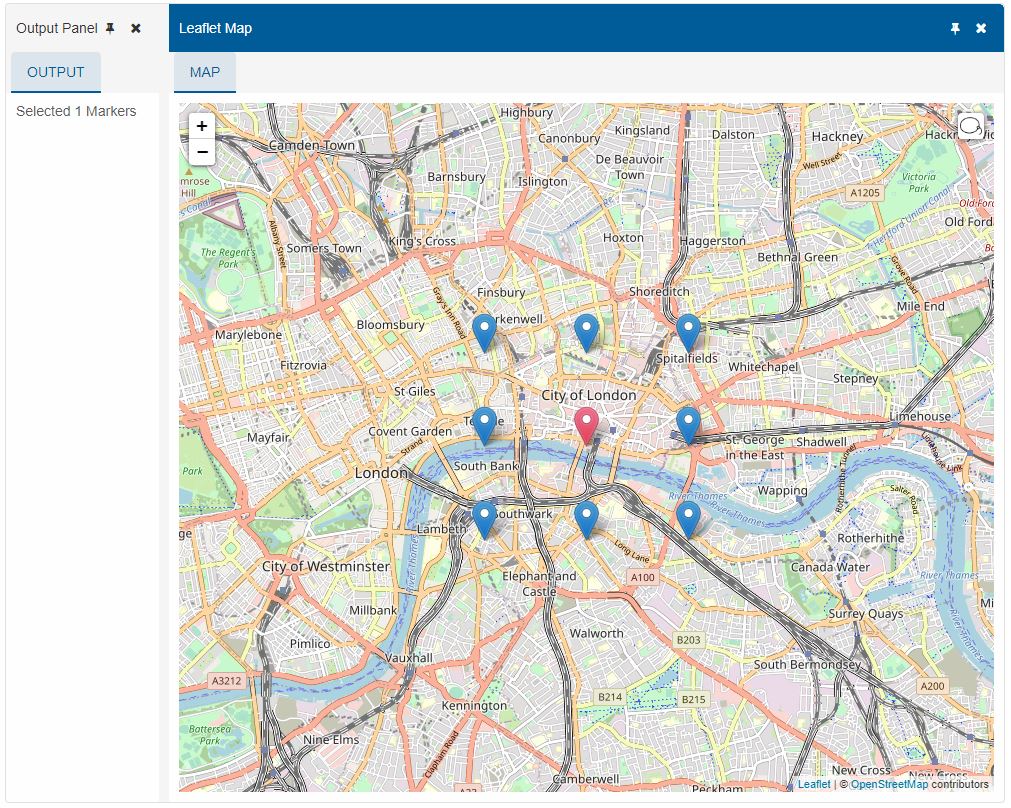
We are going to create a simple demo with a Smart.DockingLayout component which will have two Panels. The first will have a log and the second will hold the Leaflet map.
Follow the steps:
-
Download and Configure Smart Components - Smart components can be downloaded localy via NPM by
entering the following command line:
npm i smart-webcomponents
-
index.html - Configure the HTML page for the demo:
-
Inside the head section of the page add the following references:
Include the CSS file for the Smart Framework which we downloaded in the previous step.
<link rel="stylesheet" href="../../source/styles/smart.default.css" type="text/css" />
Add a reference to the CSS styles for the Leaflet Map.
<link rel="stylesheet" href="https://unpkg.com/leaflet@1.6.0/dist/leaflet.css" integrity="sha512-xwE/Az9zrjBIphAcBb3F6JVqxf46+CDLwfLMHloNu6KEQCAWi6HcDUbeOfBIptF7tcCzusKFjFw2yuvEpDL9wQ=="
crossorigin="" />
Add reference to the JS file for the Leaflet Map.
<script src="https://unpkg.com/leaflet@1.6.0/dist/leaflet.js" integrity="sha512-gZwIG9x3wUXg2hdXF6+rVkLF/0Vi9U8D2Ntg4Ga5I5BZpVkVxlJWbSQtXPSiUTtC0TjtGOmxa1AJPuV0CPthew=="
crossorigin=""></script>
Add a reference to the additional Lasso plugin that we are going to use for the Leaflet Map.
<script src="https://unpkg.com/leaflet-lasso@2.0.8/dist/leaflet-lasso.umd.min.js"></script>
-
Inside the body section of the page:
Add the html tag for the DockingLayout
<smart-docking-layout></smart-docking-layout>
We are going to define the dataSource later in the javascript file for the demo.
Add the Javascript module for the Smart DockingLayout component that will load all necessary JS files for the component.
<script type="module" src="../../source/modules/smart.dockinglayout.js"></script>
-
Inside the head section of the page add the following references:
-
index.js - Configure the javascript for the page. This is where we will configure the
components.
First we need to set the dataSource for the DockingLayout:
    useEffect(() => {
    const docking = componentRef.current;

        docking.layout = [
            {
                type: 'LayoutGroup',
                orientation: 'horizontal',
                items: [
                    {
                        type: 'LayoutGroup',
                        items: [
                            {
                                type: 'LayoutPanel',
                                id: 'tabPanel',
                                label: 'Output Panel',
                                items: [{
                                    label: 'Output',
                                    content: ' <div id="lassoResult">No markers selected</div>'
                                }]
                            },
                            {
                                type: 'LayoutPanel',
                                label: 'Leaflet Map',
                                items: [
                                    {
                                        id: 'log',
                                        label: 'Map',
                                        headerPosition: 'none',
                                        content: '<div id="mapid"></div>'
                                    }
                                ]
                            }
                        ],
                        orientation: 'vertical'
                    }
                ]
            }
        ];
...
Note that the configurations are made during the framework lifecycle hook stage.
Initialize the Leaflet Map, add markers and configure the lasso pluging:
    ...

    const mymap = L.map('mapid', { center: [0, 0], zoom: 0 });

    const lassoControl = L.control.lasso().addTo(mymap);
    const lassoResult = document.getElementById('lassoResult');
    const startLatLng = [51.5, -0.11];
    const latDelta = 0.01;
    const lngDelta = latDelta * 1.75;
    const markers = new Array(9).fill(undefined).map((_, i) => L.marker([startLatLng[0] + Math.floor(i / 3) * latDelta, startLatLng[1] + (i % 3) * lngDelta]));

    L.tileLayer('https://{s}.tile.openstreetmap.org/{z}/{x}/{y}.png', {
        attribution: '© <a href="https://www.openstreetmap.org/copyright">OpenStreetMap</a> contributors'
    }).addTo(mymap);

    L.featureGroup(markers).addTo(mymap);

    function resetSelectedState() {
        mymap.eachLayer(layer => {
            if (layer instanceof L.Marker) {
                layer.setIcon(new L.Icon.Default());
            }
        });

        lassoResult.innerHTML = '';
    }

    function setSelectedLayers(layers) {
        resetSelectedState();

        layers.forEach(layer => {
            if (layer instanceof L.Marker) {
                layer.setIcon(new L.Icon.Default({ className: 'selected ' }));
            }
        });

        lassoResult.innerHTML = layers.length ? `Selected ${layers.length} Markers` : '';
    }

    mymap.on('mousedown', () => {
        resetSelectedState();
    });

    mymap.on('lasso.finished', event => {
        setSelectedLayers(event.layers);
    });

    //Middle Marker
    mymap.setView([51.51, -0.0925], 13);
};
The code above will create 8 markers on the Map and by pressing on the Lasso icon, located on in the top right corner of the Map, you can select a marker using the lasso.
The resetSelectedState is used to reset the current Marker selection and clear the Log that is presented in the first DockingLayout panel with id "tabPanel".
The setSelectedLayers will select the Markers and return a result in the log.
-
styles.css - Addtional CSS file for the demo that will contain the following selectors:
   #mapid {
            height: 100%;
            width: 100%;
        }

        .selected {
            filter: hue-rotate(135deg);
        }
The Leaflet map needs to have it's size set in order to be displayed.
Run the Demo
Run the demo on localhost and open it in a new browser tab:
For AI tooling
Developer Quick Reference
Topic: docking-layout-custom Component: DockingLayout Framework: React
Main methods: (none detected)
Common config keys: (none detected)
Implementation Notes
Compatibility: React 19+ API access pattern: const componentRef = useRef(null) + componentRef.current.method()
Lifecycle guidance: Use useMemo for large config objects and call imperative API through componentRef.current after first render.
Common pitfalls:
- Recreating columns/dataSource objects on every render can reset component state.
- Calling API methods before ref is available causes runtime errors.
- Mixing controlled and imperative updates without sync can lead to stale UI.
Validation checklist:
- Keep config objects memoized when possible.
- Guard API calls with ref existence checks.
- Verify CSS theme import is present once per app.