Grid for Angular
Angular standalone version of this topic (compatible with Angular 17+). Import both the Smart UI component and module in the standalone component.
What this topic covers: practical setup, the framework-specific API access pattern, and copy-adapt guidance for the examples in this page.
import { Component, ViewChild, ViewEncapsulation } from '@angular/core';
import { CommonModule } from '@angular/common';
import { RouterOutlet } from '@angular/router';
import { GridComponent, GridModule } from 'smart-webcomponents-angular/grid';

@Component({
  selector: 'app-root',
  standalone: true,
  imports: [CommonModule, GridModule, RouterOutlet],
  templateUrl: './app.component.html',
  styleUrls: ['./app.component.css'],
  encapsulation: ViewEncapsulation.None
})
export class AppComponent {
  @ViewChild('grid', { read: GridComponent, static: false }) grid!: GridComponent;
}
<!-- app.component.html -->
<smart-grid #grid></smart-grid>
Use this.grid for API methods in this topic.
Row ID auto-assigned and generated by the Grid
A grid row has an unique row ID. The row ID is used by the Grid as an unique identifier. It is used to get or set selection, expand a row, etc. The row IDs can be auto-generated by the Grid or assigned by the developer through the data binding.By setting the
grid.dataSource property, row IDs are auto-generated by the grid starting from 0 and incrementing by 1. For example, the first row's ID is 0, the second row's ID is 1 and so on. The row ID does not change after it is set.
If the Grid's data source is set, the rows will be generated again and so new row ids starting from 0 will be provided.
Row ID assigned by the Web Application
You can set the Row ID in the data binding by using thedataSource.id or dataSourceSettings.id properties.
Let's look at the following example:
The rows in the data source have unique ID fields - ALFKI, ANATR, ANTON, ABOUT, BERGS, BLAUS, BLONP, etc. You can assign these ID fields to the grid by setting the
id property of the dataSource or dataSourceSettings. In the case of the example: 'CustomerID'. By doing that,
you can select, expand and update rows by using the 'CustomerID' IDs rather than the auto-generated 0, 1, 2, 3, etc.
dataSource: new Smart.DataAdapter({
	virtualDataSource: function (resultCallbackFunction, details) {
		const that = this;
		if (details.action === 'dataBind') {
			fetch('https://raw.githubusercontent.com/HTMLElements/smart-webcomponents/master/sampledata/customers.json').then(response => response.json())
				.then(data => {
				Smart.demoServer = DemoServer(data);
				const result = Smart.demoServer.getData(details);
				resultCallbackFunction({
					dataSource: result.data,
					virtualDataSourceLength: result.length
				});
			});
		}
		else {
			const result = Smart.demoServer.getData(details);
			resultCallbackFunction({
				dataSource: result.data,
				virtualDataSourceLength: result.length
			});
		}
	},
	id: 'CustomerID',
	dataFields: [
		'CustomerID: string',
		'CompanyName: string',
		'ContactName: string',
		'ContactTitle: string',
		'Address: string',
		'City: string',
		'Country: string'
	]
})
Row IDs assigned by the Web Developer
When new rows are added to the Grid, theonRowInserted callback function gets called with three parameters - indexes, rows array and getRowIdsFn(ids).
onRowInserted is called when the Grid is initialized and while you use the Grid and add new rows, it will be called again.
It is very useful for backend sync, because when the function is called, you add the new rows to the backend and after that you call the getRowIdsFn with the ids from the backend.
In case you need to use this function only after the Grid is initialized, you can use the grid.isInitialized boolean property.
Let's look at the example:
componentProps = {
    dataSourceSettings: {
        dataFields: [
            { name: 'firstName', dataType: 'string' },
            { name: 'lastName', dataType: 'string' },
            { name: 'productName', map: 'product.name', dataType: 'string' },
            { name: 'quantity', map: 'product.quantity', dataType: 'number' },
            { name: 'price', map: 'product.price', dataType: 'number' },
            { name: 'total', map: 'product.total', dataType: 'number' }
        ]
    },
    onRowInserted(indexes, rows, getRowIdsFn) {
        let IDs = [];
        for (let i = 0; i <  rows.length; i++) {
            // get row data.
            const data = rows[i].data;

            IDs.push(data.firstName.substring(0, 3));
        }

        // set the ids to the Grid rows.
        getRowIdsFn(IDs);
    },
    behavior: {
        columnResizeMode: 'growAndShrink'
    },
    sorting: {
        enabled: true
    },
    dataSource: [
        {
            firstName: 'Andrew',
            lastName: 'Burke',
            product: {
                name: 'Ice Coffee', price: 10, quantity: 3, total: 30
            }
        },
        {
            firstName: 'Petra',
            lastName: 'Williams',
            product: {
                name: 'Espresso', price: 7, quantity: 5, total: 35
            }
        },
        {
            firstName: 'Kevin',
            lastName: 'Baker',
            product: {
                name: 'Frappucino', price: 6, quantity: 4, total: 24
            }
        }
    ],
    columns: [
        {
            label: 'First Name', dataField: 'firstName'
        },
        { label: 'Last Name', dataField: 'lastName' },
        { label: 'Product', dataField: 'productName' },
        {
            label: 'Quantity', dataField: 'quantity', cellsAlign: 'right', formatSettings: {
                Intl: {
                    NumberFormat: {
                        style: 'currency',
                        currency: 'EUR'
                    }
                }
            }
        },
        { label: 'Unit Price', dataField: 'price', cellsAlign: 'right', cellsFormat: 'c2' }
    ]
}
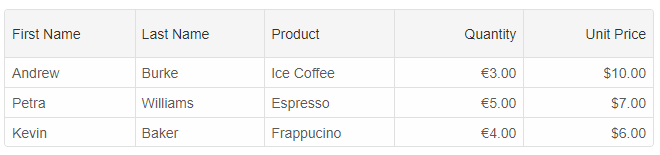
In the example, we set the row IDs to the first three letters from the row.data.firstName i.e the row IDs would be 'And', 'Pet', 'Kev'.
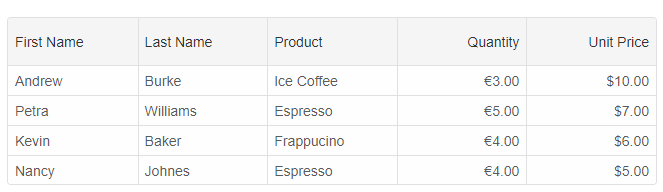
If you dynamically add a new row like that:
this.grid.addRow({
	firstName: 'Nancy',
	lastName: 'Johnes',
	product: {
		name: 'Espresso', price: 5, quantity: 4, total: 30
	}
});
the onRowInserted callback would be called again.
Now, if we print out the Row ids using:
this.grid.forEachRow((row) => { console.log(row.id) });
the result would be 'And', 'Pet', 'Kev', 'Nan'
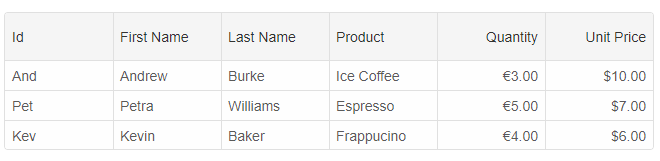
The row id can be accessed by using like that:
const rowID = grid.rows[0].id or const rowID = grid.getRowId(0);. You can also display it in the Grid by defining a new column with 'formatFunction'.
componentProps = {
    dataSourceSettings: {
        dataFields: [
            { name: 'firstName', dataType: 'string' },
            { name: 'lastName', dataType: 'string' },
            { name: 'productName', map: 'product.name', dataType: 'string' },
            { name: 'quantity', map: 'product.quantity', dataType: 'number' },
            { name: 'price', map: 'product.price', dataType: 'number' },
            { name: 'total', map: 'product.total', dataType: 'number' }
        ]
    },
    onRowInserted(indexes, rows, getRowIdsFn) {
        let IDs = [];
        for (let i = 0; i < rows.length; i++) {
            // get row data.
            const data = rows[i].data;

            IDs.push(data.firstName.substring(0, 3));
        }

        // set the ids to the Grid rows.
        getRowIdsFn(IDs);
    },
    behavior: {
        columnResizeMode: 'growAndShrink'
    },
    sorting: {
        enabled: true
    },
    dataSource: [
        {
            firstName: 'Andrew',
            lastName: 'Burke',
            product: {
                name: 'Ice Coffee', price: 10, quantity: 3, total: 30
            }
        },
        {
            firstName: 'Petra',
            lastName: 'Williams',
            product: {
                name: 'Espresso', price: 7, quantity: 5, total: 35
            }
        },
        {
            firstName: 'Kevin',
            lastName: 'Baker',
            product: {
                name: 'Frappucino', price: 6, quantity: 4, total: 24
            }
        }
    ],
    columns: [
        {
            label: 'Id', dataField: 'id', formatFunction(settings) {
				// set the cell's display value to the row ID.
				settings.value = settings.row.id
			}
        },
        {
            label: 'First Name', dataField: 'firstName'
        },
        { label: 'Last Name', dataField: 'lastName' },
        { label: 'Product', dataField: 'productName' },
        {
            label: 'Quantity', dataField: 'quantity', cellsAlign: 'right', formatSettings: {
                Intl: {
                    NumberFormat: {
                        style: 'currency',
                        currency: 'EUR'
                    }
                }
            }
        },
        { label: 'Unit Price', dataField: 'price', cellsAlign: 'right', cellsFormat: 'c2' }
    ]
}
For AI tooling
Developer Quick Reference
Topic: grid-row-id Component: Grid Framework: Angular
Main methods: addRow(), forEachRow()
Common config keys: dataSource, virtualDataSource, behavior, sorting, columns
Implementation Notes
Compatibility: Angular 17+ (standalone) API access pattern: @ViewChild(...) + this.component.method()
Lifecycle guidance: Bind inputs declaratively and call imperative API through @ViewChild in/after ngAfterViewInit.
Common pitfalls:
- Using @ViewChild API too early (before view init).
- Omitting standalone imports for Smart modules in @Component.imports.
- Type mismatches between configuration fields and template bindings.
Validation checklist:
- Ensure module import exists in standalone component imports array.
- Use typed @ViewChild(..., { read: ComponentType }).
- Call imperative methods after view initialization.